crwdns2933423:0crwdne2933423:0

Xiaomi Redmi Note 8 Vervanging van het scherm

crwdns2936315:0crwdne2936315:0
crwdns2936313:0crwdne2936313:0
crwdns2931653:06crwdne2931653:0
Xiaomi Redmi Note 8 Screen Replacement, Insert an opening pick: crwdns2935265:00crwdnd2935265:01crwdnd2935265:03crwdne2935265:0 Xiaomi Redmi Note 8 Screen Replacement, Insert an opening pick: crwdns2935265:00crwdnd2935265:02crwdnd2935265:03crwdne2935265:0 Xiaomi Redmi Note 8 Screen Replacement, Insert an opening pick: crwdns2935265:00crwdnd2935265:03crwdnd2935265:03crwdne2935265:0
Insert an opening pick
  • Once the screen is warm to touch, apply a suction cup to the bottom edge of the phone.

  • If your screen is badly cracked, covering it with a layer of clear packing tape may allow the suction cup to adhere. Alternatively, very strong tape may be used instead of the suction cup. If all else fails, you can superglue the suction cup to the screen.

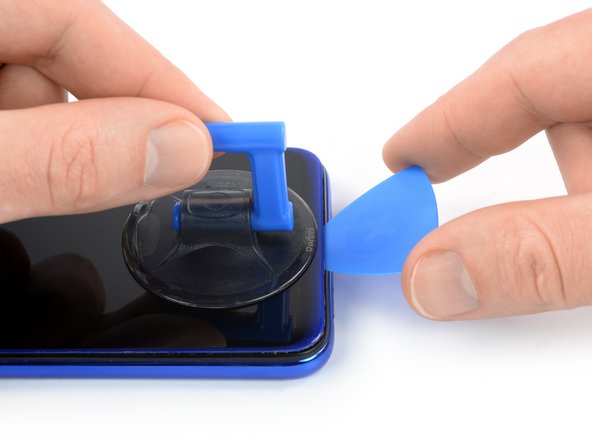
  • Lift the screen with the suction handle to create a small gap between the screen and the midframe.

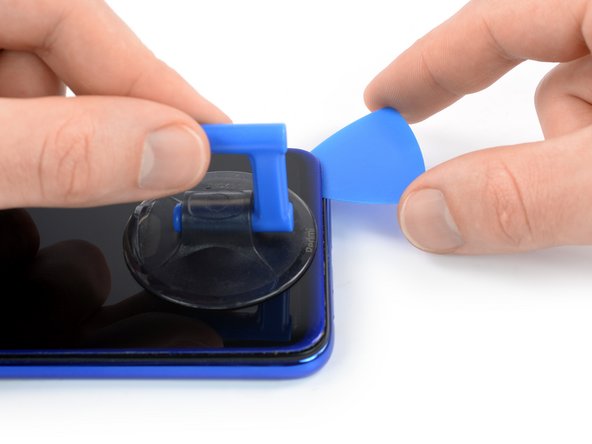
  • Insert an opening pick in the gap between the midframe and the screen.

  • In case you only want to replace the display glass but not the LCD and digitizer you need to be especially carful during the next step. There's a small cable at the bottom right end of the LCD which is very fragile. Only slide with the very tip of your opening pick (about 1-2 mm).

  • Slide the opening pick to the bottom right corner of the screen to slice its adhesive. Leave the opening pick in place to prevent the adhesive from resealing.

Als het scherm eenmaal te warm is om comfortabel aan te raken, druk je een zuignap op de onderkant van het scherm.

Als je scherm gebarsten is, kun je het beplakken met lagen doorzichtige tape, zodat de zuignap zich beter vast kan zuigen. Als alternatief kun je een stuk sterke tape gebruiken om het scherm op te tillen. Als dat alles niet werkt, kun je de zuignap vastlijmen met wat secondelijm.

Til het scherm op met behulp van de zuignap en creëer zo een kleine opening tussen het scherm en het midframe.

Steek een openingsplectrum in de opening tussen het midframe en het scherm.

Als je enkel het glas van het scherm, en niet het LCD en de digitizer, wilt vervangen, zul je extra goed op moeten letten bij de volgende stap. Er bevindt zich een kleine kabel aan de rechter onderkant van het LCD die erg kwetsbaar is. Schuif daarom enkel met het uiteinde van de punt van je plectrum (maximaal 1-2 mm) in je toestel.

Schuif je plectrum naar de rechter benedenhoek van het scherm om de lijm door te snijden. Laat je plectrum in de hoek zitten om te voorkomen dat de lijm zich opnieuw aan het toestel gaat hechten.

crwdns2944171:0crwdnd2944171:0crwdnd2944171:0crwdnd2944171:0crwdne2944171:0