crwdns2933423:0crwdne2933423:0

Google Stadia コントローラー フロントアセンブリの交換

crwdns2931529:0crwdnd2931529:0crwdnd2931529:0crwdnd2931529:07crwdnd2931529:0crwdne2931529:0

crwdns2935425:03crwdne2935425:0

crwdns2936315:0crwdne2936315:0
crwdns2936323:0crwdne2936323:0
crwdns2931653:03crwdne2931653:0
Google Stadia Controller Front Assembly Replacement, Disconnect the flex cable: crwdns2935265:00crwdnd2935265:01crwdnd2935265:03crwdne2935265:0 Google Stadia Controller Front Assembly Replacement, Disconnect the flex cable: crwdns2935265:00crwdnd2935265:02crwdnd2935265:03crwdne2935265:0 Google Stadia Controller Front Assembly Replacement, Disconnect the flex cable: crwdns2935265:00crwdnd2935265:03crwdnd2935265:03crwdne2935265:0
Disconnect the flex cable
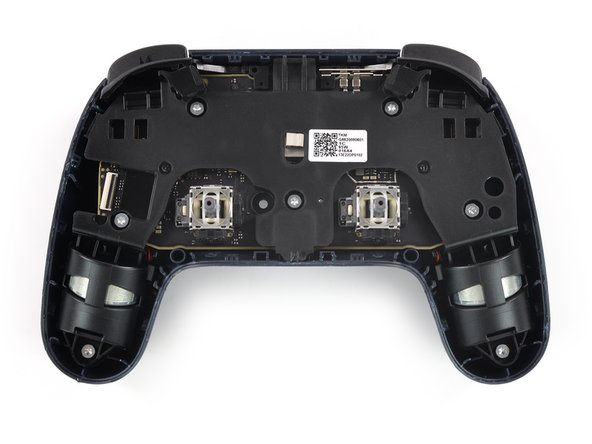
  • Use a pair of tweezers to carefully disconnect the flex cable of the button unit by pulling it out of the ZIF connector in a flat angle.

  • Separate the front from the rear assembly.

  • Remove the thumbsticks by pulling them straight upwards for an easier handling in case you want to do further disassembly.

ピンセットを使って、ボタンユニットのフレックスケーブルをZIFコネクターから平らな角度で引き抜き、慎重に外します。

フロントをリアアセンブリから離します。

さらに分解したい場合は、作業をより簡単にするために、サムスティックをまっすぐ上に引き上げて取り外します。

crwdns2944171:0crwdnd2944171:0crwdnd2944171:0crwdnd2944171:0crwdne2944171:0