crwdns2933423:0crwdne2933423:0

Google Stadia Controller Front Assembly Replacement

crwdns2862623:0crwdne2862623:0
crwdns2942641:0crwdne2942641:0

crwdns2942213:0crwdne2942213:0

  1. Google Stadia Controller Front Assembly Replacement, Loosen the screw cover adhesive: crwdns2935265:01crwdnd2935265:01crwdnd2935265:01crwdne2935265:0
    • Apply a heated iOpener to the rear side of the Stadia controller where the screw cover is located to loosen the adhesive underneath. Apply the iOpener for at least two minutes.

  2. Google Stadia Controller Front Assembly Replacement, Insert an opening pick: crwdns2935265:02crwdnd2935265:01crwdnd2935265:02crwdne2935265:0 Google Stadia Controller Front Assembly Replacement, Insert an opening pick: crwdns2935265:02crwdnd2935265:02crwdnd2935265:02crwdne2935265:0
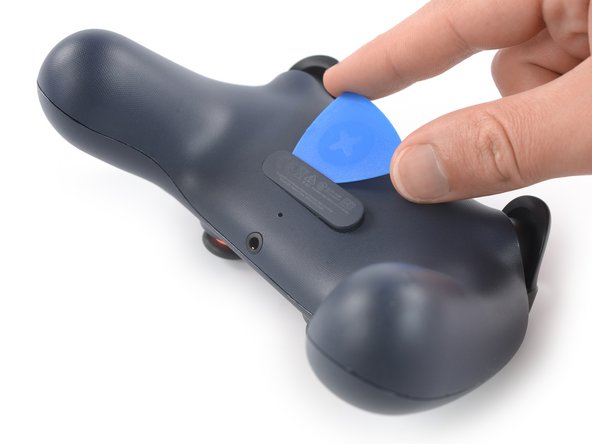
    • Insert the tip of an opening pick into the gap between the plastic screw cover and the rear case of the controller.

  3. Google Stadia Controller Front Assembly Replacement, Remove the screw cover: crwdns2935265:03crwdnd2935265:01crwdnd2935265:03crwdne2935265:0 Google Stadia Controller Front Assembly Replacement, Remove the screw cover: crwdns2935265:03crwdnd2935265:02crwdnd2935265:03crwdne2935265:0 Google Stadia Controller Front Assembly Replacement, Remove the screw cover: crwdns2935265:03crwdnd2935265:03crwdnd2935265:03crwdne2935265:0
    crwdns2935267:0crwdne2935267:0
    Tweezers
    $4.99
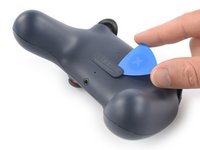
    • Slide the opening pick along the screw cover to slice the adhesive.

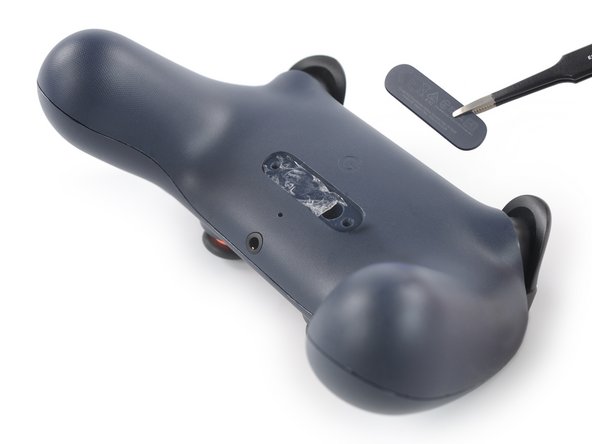
    • Use a pair of tweezers or your fingers to remove the screw cover.

    • You might want to replace the screw cover adhesive during reassembly. Apply a bit of high-concentration isopropyl alcohol (>90%) to a Q-tip or use a cleaning pad to gently remove the leftover adhesive on the rear cover of the controller before installing new adhesive.

  4. Google Stadia Controller Front Assembly Replacement, Unfasten the rear case screw: crwdns2935265:04crwdnd2935265:01crwdnd2935265:01crwdne2935265:0
    • Use a Torx T8 screwdriver to remove the 9.6 mm-long screw securing the rear case.

  5. Google Stadia Controller Front Assembly Replacement, Disassembly information: crwdns2935265:05crwdnd2935265:01crwdnd2935265:02crwdne2935265:0 Google Stadia Controller Front Assembly Replacement, Disassembly information: crwdns2935265:05crwdnd2935265:02crwdnd2935265:02crwdne2935265:0
    • The front cover assembly of the Stadia controller is held in place by various tight plastic clamps. They are very hard to open and snap back in place easily.

    • The opening procedure requires some force, however, try to avoid damaging your controller case along the way.

  6. Google Stadia Controller Front Assembly Replacement, Pry open the stadia controller: crwdns2935265:06crwdnd2935265:01crwdnd2935265:03crwdne2935265:0 Google Stadia Controller Front Assembly Replacement, Pry open the stadia controller: crwdns2935265:06crwdnd2935265:02crwdnd2935265:03crwdne2935265:0 Google Stadia Controller Front Assembly Replacement, Pry open the stadia controller: crwdns2935265:06crwdnd2935265:03crwdnd2935265:03crwdne2935265:0
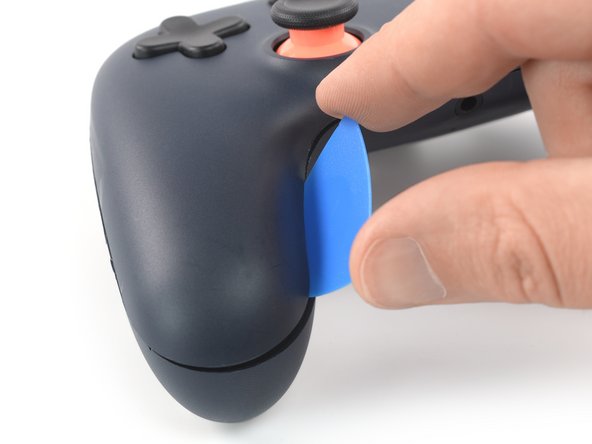
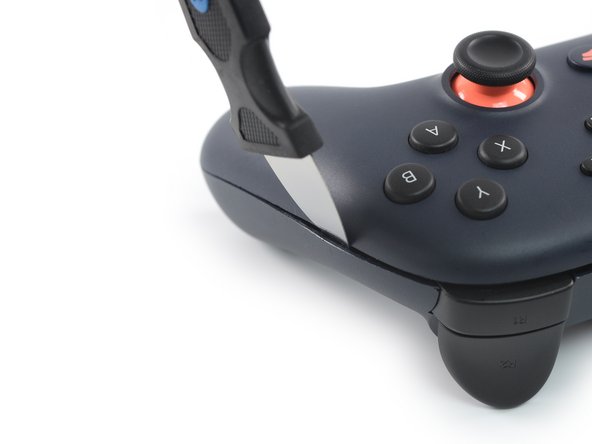
    • Insert a Jimmy into the gap between the front and back cover assembly at the inside of the left controller handle.

    • To make sure you insert the Jimmy at the correct position where the clamps are located, you can use this photo.

    • Tilt the Jimmy upwards and push it into the gap between the covers at the same time to pry open the plastic clamp. You should hear a clack noise once the clamp pops open.

    • Once the clamp is completely open, the gap between the two controller covers should be about 2-3 mm wide.

  7. Google Stadia Controller Front Assembly Replacement, Insert an opening pick: crwdns2935265:07crwdnd2935265:01crwdnd2935265:02crwdne2935265:0 Google Stadia Controller Front Assembly Replacement, Insert an opening pick: crwdns2935265:07crwdnd2935265:02crwdnd2935265:02crwdne2935265:0
    • Insert an opening pick in a steep angle into the gap you created to prevent the first clamp from popping back into its closed position.

  8. Google Stadia Controller Front Assembly Replacement, Pry open the Stadia controller: crwdns2935265:08crwdnd2935265:01crwdnd2935265:03crwdne2935265:0 Google Stadia Controller Front Assembly Replacement, Pry open the Stadia controller: crwdns2935265:08crwdnd2935265:02crwdnd2935265:03crwdne2935265:0 Google Stadia Controller Front Assembly Replacement, Pry open the Stadia controller: crwdns2935265:08crwdnd2935265:03crwdnd2935265:03crwdne2935265:0
    • To make sure you insert the Jimmy at the correct position where the clamps are located, you can use this photo.

    • Insert a Jimmy into the gap between the front and back cover assembly at the outside of the left bottom end of the controller handle.

    • Repeat the previous opening procedure to open the three plastic clamps at the outside of the left controller handle.

  9. Google Stadia Controller Front Assembly Replacement: crwdns2935265:09crwdnd2935265:01crwdnd2935265:03crwdne2935265:0 Google Stadia Controller Front Assembly Replacement: crwdns2935265:09crwdnd2935265:02crwdnd2935265:03crwdne2935265:0 Google Stadia Controller Front Assembly Replacement: crwdns2935265:09crwdnd2935265:03crwdnd2935265:03crwdne2935265:0
    • Insert a Jimmy into the gap between the front and back cover assembly between the left shoulder button and the charging port at the top edge of the Stadia controller.

    • Tilt the Jimmy upwards and push it into the gap between the covers at the same time to pry open the plastic clamp. You should hear a clack noise once the clamp pops open.

    • Repeat the previous procedure at the clamp between the right shoulder button and the charging port.

  10. Google Stadia Controller Front Assembly Replacement: crwdns2935265:010crwdnd2935265:01crwdnd2935265:03crwdne2935265:0 Google Stadia Controller Front Assembly Replacement: crwdns2935265:010crwdnd2935265:02crwdnd2935265:03crwdne2935265:0 Google Stadia Controller Front Assembly Replacement: crwdns2935265:010crwdnd2935265:03crwdnd2935265:03crwdne2935265:0
    • Insert a Jimmy into the gap between the front and back cover assembly at the right edge of the right controller handle.

    • Repeat the previous opening procedure to open the three plastic clamps at the outside of the right controller handle.

  11. Google Stadia Controller Front Assembly Replacement: crwdns2935265:011crwdnd2935265:01crwdnd2935265:02crwdne2935265:0 Google Stadia Controller Front Assembly Replacement: crwdns2935265:011crwdnd2935265:02crwdnd2935265:02crwdne2935265:0
    • Insert a Jimmy into the gap between the front and back cover assembly at the inside of the right controller handle.

    • Repeat the previous opening procedure to open plastic clamps at the inside of the left controller handle.

  12. Google Stadia Controller Front Assembly Replacement: crwdns2935265:012crwdnd2935265:01crwdnd2935265:03crwdne2935265:0 Google Stadia Controller Front Assembly Replacement: crwdns2935265:012crwdnd2935265:02crwdnd2935265:03crwdne2935265:0 Google Stadia Controller Front Assembly Replacement: crwdns2935265:012crwdnd2935265:03crwdnd2935265:03crwdne2935265:0
    • Insert a Jimmy into the gap between the front and back cover assembly at the bottom edge of the Stadia controller right to the headphone jack.

    • Tilt the Jimmy upwards and push it into the gap between the covers at the same time to pry open the plastic clamp.

    • Repeat the previous procedure at the clamp left to the headphone jack.

    • Do not try to remove the front cover assembly all the way yet. It's still connected to the rear cover assembly.

  13. Google Stadia Controller Front Assembly Replacement, Unfold the front cover assembly: crwdns2935265:013crwdnd2935265:01crwdnd2935265:03crwdne2935265:0 Google Stadia Controller Front Assembly Replacement, Unfold the front cover assembly: crwdns2935265:013crwdnd2935265:02crwdnd2935265:03crwdne2935265:0 Google Stadia Controller Front Assembly Replacement, Unfold the front cover assembly: crwdns2935265:013crwdnd2935265:03crwdnd2935265:03crwdne2935265:0
    • Avoid straining the front cover assembly cable during this step.

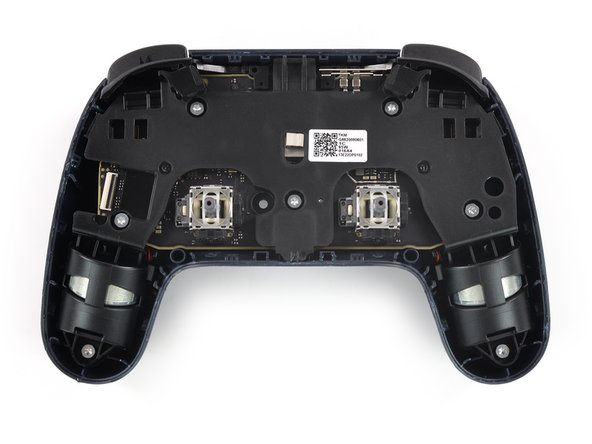
    • Carefully lift the front cover assembly and fold it to the left side of the Google Stadia controller.

  14. Google Stadia Controller Front Assembly Replacement, Remove the adhesive tape: crwdns2935265:014crwdnd2935265:01crwdnd2935265:02crwdne2935265:0 Google Stadia Controller Front Assembly Replacement, Remove the adhesive tape: crwdns2935265:014crwdnd2935265:02crwdnd2935265:02crwdne2935265:0
    crwdns2935267:0crwdne2935267:0
    Tweezers
    $4.99
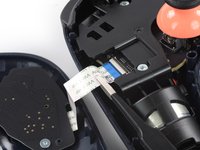
    • Use a pair of tweezers to peel the clear protective tape off the ZIF connector on the left side of the rear case.

  15. Google Stadia Controller Front Assembly Replacement, Open the ZIF connector: crwdns2935265:015crwdnd2935265:01crwdnd2935265:02crwdne2935265:0 Google Stadia Controller Front Assembly Replacement, Open the ZIF connector: crwdns2935265:015crwdnd2935265:02crwdnd2935265:02crwdne2935265:0
    • Use the pointed end of a spudger to open the ZIF connector holding the button contact board cable in place.

  16. Google Stadia Controller Front Assembly Replacement, Disconnect the flex cable: crwdns2935265:016crwdnd2935265:01crwdnd2935265:03crwdne2935265:0 Google Stadia Controller Front Assembly Replacement, Disconnect the flex cable: crwdns2935265:016crwdnd2935265:02crwdnd2935265:03crwdne2935265:0 Google Stadia Controller Front Assembly Replacement, Disconnect the flex cable: crwdns2935265:016crwdnd2935265:03crwdnd2935265:03crwdne2935265:0
    • Use a pair of tweezers to carefully disconnect the flex cable of the button unit by pulling it out of the ZIF connector in a flat angle.

    • Separate the front from the rear assembly.

    • Remove the thumbsticks by pulling them straight upwards for an easier handling in case you want to do further disassembly.

crwdns2915888:0crwdne2915888:0

To reassemble your device, follow these instructions in reverse order.

Dominik Schnabelrauch

crwdns2935283:011/23/16crwdne2935283:0

231 870 crwdns2915208:0crwdne2915208:0

crwdns2935297:0682crwdne2935297:0

crwdns2915084:0crwdne2915084:0

iFixit crwdns2935289:0iFixitcrwdne2935289:0

Staff

crwdns2931471:0121crwdne2931471:0

crwdns2935297:019 806crwdne2935297:0

crwdns2947412:00crwdne2947412:0

crwdns2917038:0crwdne2917038:0

crwdns2936625:0crwdne2936625:0:

crwdns2936751:024crwdne2936751:0 0

crwdns2936753:07crwdne2936753:0 0

crwdns2936753:030crwdne2936753:0 3

crwdns2942667:0crwdne2942667:0 37