crwdns2931529:0crwdnd2931529:0crwdnd2931529:0crwdnd2931529:02crwdnd2931529:0crwdne2931529:0
crwdns2935425:03crwdne2935425:0
crwdns2931653:03crwdne2931653:0


Remove the right speaker adhesive
-
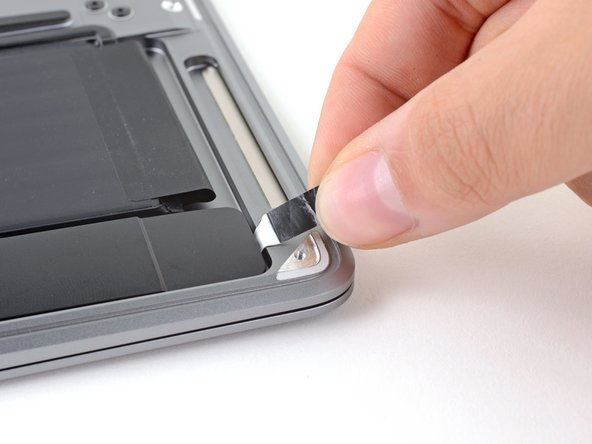
Use a pair of tweezers to lift up the black adhesive pull tab at the bottom of the right speaker, enough so you can grab it with your fingers.
-
Grab the adhesive strip's pull tab and slowly pull the adhesive strip out from underneath the speaker.
-
Pull the adhesive strip until it's freed from under the speaker.
-
Apply heat to the speaker to soften the adhesive underneath.
-
Carefully slide a spudger or opening pick underneath the speaker to separate the adhesive.
| [title] Remove the right speaker adhesive | |
| - | [* black] Use a pair of tweezers to lift up the black adhesive pull tab at the bottom of the right speaker, enough so you can grab it with your fingers. |
| + | [* black] Use a pair of [product|IF145-020|tweezers] to lift up the black adhesive pull tab at the bottom of the right speaker, enough so you can grab it with your fingers. |
| [* black] Grab the adhesive strip's pull tab and slowly pull the adhesive strip out from underneath the speaker. | |
| [* icon_note] Keep the angle of the adhesive strip as parallel to the laptop as you can. Try to avoid dragging it across the inside of the case. | |
| [* black] Pull the adhesive strip until it's freed from under the speaker. | |
| [* icon_note] If the adhesive strip breaks, use a [guide|25705|heated iOpener|new_window=true], a heat gun, or a hair dryer to help remove the adhesive: | |
| [* black] Apply heat to the speaker to soften the adhesive underneath. | |
| [* black] Carefully slide a spudger or opening pick underneath the speaker to separate the adhesive. |
crwdns2944171:0crwdnd2944171:0crwdnd2944171:0crwdnd2944171:0crwdne2944171:0