crwdns2933423:0crwdne2933423:0

Remplacement du commutateur du Ducky One 2 Mini Cherry MX

crwdns2936315:0crwdne2936315:0
crwdns2936317:0crwdne2936317:0
crwdns2931653:05crwdne2931653:0
Ducky One 2 Mini Cherry MX Switch Replacement: crwdns2935265:00crwdnd2935265:01crwdnd2935265:03crwdne2935265:0 Ducky One 2 Mini Cherry MX Switch Replacement: crwdns2935265:00crwdnd2935265:02crwdnd2935265:03crwdne2935265:0 Ducky One 2 Mini Cherry MX Switch Replacement: crwdns2935265:00crwdnd2935265:03crwdnd2935265:03crwdne2935265:0
  • Once both pins are removed, flip the board over again.

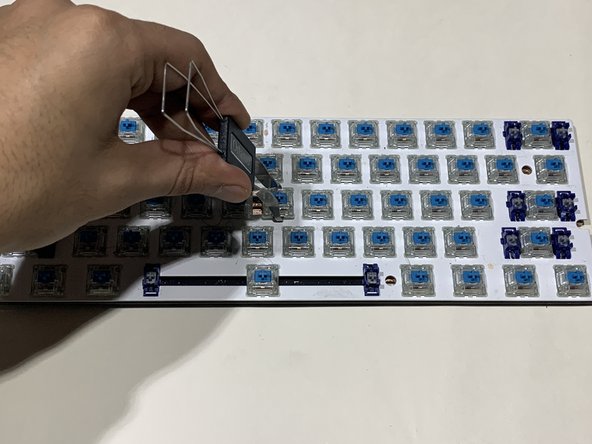
  • Use the switch puller, place the tool vertically over the switch. You will notice two tabs on the switches, push the tabs inwards.

  • With the tabs pushed in, pull the switch puller up and the switch should separate from the board.

  • The switch puller should be vertical because the two tabs on the switch are placed on the top and bottom.

Une fois les deux broches retirées, retournez à nouveau la carte.

Utilisez l'extracteur d'interrupteur, placez l'outil verticalement sur l'interrupteur. Vous remarquerez deux languettes sur les interrupteurs, poussez les languettes vers l'intérieur.

Avec les languettes enfoncées, tirez l'extracteur de l'interrupteur vers le haut et l'interrupteur devrait se séparer de la carte.

L'extracteur de commutateur doit être vertical car les deux languettes du commutateur sont placées en haut et en bas.

crwdns2944171:0crwdnd2944171:0crwdnd2944171:0crwdnd2944171:0crwdne2944171:0