crwdns2933423:0crwdne2933423:0

Desmontaje de Wacom Cintiq Pro 13

crwdns2936315:0crwdne2936315:0
crwdns2936331:0crwdne2936331:0
crwdns2931653:016crwdne2931653:0
Wacom Cintiq Pro 13 Disassembly: crwdns2935265:00crwdnd2935265:01crwdnd2935265:03crwdne2935265:0 Wacom Cintiq Pro 13 Disassembly: crwdns2935265:00crwdnd2935265:02crwdnd2935265:03crwdne2935265:0 Wacom Cintiq Pro 13 Disassembly: crwdns2935265:00crwdnd2935265:03crwdnd2935265:03crwdne2935265:0
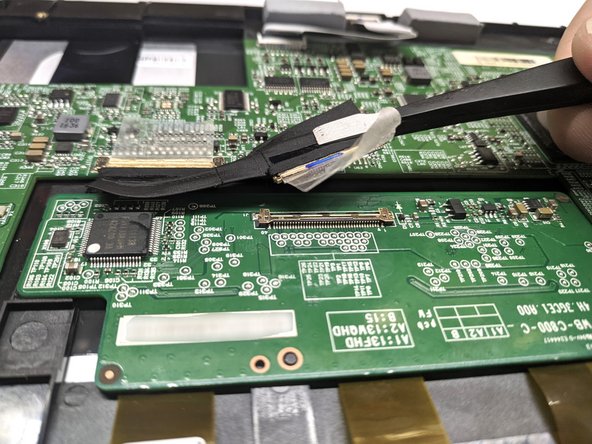
  • Remove the adhesive from the mainboard

  • Do not remove it entirely - it's a part of the cable

  • Slide the cable towards the mainboard by holding it as near the connector as possible

  • Do not pull by the middle or other end of the cable

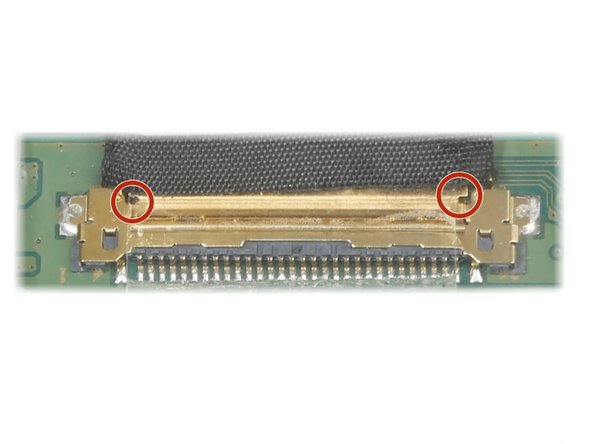
  • If cable seems hard to remove, try to push one side of the connector using a pair of tweezers by spots marked on third image

  • Do not push center part of the connector as it can be easily bent

  • Repeat the steps for another end of the cable connected to the mainboard

Retira el adhesivo de la placa base

No lo quites del todo, ya que es una parte del cable

Desliza el cable hacia la placa base sujetándolo lo más cerca posible del conector

No tire por el medio ni por el otro extremo del cable

Si el cable parece difícil de quitar, intenta empujar un lado del conector con unas pinzas por los puntos marcados en la tercera imagen

No empujes la parte central del conector, ya que puede doblarse fácilmente.

Repite los pasos para otro extremo del cable conectado a la placa base

crwdns2944171:0crwdnd2944171:0crwdnd2944171:0crwdnd2944171:0crwdne2944171:0