crwdns2933423:0crwdne2933423:0

Desmontaje de Wacom Cintiq Pro 13

crwdns2936315:0crwdne2936315:0
crwdns2936331:0crwdne2936331:0
crwdns2931653:09crwdne2931653:0
Wacom Cintiq Pro 13 Disassembly: crwdns2935265:00crwdnd2935265:01crwdnd2935265:03crwdne2935265:0 Wacom Cintiq Pro 13 Disassembly: crwdns2935265:00crwdnd2935265:02crwdnd2935265:03crwdne2935265:0 Wacom Cintiq Pro 13 Disassembly: crwdns2935265:00crwdnd2935265:03crwdnd2935265:03crwdne2935265:0
  • The bottom part of the device will come loose allowing you to place finger between the case and the display assembly

  • Unclip hidden clips on left or right side and continue to opposite side. Plastic flat tool may come in handy here

  • You can insert plastic tools up to 2 cm / 1 inch inside and not damage anything. Third image will guide you through clips and other obstacles

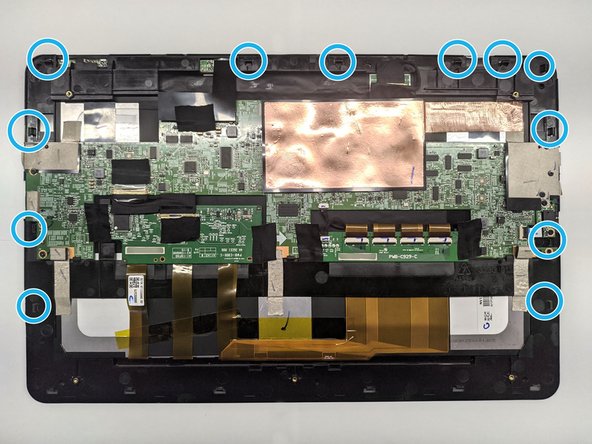
  • Unclip all twelve clips. Keep one hand on the display to decrease display bending and second to slowly lift the back cover.

  • There is nothing connected to the back panel - no need to worry about hidden flex/ribbon cables

  • Remove the back cover

La parte inferior del dispositivo se soltará permitiéndote colocar el dedo entre la carcasa y el conjunto de la pantalla.

Desengancha los clips ocultos del lado izquierdo o derecho y continúe con el lado opuesto. La herramienta plana de plástico puede ser útil aquí

Puedes insertar herramientas de plástico de hasta 2 cm / 1 pulgada en el interior y no dañar nada. La tercera imagen le guiará a través de clips y otros obstáculos

Desengancha los doce clips. Manten una mano sobre la pantalla para evitar que se doble y la otra para levantar lentamente la cubierta posterior.

No hay nada conectado al panel trasero, por lo que no hay que preocuparse por cables flexibles o de cinta ocultos.

Retira la tapa trasera

crwdns2944171:0crwdnd2944171:0crwdnd2944171:0crwdnd2944171:0crwdne2944171:0