crwdns2933423:0crwdne2933423:0

Gaggia Cubica vervangen afdichting verwarmingselement.

crwdns2936315:0crwdne2936315:0
crwdns2936313:0crwdne2936313:0
crwdns2931653:05crwdne2931653:0
Gaggia Cubika Seal for the heating tank Replacement: crwdns2935265:00crwdnd2935265:01crwdnd2935265:03crwdne2935265:0 Gaggia Cubika Seal for the heating tank Replacement: crwdns2935265:00crwdnd2935265:02crwdnd2935265:03crwdne2935265:0 Gaggia Cubika Seal for the heating tank Replacement: crwdns2935265:00crwdnd2935265:03crwdnd2935265:03crwdne2935265:0
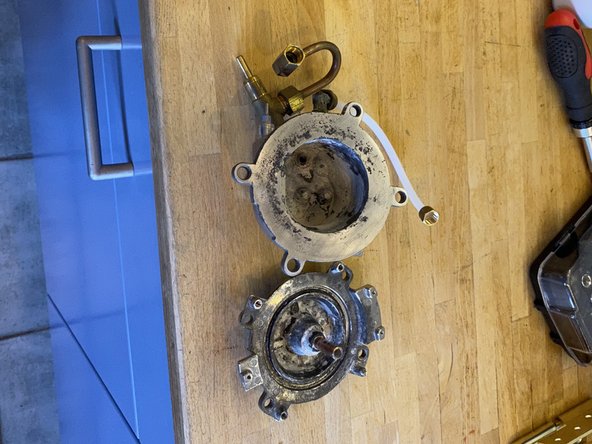
  • The insides were really covered with calcium carbonate (chalk)

  • I scrubbed out the inside of the unit, then I used an iron descaler product from a DIY store to remove the worst of the chalk

  • Don't submerge the top of the heater as it has electrical components on it

  • (OPTIONAL) With the scale removed, the pitting to the die-cast heater body was clear. I polished this by using a very fine wet-or-dry paper placed on a flat surface . Dampen the wet-or-dry, and using small movements smooth the top half of the heater. See photo 2.

  • Clean the inside of the bottom half of the heater. You can't use the same technique to celan the face of the bottom as it has a central spiggot.

  • Clean the hole which is at the bottom of the spiggot (from outside the heater). This allows hot water to come out of the heater, into the coffee. It should be 2.5mm in diameter (mine was not, hence the poor water flow), so I used a drill to clean this. The bullet shaped piece with the spring fits into this so make sure it is clean.

  • Reassemble this and the brass nut into the bottom of the unit, and reattach the water sieve.

  • See photo 3 for the completed clean faces.

De binnenkant was echt bedekt met calciumcarbonaat (kalk).

Ik heb de binnenkant van het apparaat zo goed mogelijk schoon gemaakt en daarna een ontkalker van een bouwmarkt gebruikt om de ergste kalkaanslag te verwijderen.

Dompel de bovenkant van het verwarmingselement niet onder, omdat er elektrische onderdelen op zitten.

(OPTIONEEL) Toen de kalk verwijderd was, waren de putjes in het gegoten verwarmingselement duidelijk zichtbaar. Ik heb dit gepolijst met heel fijn nat of droog papier op een plat oppervlak. Maak het nat of droog en strijk met kleine bewegingen de bovenste helft van het verwarmingselement glad. Zie foto 2.

Maak de binnenkant van de onderste helft van het verwarmingselement schoon. Je kunt niet dezelfde techniek gebruiken om de voorkant van de onderkant te reinigen, omdat deze een centrale aansluiting heeft.

Maak het gat schoon dat aan de onderkant van de tap zit (van buiten het verwarmingselement). Hierdoor komt heet water uit het verwarmingselement in de koffie. Het moet 2,5 mm in diameter zijn, dus ik heb een boor gebruikt om dit schoon te maken. Het kogelvormige stuk met de veer past hierin, dus zorg ervoor dat het schoon is.

Monteer dit en de koperen moer weer in de bodem van het apparaat en bevestig de waterzeef weer.

Zie foto 3 voor de voltooide schone oppervlakken.

crwdns2944171:0crwdnd2944171:0crwdnd2944171:0crwdnd2944171:0crwdne2944171:0