crwdns2933423:0crwdne2933423:0

Sony Xperia Z1 スクリーンの交換

crwdns2931527:0crwdnd2931527:0crwdnd2931527:0crwdnd2931527:0crwdne2931527:0

crwdns2936315:0crwdne2936315:0
crwdns2936323:0crwdne2936323:0
crwdns2931653:07crwdne2931653:0
Sony Xperia Z1 Screen Replacement: crwdns2935265:00crwdnd2935265:01crwdnd2935265:03crwdne2935265:0 Sony Xperia Z1 Screen Replacement: crwdns2935265:00crwdnd2935265:02crwdnd2935265:03crwdne2935265:0 Sony Xperia Z1 Screen Replacement: crwdns2935265:00crwdnd2935265:03crwdnd2935265:03crwdne2935265:0
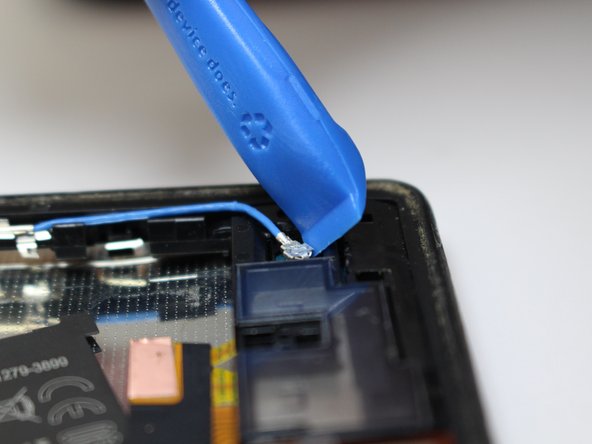
  • Detach the other end of the blue coaxial cable with a plastic opening tool.

  • Start to pry up the daughterboard using a plastic spudger, taking caution not to sever any of the attached ribbon cables.

  • Although the images depict the use of a metal spudger to pry up the daughterboard, we recommend using an ESD-safe tool instead to reduce the risk of damage to the componentry.

プラスチックの開口ツールで、ブルーの同軸ケーブルの反対側の先端を外します。

プラスチックのスパッジャーで、装着されたリボンケーブルを破損しないようにドーターボードをこじ開けます。

画像はドーターボードをこじ開けるために、メタル製スパッジャーを使用していますが、コンポーネントへの損傷のリスクを減らすために、代わりにESDセーフツールを使用することをお勧めします。

crwdns2944171:0crwdnd2944171:0crwdnd2944171:0crwdnd2944171:0crwdne2944171:0