crwdns2933423:0crwdne2933423:0

Smontaggio Intel NUC8i7BEH

crwdns2931527:0crwdnd2931527:0crwdnd2931527:0crwdnd2931527:0crwdne2931527:0

crwdns2936315:0crwdne2936315:0
crwdns2936321:0crwdne2936321:0
crwdns2931653:03crwdne2931653:0
Intel NUC8i7BEH Disassembly, Lid and HDD Bracket: crwdns2935265:00crwdnd2935265:01crwdnd2935265:03crwdne2935265:0 Intel NUC8i7BEH Disassembly, Lid and HDD Bracket: crwdns2935265:00crwdnd2935265:02crwdnd2935265:03crwdne2935265:0 Intel NUC8i7BEH Disassembly, Lid and HDD Bracket: crwdns2935265:00crwdnd2935265:03crwdnd2935265:03crwdne2935265:0
Lid and HDD Bracket
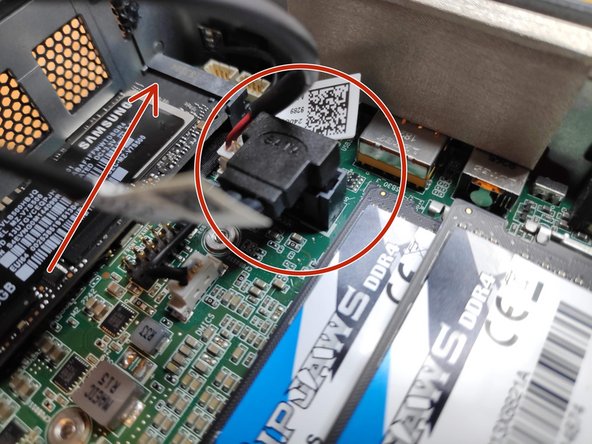
  • Lift the door, and keep an eye on the cables that connect to the NUC's motherboard. These cables are the power and data cables for the 2.5" hard drive bay.

  • Carefully unplug the cables from the motherboard, and set the bracket aside.

  • In the last photo, the slot for a blade SSD is marked with a red arrow. This is where you would install the blade SSD, and use a screw to hold it in place.

Aprite il coperchio, e tenete d'occhio i cavi che vanno alla scheda madre. Si tratta del cavo di alimentazione e del cavo dati del vassoio del hard disk da 2,5 pollici.

Scollegate delicatamente i cavi dalla scheda madre e mettete da parte il coperchio col vassoio del HDD.

Nell'ultima foto potete vedere lo slot per l'SSD M.2 indicato dalla freccia rossa. Si può utilizzare questo slot per installare un SSD, per tenerlo fermo c'è una comoda vite.

crwdns2944171:0crwdnd2944171:0crwdnd2944171:0crwdnd2944171:0crwdne2944171:0