crwdns2933423:0crwdne2933423:0

Remplacement de la coque de la Joy-Con droite de la Nintendo Switch

crwdns2936315:0crwdne2936315:0
crwdns2936317:0crwdne2936317:0
crwdns2931653:07crwdne2931653:0
Nintendo Switch Right Joy-Con Shell Replacement: crwdns2935265:00crwdnd2935265:01crwdnd2935265:03crwdne2935265:0 Nintendo Switch Right Joy-Con Shell Replacement: crwdns2935265:00crwdnd2935265:02crwdnd2935265:03crwdne2935265:0 Nintendo Switch Right Joy-Con Shell Replacement: crwdns2935265:00crwdnd2935265:03crwdnd2935265:03crwdne2935265:0
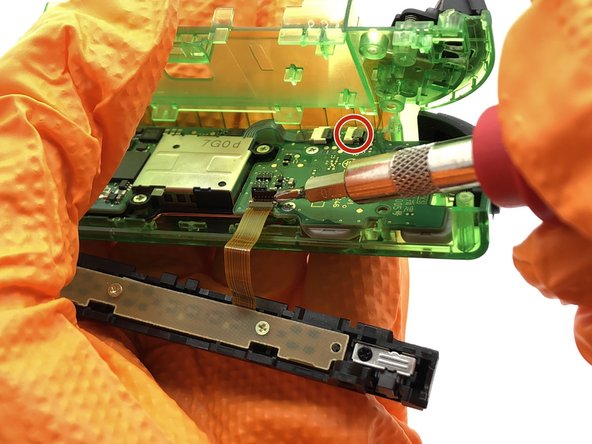
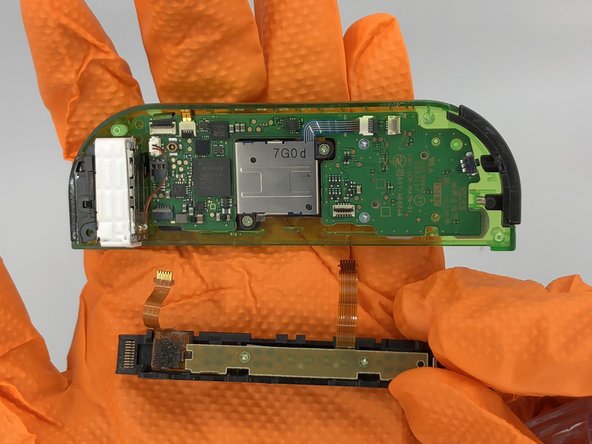
  • Remove the ribbon cables connecting the rail and battery casing to the motherboard. Unlock the cables by flipping the connector upwards with a spudger, then pull the cable out of the connector.

  • You may even choose to leave the rail connected, though it will be unwieldy.

  • Be careful not to lift the connectors in the wrong direction. The connection nearest to the shoulder buttons lifts up away from the rail (the black part), and the connection nearest to the rumble motor lifts in the opposite direction, up toward the rail (the thin grey part.)

Enlevez les nappes qui relient le rail et le compartiment de la batterie à la carte mère. Détachez les nappes en soulevant leur connecteur à l'aide d'un outil plat ou d'une spatule, puis tirez la nappe pour la sortir du connecteur.

Vous pouvez choisir de quand même laisser le rail connecté, même si cela sera plus difficile à manipuler.

Faites attention à ne pas soulever les connecteurs dans le mauvais sens. La connexion la plus proche des gâchettes s'éloigne du rail (la partie noire) et la connexion la plus proche du moteur vibreur se lève dans la direction opposée, vers le rail (la fine partie grise).

crwdns2944171:0crwdnd2944171:0crwdnd2944171:0crwdnd2944171:0crwdne2944171:0