crwdns2933423:0crwdne2933423:0

Reemplazo de la Carcasa del Joy-Con derecho

crwdns2936315:0crwdne2936315:0
crwdns2936331:0crwdne2936331:0
crwdns2931653:07crwdne2931653:0
Nintendo Switch Right Joy-Con Shell Replacement: crwdns2935265:00crwdnd2935265:01crwdnd2935265:03crwdne2935265:0 Nintendo Switch Right Joy-Con Shell Replacement: crwdns2935265:00crwdnd2935265:02crwdnd2935265:03crwdne2935265:0 Nintendo Switch Right Joy-Con Shell Replacement: crwdns2935265:00crwdnd2935265:03crwdnd2935265:03crwdne2935265:0
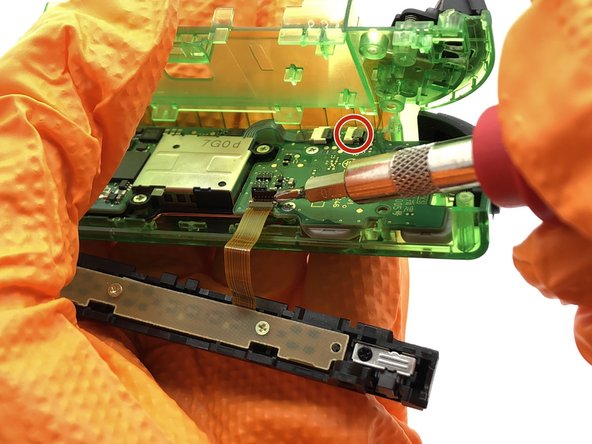
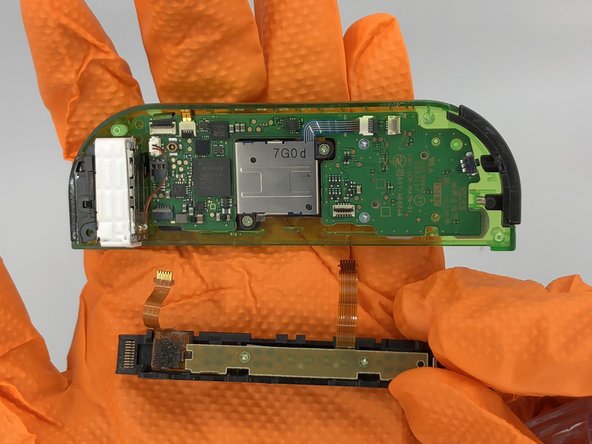
  • Remove the ribbon cables connecting the rail and battery casing to the motherboard. Unlock the cables by flipping the connector upwards with a spudger, then pull the cable out of the connector.

  • You may even choose to leave the rail connected, though it will be unwieldy.

  • Be careful not to lift the connectors in the wrong direction. The connection nearest to the shoulder buttons lifts up away from the rail (the black part), and the connection nearest to the rumble motor lifts in the opposite direction, up toward the rail (the thin grey part.)

Retira los cables de cinta que conectan el carril y la carcasa de la batería a la placa madre. Desbloquea los cables volteando el conector hacia arriba con un spudger, y luego tira del cable para sacarlo del conector.

Si lo prefieres, puedes dejar el carril conectado, aunque si lo dejas conectado, será difícil de maniobrar a posteriori.

Ten cuidado de no mover los conectores en la dirección equivocada. El conector más cercano a los botones ZR y R, se levanta en dirección opuesta al carril de carga (la parte negra), y el conector más cercano al motor de vibración se levanta al revés, mirando hacia el carril (la parte fina gris.)

crwdns2944171:0crwdnd2944171:0crwdnd2944171:0crwdnd2944171:0crwdne2944171:0