crwdns2933423:0crwdne2933423:0

Desmontaje del Hyperkin Duke

crwdns2936315:0crwdne2936315:0
crwdns2936331:0crwdne2936331:0
crwdns2931653:04crwdne2931653:0
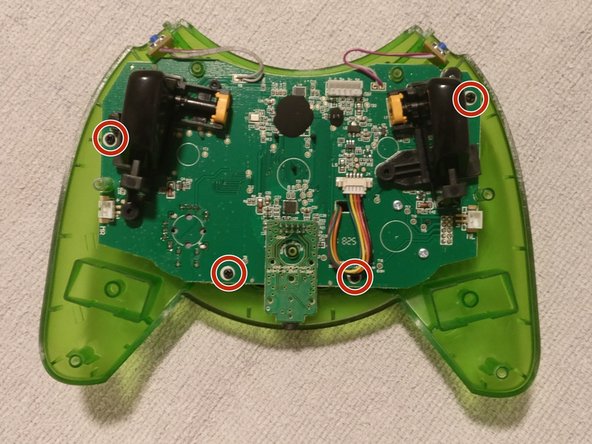
Hyperkin Duke Teardown, Main PCB removal: crwdns2935265:00crwdnd2935265:01crwdnd2935265:02crwdne2935265:0 Hyperkin Duke Teardown, Main PCB removal: crwdns2935265:00crwdnd2935265:02crwdnd2935265:02crwdne2935265:0
Main PCB removal
  • The center piece, along with the left and right bumpers have been removed simply by sliding them up and away from the controller

  • A similar style of cable/connector as the micro USB is used for the vibration motors

  • Use the angled tweezers in the same manner as before to separate these cables from the PCB connectors

  • Vibration motors can now be lifted out

  • Remove the four screws holding the PCB to the front half of the controller

La pieza central, junto con los parachoques izquierdo y derecho, se quitaron simplemente deslizándolos hacia arriba y hacia afuera del mando.

Se utiliza un estilo de cable/conector similar al del micro USB para los motores de vibración.

Usa las pinzas en ángulo de la misma manera que antes para separar estos cables de los conectores de PCB

Los motores de vibración ahora se pueden levantar

Retira los cuatro tornillos que sujetan la PCB a la mitad frontal del mando.

crwdns2944171:0crwdnd2944171:0crwdnd2944171:0crwdnd2944171:0crwdne2944171:0