crwdns2933423:0crwdne2933423:0

Remplacement du panneau LCD des MacBook Pro 15" Core 2 Duo modèles A1226 et A1260

crwdns2936315:0crwdne2936315:0
crwdns2936317:0crwdne2936317:0
crwdns2931653:09crwdne2931653:0
MacBook Pro 15" Core 2 Duo Models A1226 and A1260 LCD Panel Replacement: crwdns2935265:00crwdnd2935265:01crwdnd2935265:02crwdne2935265:0 MacBook Pro 15" Core 2 Duo Models A1226 and A1260 LCD Panel Replacement: crwdns2935265:00crwdnd2935265:02crwdnd2935265:02crwdne2935265:0
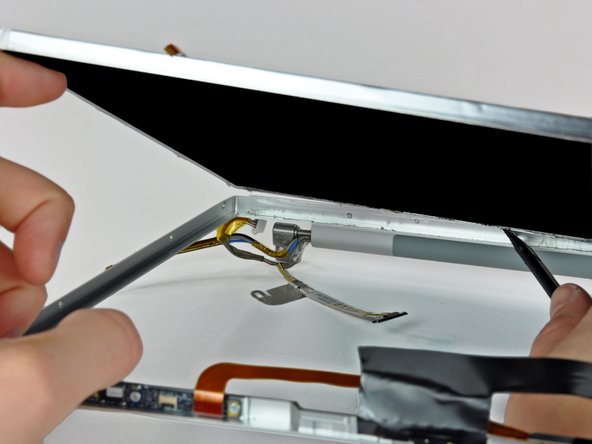
  • Now that the top edge is free, slightly lift the LCD out of the front bezel for enough room to pry the steel strip along the lower edge of the LCD away from the front bezel.

  • Pry along the lower edge of the LCD until it is freed from the adhesive on the front bezel.

  • Avoid pulling the edge of the LCD unit from the screen. Be sure to insert the tool between the metal of the bezel and the metal of the LCD. If the adhesive is very strong, make a couple trips across the bottom edge to avoid applying too much pressure.

Une fois que vous avez fini avec le bord supérieur, éloignez délicatement l'écran LCD du cache avant. Vous devez avoir suffisamment de place pour faire levier sur la bande en acier le long du bord inférieur du LCD afin de l'enlever du cache avant.

Progressez le long du bord inférieur de l'écran LCD jusqu'à ce que la colle soit enlevée du cache avant.

Evitez d'écarter le bord du panneau LCD de l'écran. Veillez à insérez votre outil entre le métal du cache et le métal de l'écran LCD. Si la colle est très forte, passez plusieurs fois le long du bord inférieur pour éviter de faire trop pression.

crwdns2944171:0crwdnd2944171:0crwdnd2944171:0crwdnd2944171:0crwdne2944171:0