crwdns2933423:0crwdne2933423:0

MacBook Pro 15" Core 2 Duo Modelos A1226 y A1260 Reemplazar Panel LCD

crwdns2936315:0crwdne2936315:0
crwdns2936331:0crwdne2936331:0
crwdns2931653:09crwdne2931653:0
MacBook Pro 15" Core 2 Duo Models A1226 and A1260 LCD Panel Replacement: crwdns2935265:00crwdnd2935265:01crwdnd2935265:02crwdne2935265:0 MacBook Pro 15" Core 2 Duo Models A1226 and A1260 LCD Panel Replacement: crwdns2935265:00crwdnd2935265:02crwdnd2935265:02crwdne2935265:0
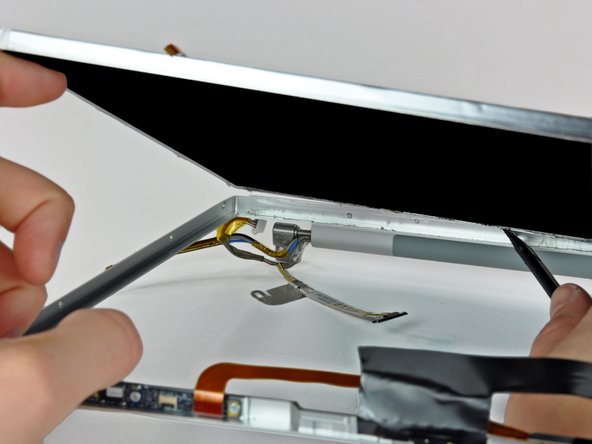
  • Now that the top edge is free, slightly lift the LCD out of the front bezel for enough room to pry the steel strip along the lower edge of the LCD away from the front bezel.

  • Pry along the lower edge of the LCD until it is freed from the adhesive on the front bezel.

  • Avoid pulling the edge of the LCD unit from the screen. Be sure to insert the tool between the metal of the bezel and the metal of the LCD. If the adhesive is very strong, make a couple trips across the bottom edge to avoid applying too much pressure.

Ahora que el borde superior está libre, levanta ligeramente la pantalla LCD del bisel frontal para obtener suficiente espacio para hacer palanca en la banda de acero a lo largo del borde inferior de la pantalla LCD, lejos del panel frontal.

Haz palanca a lo largo del borde inferior de la pantalla LCD hasta que se libere del adhesivo en el bisel frontal.

Evita tirar del borde de la unidad LCD desde la pantalla. Asegúrate de insertar la herramienta entre el metal del bisel y el metal de la pantalla LCD. Si el adhesivo está muy fuerte, haz un par de tirones suaves en el borde inferior para evitar aplicar demasiada presión.

crwdns2944171:0crwdnd2944171:0crwdnd2944171:0crwdnd2944171:0crwdne2944171:0