crwdns2933423:0crwdne2933423:0

Microsoft Surface Pro Xの分解

crwdns2936315:0crwdne2936315:0
crwdns2936323:0crwdne2936323:0
crwdns2931653:05crwdne2931653:0
Microsoft Surface Pro X Teardown: crwdns2935265:00crwdnd2935265:01crwdnd2935265:03crwdne2935265:0 Microsoft Surface Pro X Teardown: crwdns2935265:00crwdnd2935265:02crwdnd2935265:03crwdne2935265:0 Microsoft Surface Pro X Teardown: crwdns2935265:00crwdnd2935265:03crwdnd2935265:03crwdne2935265:0
  • While relatively painless, this opening procedure is not without hurdles—we see a few flex cables along the bottom of the display, dangerously close to the path of our cutting tools.

  • That said, it gets even painless-er when we start removing the adhesive. It peels off like magic—no mess! This is the kind of change we've been pleading for. If you must glue together a super thin, space-constrained device, this is how you should do it. (But don't do it on a desktop, okay? Because that's just lame.)

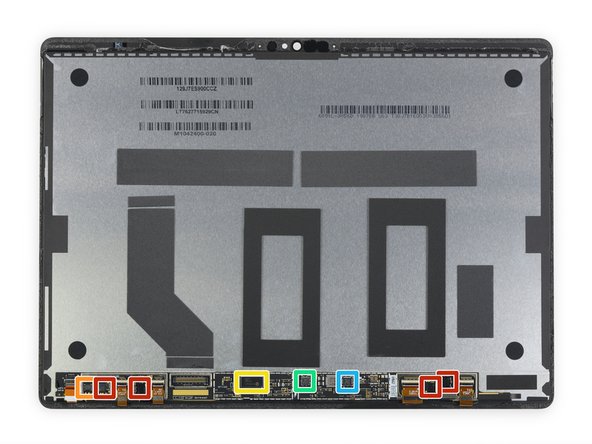
  • Our excitement is real, but let's pause to peruse these display chips. We've got:

  • Microsoft X904163 and X904169 display drivers

  • Winbond Q16FWUXB2 1921-681C DR80006

  • Analogix ANX2684 1920 C975AA

  • SiW SW50014A 8266631T 1844

  • SiW SW5077 J004370V 1920

作業は比較的簡単であるものの、この開口方法にはハードルがあります。ディスプレイ底に沿って、フレックスケーブルが数本付けられています。私たちの開口ツールの通り道に、危険なほど近い位置に搭載されているのです。

接着剤を剥がす時は、魔法のように綺麗に剥がせて、作業は順調に進みます。これは私たちが願ってきた変化です。このようなスペースが限られた超薄型デバイスに接着剤を使用しなければならない場合、このようにするべきです。しかし、このやり方は内部スペースのあるデスクトップには適用されるべきではありません。分かりますか?なぜならそれは無駄なものだからです。

私たちの喜びは本物です。しかし、これらのディスプレイチップを識別するため、一度立ち止まります。私たちが確認できたのは、

Microsoft X904163 とX904169 ディスプレイドライバー

Winbond Q16FWUXB2 1921-681C DR80006

Analogix ANX2684 1920 C975AA

SiW SW50014A 8266631T 1844

SiW SW5077 J004370V 1920

crwdns2944171:0crwdnd2944171:0crwdnd2944171:0crwdnd2944171:0crwdne2944171:0