crwdns2933423:0crwdne2933423:0

Reemplazo de la batería de los Samsung Galaxy Buds

crwdns2936315:0crwdne2936315:0
crwdns2936331:0crwdne2936331:0
crwdns2931653:03crwdne2931653:0
Samsung Galaxy Buds Battery Replacement: crwdns2935265:00crwdnd2935265:01crwdnd2935265:03crwdne2935265:0 Samsung Galaxy Buds Battery Replacement: crwdns2935265:00crwdnd2935265:02crwdnd2935265:03crwdne2935265:0 Samsung Galaxy Buds Battery Replacement: crwdns2935265:00crwdnd2935265:03crwdnd2935265:03crwdne2935265:0
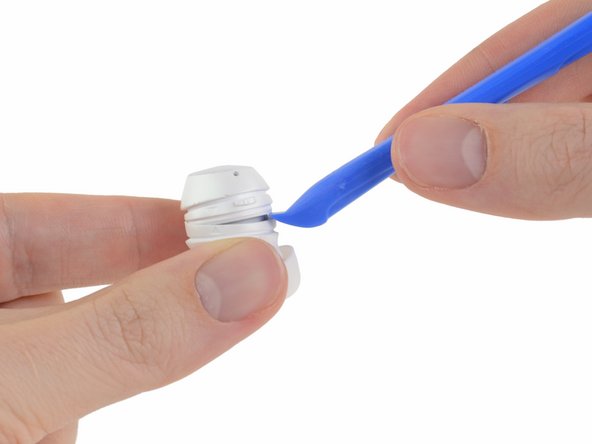
  • Once you have created a gap between the two halves of the bud, gently pry them apart with a plastic opening tool.

  • You may need to work your way around the entire earbud with the opening tool. Take your time and do your best not to deform the plastic.

  • Carefully remove the top half of the bud.

  • Be careful when pulling the halves apart! Sometimes the battery assembly gets caught in the case. If the top half of your case doesn't come out cleanly, skip this step and disconnect the cable in step 4 before separating the two halves of the bud.

  • During reassembly, line up the arrows on the two halves of the outer case, then press the halves together until they snap into place.

Una vez que hayas abierto un espacio entre las dos mitades del auricular, sepáralas suavemente con una herramienta de apertura de plástico.

Es posible que necesites progresar gradualmente alrededor del auricular con la herramienta. Tómate tu tiempo y haz todo lo posible para no deformar el plástico.

Retira con cuidado la mitad superior del auricular.

Ten cuidado al retirar las dos mitades. A veces la batería se queda atascada en la caja. Si la mitad superior no sale fácilmente, omite este paso y desconecta el cable del paso 4 antes de terminar de separar las dos partes.

Al volver a montar, alinea las flechas en cada mitad de la caja, luego cierra las dos piezas y presiona hasta que encajen en su lugar.

crwdns2944171:0crwdnd2944171:0crwdnd2944171:0crwdnd2944171:0crwdne2944171:0