crwdns2933423:0crwdne2933423:0

Extracción del cristal trasero del Samsung Galaxy S9

crwdns2931529:0crwdnd2931529:0crwdnd2931529:0crwdnd2931529:012crwdnd2931529:0crwdne2931529:0

crwdns2936315:0crwdne2936315:0
crwdns2936331:0crwdne2936331:0
crwdns2931653:03crwdne2931653:0
Samsung Galaxy S9 Rear Glass Removal: crwdns2935265:00crwdnd2935265:01crwdnd2935265:03crwdne2935265:0 Samsung Galaxy S9 Rear Glass Removal: crwdns2935265:00crwdnd2935265:02crwdnd2935265:03crwdne2935265:0 Samsung Galaxy S9 Rear Glass Removal: crwdns2935265:00crwdnd2935265:03crwdnd2935265:03crwdne2935265:0
  • If the phone's rear glass is cracked, the suction cup may not stick. Try lifting it with strong tape, or superglue the suction cup in place and allow it to cure so you can proceed.

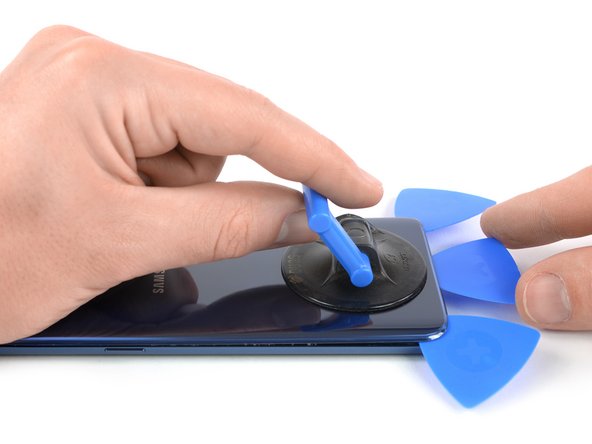
  • Press a suction cup onto the back cover.

  • Lift the back cover's bottom edge with your suction cup, opening a slight gap between the back cover and the frame.

  • This may require a significant amount of force, but you only need to open a very slight gap with the suction cup to insert your tool. If you have trouble, apply more heat to further soften the adhesive, and try again. The adhesive cools very fast, so you may need to heat it repeatedly.

  • Insert an opening pick in the gap you created and slide it to the bottom right corner.

  • Insert a second opening pick and slide it to the bottom left corner.

  • Insert a third opening pick to prevent the adhesive from resealing during the rest of the removal procedure.

Si la tapa trasera de cristal del teléfono está rasgada, la ventosa no podrá adherirse. Intenta levantarla con una cinta resistente o pega con adhesivo instantáneo la ventosa y permite que se pega así puedes proceder.

Presiona una ventosa sobre la tapa trasera.

Levanta el borde inferior de la tapa trasera con la ventosa con fuerza y firmemente para crear un espacio entre la tapa trasera y el marco.

Esto podría requerir bastante fuerza, pero solo necesitas una grieta muy pequeña con la ventosa para insertar tu herramienta. Si tienes problemas, aplica más calor para ablandar más el adhesivo e intenta de nuevo. El adhesivo se enfría muy rápido así que puede ser que tengas que calentarla repetidamente.

Inserta una púa de apertura en la grieta y deslízala hacia la esquina derecha inferior.

Inserta una segunda púa de apertura y deslízala hacia la esquina izquierda inferior.

Inserta una tercer púa de apertura en el extremo inferior del teléfono para prevenir que el adhesivo se vuelva a sellar durante el resto del procedimiento de extracción.

crwdns2944171:0crwdnd2944171:0crwdnd2944171:0crwdnd2944171:0crwdne2944171:0