crwdns2933423:0crwdne2933423:0

오른편 Joy-Con Joystick 교체

crwdns2936315:0crwdne2936315:0
crwdns2936325:0crwdne2936325:0
crwdns2931653:05crwdne2931653:0
Right Joy-Con Joystick Replacement, Remove the battery: crwdns2935265:00crwdnd2935265:01crwdnd2935265:03crwdne2935265:0 Right Joy-Con Joystick Replacement, Remove the battery: crwdns2935265:00crwdnd2935265:02crwdnd2935265:03crwdne2935265:0 Right Joy-Con Joystick Replacement, Remove the battery: crwdns2935265:00crwdnd2935265:03crwdnd2935265:03crwdne2935265:0
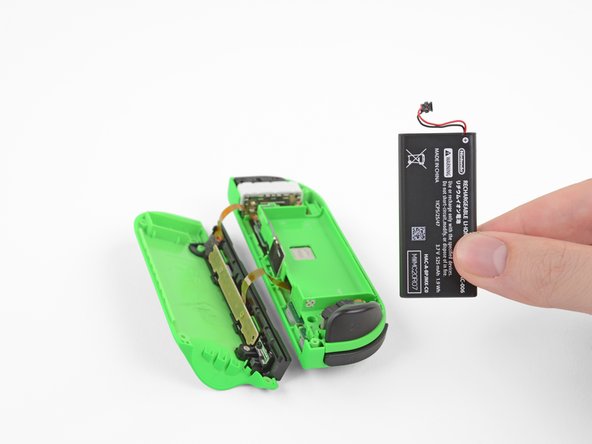
Remove the battery
  • The following two steps show the removal of the battery and the coaxial antenna cable from the midframe. These two steps make for a less cluttered repair, but are not essential. If you want, you can leave the battery and the grey coax cable in place here and proceed to step 7.

  • Insert an opening pick between the battery and the Joy-Con housing. Gently pry out the battery, which is lightly taped in place.

  • Be careful not to deform or puncture the battery—it can catch fire or explode if damaged.

다음 두 단계는 중앙프레임에서 배터리와 동축 안테나 케이블을 분리하는 방법을 보여줍니다. 이 두 단계는 수리를 덜 복잡하게 만들지만 필수는 아닙니다. 원한다면, 배터리와 회색 동축 케이블을 여기에 그대로 두고 7단계로 진행할 수 있습니다.

배터리와 Joy-Con 하우징 사이에 여는 픽을 끼우세요. 테이프로 살짝 고정되어 있는 배터리를 조심히 들어 올리세요.

배터리를 변형하거나 구멍내지 않도록 주의하세요—배터리를 손상하면 화재가 발생하거나 폭발할 수 있습니다.

crwdns2944171:0crwdnd2944171:0crwdnd2944171:0crwdnd2944171:0crwdne2944171:0