crwdns2933423:0crwdne2933423:0

Retina MacBook 2015 バッテリー の交換

crwdns2931529:0crwdnd2931529:0crwdnd2931529:0crwdnd2931529:02crwdnd2931529:0crwdne2931529:0

crwdns2935425:016crwdne2935425:0

crwdns2936315:0crwdne2936315:0
crwdns2936323:0crwdne2936323:0
crwdns2931653:016crwdne2931653:0
Retina MacBook 2015 Battery Replacement: crwdns2935265:00crwdnd2935265:01crwdnd2935265:03crwdne2935265:0 Retina MacBook 2015 Battery Replacement: crwdns2935265:00crwdnd2935265:02crwdnd2935265:03crwdne2935265:0 Retina MacBook 2015 Battery Replacement: crwdns2935265:00crwdnd2935265:03crwdnd2935265:03crwdne2935265:0
  • Test your new battery's fit and alignment carefully before installing it.

  • Unlike most laptop batteries, the MacBook's battery is precisely contoured to fit the "terraced" shape of the lower case. Each cell must be correctly positioned, or the MacBook may not close correctly and damage may result.

  • Your replacement battery may come affixed to a thick plastic top liner to help keep the individual cells in position as you install it. Don't remove this liner until after the battery is installed.

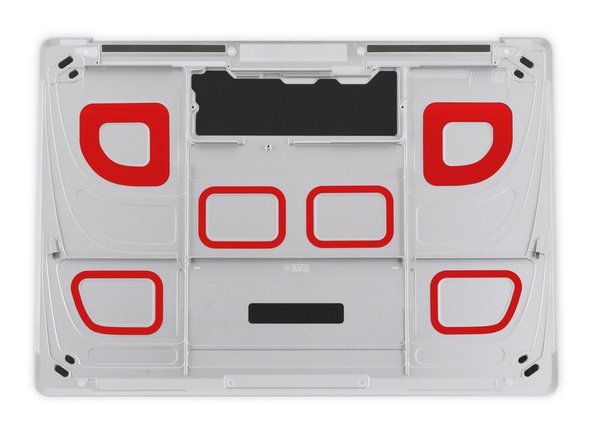
  • If your battery came with adhesive pre-installed on the bottom, peel away the bottom plastic liners to expose the adhesive. If your battery did not come with adhesive, apply a thin double-sided adhesive tape such as Tesa 61395 to the lower case in the areas marked in red.

  • Carefully position the battery and set it into place. Press and hold each cell firmly for 5-10 seconds to secure it to the lower case. Afterward, peel off the plastic top liner along with any foam padding.

新しいバッテーリを取り付ける前に、適合性と位置合わせを慎重に確認してください

ほとんどのラップトップバッテリーと異なり、MacBookのバッテリーは、下部ケースの「段付き」形状に合うように正確に輪郭が描かれています。各セルを正しく配置する必要があります。さもなくば、MacBookが正しく閉じられず、損傷する可能性があります

交換用のバッテリーは、厚いプラスチック製のトップライナーに貼り付けられ、取り付け時に個々のセルを所定の位置に保持するのに役立ちます。バッテリーを取り付けるまで、このライナーを取り外さないでください

バッテリー底面に接着剤が事前にインストールされている場合、プラスチックのライナーを剥がして接着面を露出させます。 バッテリーに接着剤が付いていない場合は、Tesa61395などの薄い両面接着テープを、赤色でマークされた領域の下部ケースに貼り付けます。

バッテリーを慎重に配置し、所定の位置にセットします。 各バッテリーセルを5〜10秒間しっかりと押して、下部ケースに固定します。 その後、フォーム製パッドと共にプラスチックの上部ライナーを剥がします。

crwdns2944171:0crwdnd2944171:0crwdnd2944171:0crwdnd2944171:0crwdne2944171:0