crwdns2933423:0crwdne2933423:0

Retina MacBook 2015 Akku tauschen

crwdns2931529:0crwdnd2931529:0crwdnd2931529:0crwdnd2931529:02crwdnd2931529:0crwdne2931529:0

crwdns2935425:016crwdne2935425:0

crwdns2936315:0crwdne2936315:0
crwdns2936319:0crwdne2936319:0
crwdns2931653:016crwdne2931653:0
Retina MacBook 2015 Battery Replacement: crwdns2935265:00crwdnd2935265:01crwdnd2935265:03crwdne2935265:0 Retina MacBook 2015 Battery Replacement: crwdns2935265:00crwdnd2935265:02crwdnd2935265:03crwdne2935265:0 Retina MacBook 2015 Battery Replacement: crwdns2935265:00crwdnd2935265:03crwdnd2935265:03crwdne2935265:0
  • Test your new battery's fit and alignment carefully before installing it.

  • Unlike most laptop batteries, the MacBook's battery is precisely contoured to fit the "terraced" shape of the lower case. Each cell must be correctly positioned, or the MacBook may not close correctly and damage may result.

  • Your replacement battery may come affixed to a thick plastic top liner to help keep the individual cells in position as you install it. Don't remove this liner until after the battery is installed.

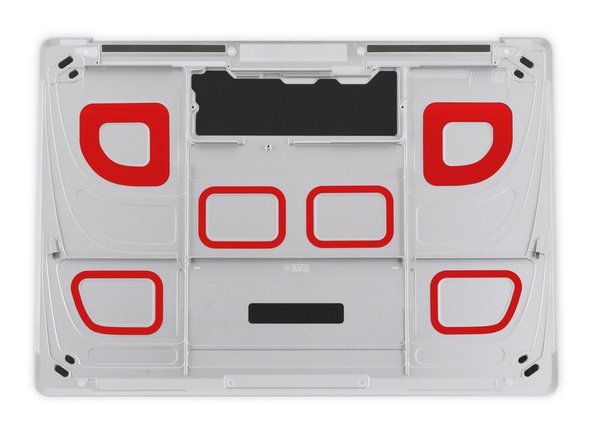
  • If your battery came with adhesive pre-installed on the bottom, peel away the bottom plastic liners to expose the adhesive. If your battery did not come with adhesive, apply a thin double-sided adhesive tape such as Tesa 61395 to the lower case in the areas marked in red.

  • Carefully position the battery and set it into place. Press and hold each cell firmly for 5-10 seconds to secure it to the lower case. Afterward, peel off the plastic top liner along with any foam padding.

Prüfe sorgfältig, ob dein neuer Akku gut passt und richtig ausgerichtet ist, bevor du ihn einbaust.

Im Gegensatz zu den meisten anderen Laptops, sind die Akkus des MacBook genau geformt, so dass sie in das "terassenartige" untere Gehäuse passen. Jede einzelne Zelle muss genau eingepasst werden, sonst schließt das MacBook nicht richtig und kann beschädigt werden.

Es kann sein, dass die einzelnen Zellen deines Ersatzakkus mit einer dicken Plastikfolie zusammengehalten werden, damit sie bei der Montage in der richtigen Position bleiben. Entferne diese Schutzfolie erst, wenn der Akku komplett eingebaut ist.

Wenn dein Akku auf der Bodenseite schon mit Klebestreifen versehen ist, dann kannst du jetzt die Schutzfolien abziehen, um die Klebeflächen freizulegen. Wenn keine Klebestreifen angebracht sind, dann befestige dünnes doppelseitiges Klebeband z.B. Tesa 61395 auf dem unteren Gehäuse in den rot markierten Bereichen.

Setze den Akku vorsichtig an den richtigen Stellen ein. Drücke jede einzelne Zelle gegen das untere Gehäuse und halte sie 5-10 Sekunden lang fest. Danach kannst du die obere Schutzfolie und etwas Schaumstoff ablösen.

crwdns2944171:0crwdnd2944171:0crwdnd2944171:0crwdnd2944171:0crwdne2944171:0