crwdns2933423:0crwdne2933423:0

HTC Vive Pro 拆解

crwdns2936315:0crwdne2936315:0
crwdns2936311:0crwdne2936311:0
crwdns2931653:09crwdne2931653:0
HTC Vive Pro Teardown: crwdns2935265:00crwdnd2935265:01crwdnd2935265:03crwdne2935265:0 HTC Vive Pro Teardown: crwdns2935265:00crwdnd2935265:02crwdnd2935265:03crwdne2935265:0 HTC Vive Pro Teardown: crwdns2935265:00crwdnd2935265:03crwdnd2935265:03crwdne2935265:0
  • After that brief board break, we continue our journey into the headset.

  • Now tethered by just two headphone interconnect cables, the headset is easily lifted away and set aside.

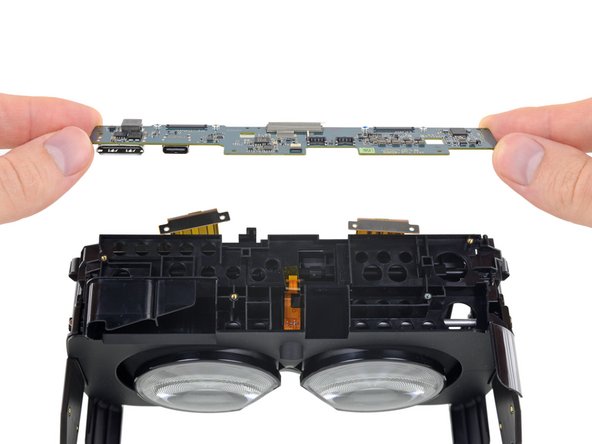
  • Where the original Vive kept nearly all its onboard silicon clustered onto a single board, the sequel uses two smaller boards. This daughterboard services the displays, I/O, and one or two other things we'll show you in just a moment.

  • While we are excited about the chips, we're a little bummed that the ports are still soldered to a board. Non-modular, high-stress components like ports can be a pricey repair.

  • This board also hosts the little linear potentiometer that formerly lived on its own FPC. That small slider tracks where you position the displays when making IPD adjustments.

扔开主板片刻,我们继续头显的旅程

现在只需断开两根耳机互连排线即可,头显很容易被拆开抬起并放在一边。

原来的Vive几乎将所有板载芯片集成在一块电路板上,继承者使用两块较小的电路板。这个子板为显示器,I / O,以及一两个我们稍后会告诉你的东西服务。

虽然我们对芯片感到兴奋,但我们对端口仍然焊接在主板上感到有些沮丧。诸如端口之类的非模块化高压部件可能会导致昂贵的维修费用。

该电路板还包含以前在FPC上的小型线性电位器。在进行IPD调整时,该小滑块会跟踪显示屏的位置。

crwdns2944171:0crwdnd2944171:0crwdnd2944171:0crwdnd2944171:0crwdne2944171:0