crwdns2933423:0crwdne2933423:0

HTC Vive Proの分解

crwdns2936315:0crwdne2936315:0
crwdns2936323:0crwdne2936323:0
crwdns2931653:09crwdne2931653:0
HTC Vive Pro Teardown: crwdns2935265:00crwdnd2935265:01crwdnd2935265:03crwdne2935265:0 HTC Vive Pro Teardown: crwdns2935265:00crwdnd2935265:02crwdnd2935265:03crwdne2935265:0 HTC Vive Pro Teardown: crwdns2935265:00crwdnd2935265:03crwdnd2935265:03crwdne2935265:0
  • After that brief board break, we continue our journey into the headset.

  • Now tethered by just two headphone interconnect cables, the headset is easily lifted away and set aside.

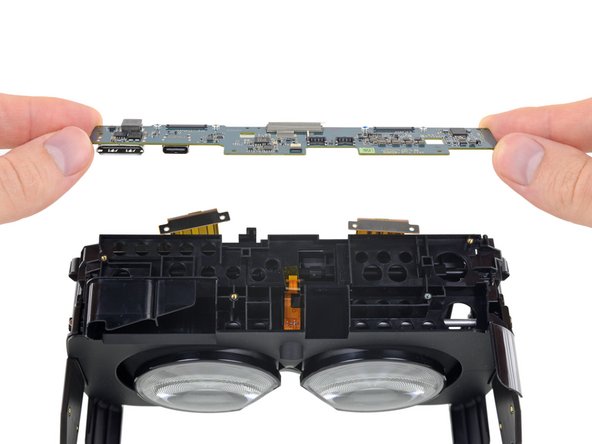
  • Where the original Vive kept nearly all its onboard silicon clustered onto a single board, the sequel uses two smaller boards. This daughterboard services the displays, I/O, and one or two other things we'll show you in just a moment.

  • While we are excited about the chips, we're a little bummed that the ports are still soldered to a board. Non-modular, high-stress components like ports can be a pricey repair.

  • This board also hosts the little linear potentiometer that formerly lived on its own FPC. That small slider tracks where you position the displays when making IPD adjustments.

基板の点検が終わったら、次にヘッドセットへの分解に移ります。

2つのヘッドホンインターコネクトケーブルで繋がれているため、ヘッドセットは簡単に持ち上がり外せます。

オリジナルのViveは1枚の基板の上にチップが綺麗に整列していましたが、この新モデルは2枚の小さくなった基板を使用しています。このドーターボード(サブ基板)はディスプレイ、I/O、このあとすぐ紹介するあるものに接続されています。

チップに感嘆する一方で、今回も基板に端子が半田付けされているため少しがっかりしています。使用頻度が高いのに非モジュール式の端子のようなコンポーネントの修理は高額になります。

この基板には、小さなリニアポテンショメータも搭載したFPC(フレキシブルプリント回路基板)も付いています。前モデルではこのFPCは独自の基板に付いていました。小さなスライダはIPD 調節をしながら、ディスプレイの位置を追跡します。

crwdns2944171:0crwdnd2944171:0crwdnd2944171:0crwdnd2944171:0crwdne2944171:0