crwdns2931529:0crwdnd2931529:0crwdnd2931529:0crwdnd2931529:06crwdnd2931529:0crwdne2931529:0
crwdns2935425:02crwdne2935425:0
crwdns2931653:02crwdne2931653:0


Release the Screen Assembly
-
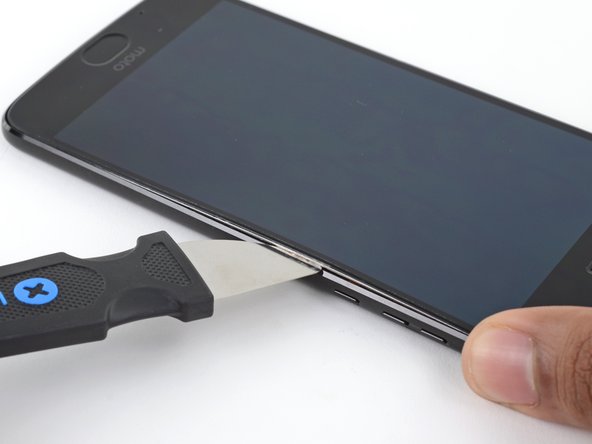
Insert a Jimmy or other metal tool between the right side of the plastic display and the metal frame, near the phone's side buttons.
-
Tilt the Jimmy downward while continuing to push it deeper into the gap to pry up the right side of the screen assembly.
| - | [* black] Wedge the plastic opening tool between the gap created by separating the screen and body of the phone in the right hand corner to hold it open. |
|---|---|
| - | [* black] Insert the nylon spudger into the lower left corner of the screen and pry the screen toward you. |
| - | [* black] Continue to insert the plastic opening and spudger tools around the phone, and pry open the screen until it is fully separated from the device. |
| - | [* icon_caution] Remove the screen gently and slowly as the screen may crack otherwise. |
| + | [title] Release the Screen Assembly |
| + | [* black] Insert a Jimmy or other metal tool between the right side of the plastic display and the metal frame, near the phone's side buttons. |
| + | [* icon_note] This may require a considerable amount of force. Push the tool as far down into the gap as you can, taking care to not scratch the chassis of your device in the process. |
| + | [* black] Tilt the Jimmy downward while continuing to push it deeper into the gap to pry up the right side of the screen assembly. |
| + | [* icon_caution] Since the display on top of the screen assembly is flexible and only attached with a slight amount of adhesive, you may end up prying up only the display instead of lifting the entire assembly. If this occurs, remove the tool and try again, this time using more downward force to get underneath the entire assembly. |
| + | [* icon_note] Ensure your tool is behind the entire screen assembly and not just the display. If done correctly, you should notice the thin silver metal midframe come up with the plastic display (as pictured). |
crwdns2944171:0crwdnd2944171:0crwdnd2944171:0crwdnd2944171:0crwdne2944171:0