crwdns2933423:0crwdne2933423:0

Retirez la station de nettoyage.

crwdns2931527:0crwdnd2931527:0crwdnd2931527:0crwdnd2931527:0crwdne2931527:0

crwdns2935425:01crwdne2935425:0

crwdns2936315:0crwdne2936315:0
crwdns2936317:0crwdne2936317:0
crwdns2931653:01crwdne2931653:0
Remove the cleaning station., Release the carriage support.: crwdns2935265:00crwdnd2935265:01crwdnd2935265:03crwdne2935265:0 Remove the cleaning station., Release the carriage support.: crwdns2935265:00crwdnd2935265:02crwdnd2935265:03crwdne2935265:0 Remove the cleaning station., Release the carriage support.: crwdns2935265:00crwdnd2935265:03crwdnd2935265:03crwdne2935265:0
Release the carriage support.
  • Remove the three screws from the bracket between the end of the carriage support and the case. Remove this bracket.

  • With clean hands or gloves, depress the sprung bracket on the right, and release the plastic sensor strip. Then undo it from the hook on the left side. Lay it over the print head, and secure it with a clean object.

  • It is essential that you do not crease, twist or soil this strip. Small amounts of ink can be removed with a mild solvent, such as isopropyl alcohol, but other solvents may remove the fine lines printed on it. It may be safer to remove it at this point, but it is hard to feed it back through the print head assembly.

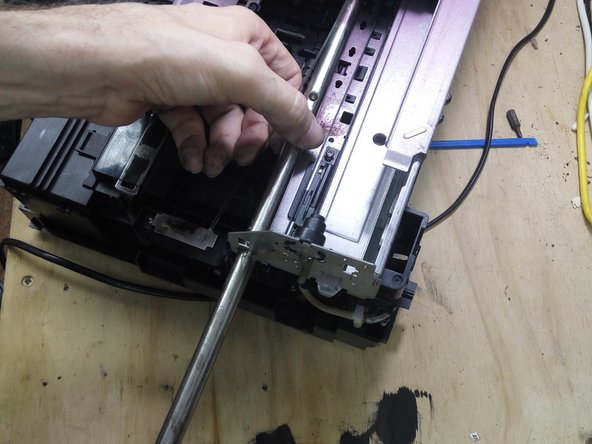
  • Remove the two bolts holding the steel rod to the chassis, and slide it out of the printer.

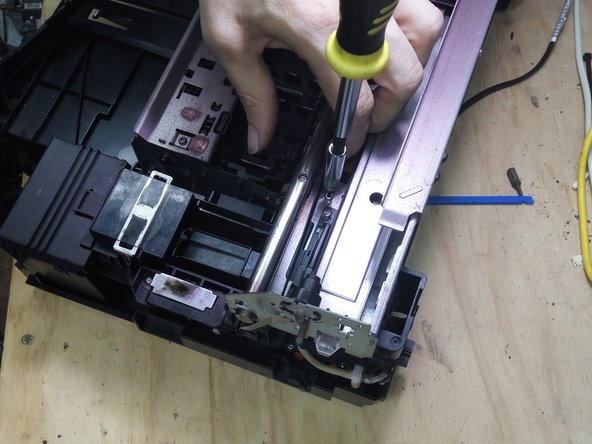
  • Undo the two bolts holding the right side of the carriage support.

  • The rear bolt is in a deep hole, so if you are using a bit set and handle, you will need to get creative!

Retirez les trois vis du support entre l'extrémité du support du chariot et le boîtier. Retirez ce support.

Avec des mains ou des gants propres, appuyez sur le support à ressort sur la droite et relâchez la bande de capteur en plastique. Ensuite, détachez-le du crochet sur le côté gauche. Placez-le sur la tête d'impression et fixez-le avec un objet propre.

Il est essentiel de ne pas froisser, tordre ou salir cette bande. De petites quantités d'encre peuvent être éliminées avec un solvant doux, tel que l'alcool isopropylique . Il peut être plus sûr de le retirer à ce stade, il est difficile de le réintroduire dans l'ensemble de tête d'impression.

Retirez les deux boulons retenant la tige en acier au châssis et faites-la glisser hors de l'imprimante.

Dévissez les deux boulons retenant le côté droit du support du chariot.

Le boulon arrière est dans un trou profond, donc si vous utilisez un jeu d'embouts et une poignée, vous devrez faire preuve de créativité !

crwdns2944171:0crwdnd2944171:0crwdnd2944171:0crwdnd2944171:0crwdne2944171:0