crwdns2915892:0crwdne2915892:0
Prerequisite only, loosen the battery from the rear case.
crwdns2942213:0crwdne2942213:0
-
-
Remove three 1.6 mm #000 Phillips screws securing the logic board to the rear case.
-
-
-
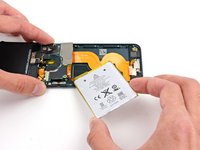
There are two strips of adhesive keeping the battery in place.
-
Turn the iPod over and heat the BACK of the aluminium iPod case. Do not heat the battery.
-
The aluminium case does not have to be hot; you should always be able to touch heated parts with your fingers at all times without it being uncomfortable.
Instead of a heat gun or hair dryer, I used a rice sock (http://www.wikihow.com/Make-a-Rice-Sock) to apply heat evenly across the entire back of the case while the case still sat upright for me to work on getting the battery loose. It was a lot easier than trying to heat the back of the case, then flip the case over and work feverishly before it cooled.
I'm sure this works, but it doesn't seem like the proper way to do this. I didn't like the feeling of prying on a flimsy battery at all. That's not practical. Instead get some molybdenum wire start it underneath the corners, then wrap the ends of the wire on like 2 pencils then tape them so u dont have to wrap the wire around your fingers because it will hurt lol. then apply heat, i went about 130 degrees is what my infrared gun said. I used a geat gun on low and a good distance away. Then just work the wire down the adhesive obviously lol. This worked out very easily for me and I felt safe and more confident about what I was doing. Good luck.
First of all, one of the strips is accessible with a pair of angled tweezers (bottom right of device). Second, where can we get replacement adhesive strips for the battery?
If you really don’t want to remove the battery, you may lift the mainboard slightly instead and disonnect display, back camera flexes and antenna connector. Then gently pull back camera module out of the seat. This gives you enough room to connect new display and back camera flexes. Back cam module would be hanging while you connect everything that got disconnected. Screw back the mainboard and push camera module to its seat.
Removing the battery is absolutely unnecessary. Its very likely the battery would be damaged during the removal… Similar to Slava up above, just lift the freaking motherboard up, disconnect the cables, and install the new display, easy.
-
-
-
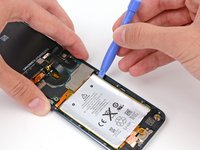
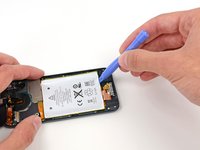
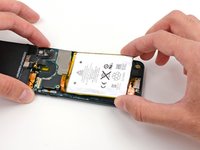
Insert a plastic opening tool into the top right notch and gently pry up on the battery.
-
-
-
-
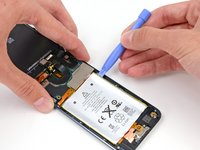
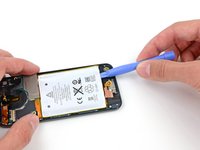
Continue with the lower right notch. Insert the plastic opening tool into the notch, and gently pry up on the side of the battery.
-
-
-
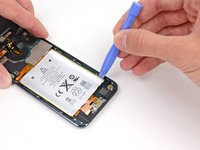
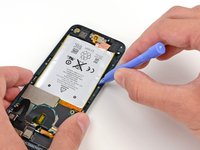
Continue prying the battery up from the bottom.
-
-
-
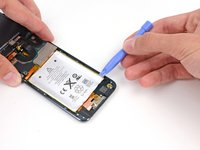
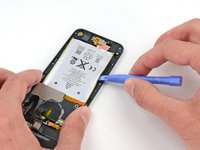
Once all of the adhesive is loosened, lift the battery up from the bottom and swing it out over the left side of the rear case.
-
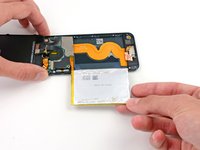
Flip the battery over to straighten its cable and set it down.
-


To reassemble your device, follow these instructions in reverse order.
To reassemble your device, follow these instructions in reverse order.
crwdns2935221:0crwdne2935221:0
crwdns2935227:0crwdne2935227:0

crwdns2947412:03crwdne2947412:0
You skipped steps.
This isn't even half of the procedure - the battery isn't even completely removed, much less replaced! Helpful but nowhere near complete.
Yeah, you might have skipped the most critical steps, like glass and bezel removal, desoldering, soldering etc..
Hi, the MPN on that WiFi flex confirms this is not an iPod Touch 6th gen, it is 5th Gen. I am trying to source a 6th Gen WiFi Flex.
Ricky Pohlman - crwdns2934203:0crwdne2934203:0