crwdns2915892:0crwdne2915892:0
Use this guide to replace your iPod Nano's outer casing.
crwdns2942213:0crwdne2942213:0
-
-
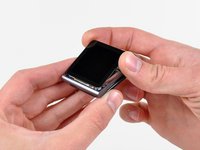
Use a heat gun or hair dryer to soften the adhesive securing the perimeter of the front panel assembly to the outer case.
-
-
-
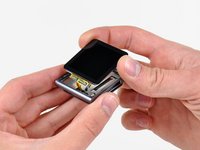
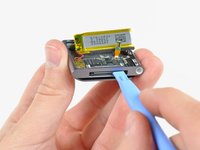
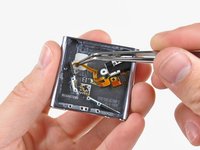
While the front panel is still warm, use the edge of an opening tool to pry it from the headphone jack side of the front panel assembly out of the Nano.
-
Continue prying the perimeter of the front panel assembly out of the outer casing, being careful not to damage the display data cable held under its left edge.
I strongly recommend using a Small Suction Cup (IF145-019-1) instead of a plastic opening tool.
After half an hour of various heating times, trying to use a plastic opening tool, I overheated the LCD, which caused it to discolour. Now I need to buy a new screen. I wish I'd thought to use a suction cup earlier; it seems so obvious in retrospect.
I used a hot water bottle with towelling cover, resting on it for about 5 minutes. glue softened at 45 degrees. enough to easily lift panel.. Ipod’s working temperate is 55 deg C max according to apple. I used IR heat gun for temperature check.
We have a temperature controlled testing oven at work. I set the oven for 50 degrees C, let it absorb heat for half an hour, then took it out. I had zero luck with either the plastic pry tool or the suction cup, so I carefully pried up the indicated side with the sharp pointed tip of a dental pick until I could get the plastic tool into the crack opening.
-
-
-
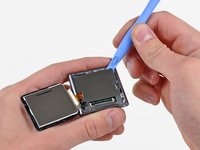
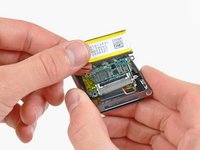
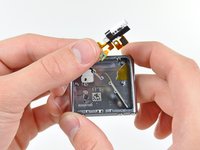
Lift the front panel assembly from the headphone jack side of the Nano.
-
Pull the front panel assembly slightly away from the left side of the Nano to clear the display data cable.
-
-
-
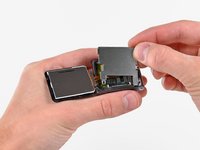
Lay the front panel assembly next to the Nano.
-
Remove the following two screws:
-
One 2.3 mm Phillips screw
-
One 2.6 mm shouldered Phillips screw
-
-
-
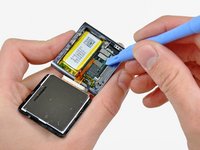
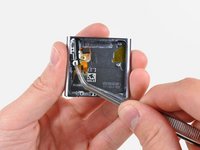
Use an opening tool to pry the steel shield out of the Nano by its upper right corner.
-
Remove the steel shield from the Nano.
Why does the steel shielding look like a DS cart (this isn't a real question)
-
-
-
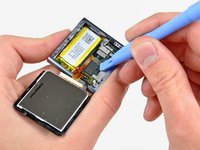
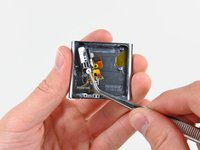
Use an opening tool to disconnect the display data and digitizer cable connectors up from their sockets on the logic board.
-
-
-
-
Remove the front panel assembly, minding its two cables that may get caught.
How come you did not put back the metal plate that goes between the iPod and the display?
You do put the steel shield back in to place and screw it down, but only after you connect the digitizer and display data cable connectors to their sockets on the logic board.
Does anyone have a current link to the screen adhesive tape product? The ebay link in the article is dead.
-
-
-
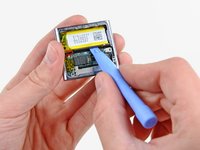
Use an iPod opening tool to lift the headphone jack assembly connector up and out of its socket on the logic board.
Hello.. I lost my jack connector and it still stay on logic board.. So what will i do? I cant remove it from logic board.. Please help me.. :(
-
-
-
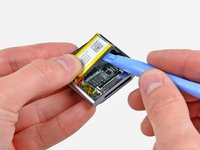
Remove the single 1.9 mm Phillips screw securing the logic board to the outer case.
-
-
-
Use an iPod opening tool to gently pry the battery up from the adhesive securing it to the outer case.
-
Use your thumb to pull the battery toward the left side of the Nano as you pry the battery's other edge out of the outer case.
-
-
-
Use an iPod opening tool to gently pry the logic board off the adhesive holding it against the outer case.
You need to be careful here, I used an opening pick because I felt like I needed something wider to pry the logic board up, and I sliced the headphone jack assembly connector... (the one disconnected in step 8) :(
-
-
-
Use your iPod opening tool to gently push the dock connector toward the center of the Nano.
-
Remove the logic board assembly from the Nano, being careful not to damage the headphone jack assembly cable.
very good directions. You lead only half way to the push button area. I have to try the rest of the way!
Good work!
-
-
-
Remove the following five screws:
-
One 1.7 mm Phillips screw
-
Four 3.9 mm Phillips screws.
-
-
crwdns2935267:0crwdne2935267:0Tweezers$4.99
-
Use a pair of tweezers to carefully pull the headphone jack toward the center of the Nano.
hello all.!!
i replaced the whole assembly (power, volume and headphones). Now my ipod is not getting ON. i followed the whole procedure as mentioned. Can anyone suggest me anymore.
-
-
-
Very carefully pull the headphone jack assembly ribbon cable toward the dock connector to separate the sleep and volume buttons from the outer case.
-
Remove the headphone jack assembly.
Note that on the two-button sub-frame (the left-hand piece secured by two of the four screws in Step 13) there are two tiny locating studs which must be aligned on the replacement wire ribbon.
Thank for providing the notice. It was perfect.
To make the way back, it is better to skew first the power button before the +/- volume buttons.
-
-
-
Remove the following three screws:
-
One black 1.8 mm Phillips screw
-
Two 1.7 mm Phillips screws
-
-
-
Remove the clip from the outer case.
-
Outer case remains.
-


To reassemble your device, follow these instructions in reverse order.
To reassemble your device, follow these instructions in reverse order.
crwdns2935221:0crwdne2935221:0
crwdns2935229:013crwdne2935229:0

crwdns2947412:02crwdne2947412:0
Step 9: This screw was missing on my iPod. It has been replaced by a rivet.
Where can I buy a housing in any color (other than pink) for my ipod nano?
Do I need new adhesive to reassemble?
David Wallin - crwdns2934203:0crwdne2934203:0
Make sure to not break this cable even if your backlight is out, there can be internal corrosion that prevents the backlight from working. It may still work with the old display.
Matthew Borgholthaus - crwdns2934203:0crwdne2934203:0