crwdns2933423:0crwdne2933423:0

iPhone 16 Pro Max Back Glass Removal

crwdns2862623:0crwdne2862623:0
crwdns2942641:0crwdne2942641:0

crwdns2942213:0crwdne2942213:0

  1. iPhone 16 Pro Max Back Glass Removal, Create a gap using a suction handle: crwdns2935265:01crwdnd2935265:01crwdnd2935265:01crwdne2935265:0
    crwdns2935267:0crwdne2935267:0
    iOpener
    $12.99
    • The next two steps show how to create an initial gap using a suction handle.

    • Use a hair dryer or heat gun to heat the bottom edge of the back glass until it's hot to the touch.

    • You can also use an iOpener to heat the back glass. Follow these instructions to heat and apply the iOpener properly.

  2. iPhone 16 Pro Max Back Glass Removal: crwdns2935265:02crwdnd2935265:01crwdnd2935265:03crwdne2935265:0 iPhone 16 Pro Max Back Glass Removal: crwdns2935265:02crwdnd2935265:02crwdnd2935265:03crwdne2935265:0 iPhone 16 Pro Max Back Glass Removal: crwdns2935265:02crwdnd2935265:03crwdnd2935265:03crwdne2935265:0
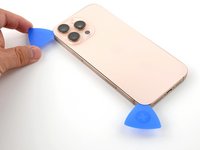
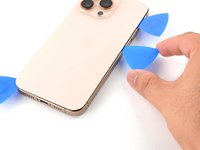
    • Apply a suction handle to the bottom edge of the back glass.

    • Pull up on the handle with strong, steady force to create a gap between the back glass and the frame.

    • If a gap doesn't appear, apply more heat to the edge and try again.

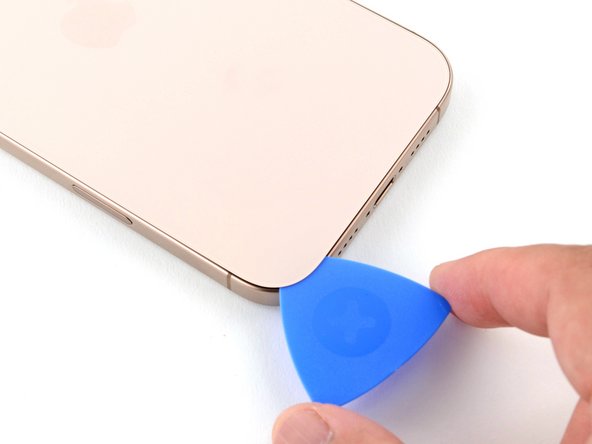
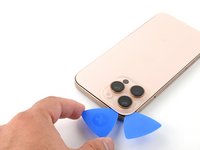
    • Insert the tip of an opening pick into the gap.

  3. iPhone 16 Pro Max Back Glass Removal, Back glass information: crwdns2935265:03crwdnd2935265:01crwdnd2935265:01crwdne2935265:0
    • As you slice the adhesive securing the back glass in the following steps, don't insert your pick deeper than 3 mm to avoid damaging the following areas:

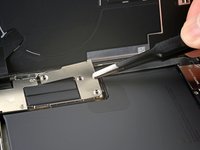
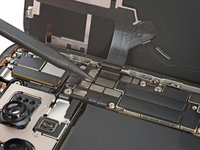
    • A delicate cable connecting the back glass to the iPhone, right next to the volume up button. Don't insert your pick here to avoid slicing the cable.

    • Multiple spring contacts around the perimeter of the iPhone.

  4. iPhone 16 Pro Max Back Glass Removal, Separate the bottom edge adhesive: crwdns2935265:04crwdnd2935265:01crwdnd2935265:02crwdne2935265:0 iPhone 16 Pro Max Back Glass Removal, Separate the bottom edge adhesive: crwdns2935265:04crwdnd2935265:02crwdnd2935265:02crwdne2935265:0
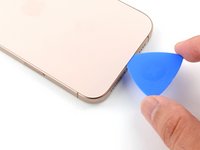
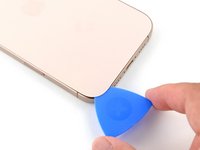
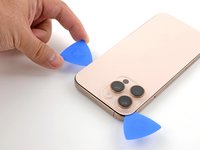
    • Slide the opening pick along the bottom edge to slice the adhesive.

    • If the adhesive feels difficult to slice, reheat the edge for a minute and try again.

    • Leave the opening pick in the bottom-left corner to prevent the adhesive from resealing.

  5. iPhone 16 Pro Max Back Glass Removal, Heat the left edge: crwdns2935265:05crwdnd2935265:01crwdnd2935265:01crwdne2935265:0
    • Use a hair dryer or heat gun to heat the left edge of the back glass until it's hot to the touch.

  6. iPhone 16 Pro Max Back Glass Removal, Separate the left adhesive: crwdns2935265:06crwdnd2935265:01crwdnd2935265:02crwdne2935265:0 iPhone 16 Pro Max Back Glass Removal, Separate the left adhesive: crwdns2935265:06crwdnd2935265:02crwdnd2935265:02crwdne2935265:0
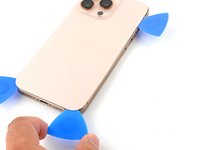
    • Insert a second opening pick into the bottom-left corner, close to the existing pick.

    • Don't insert your pick deeper than 3 mm to avoid damaging the spring contacts.

    • Slide your pick along the left edge to separate the adhesive and release the metal clips.

    • You'll hear and feel the metal clips release as you pass them.

    • Leave this pick inserted in the top-left corner to prevent the adhesive from resealing.

  7. iPhone 16 Pro Max Back Glass Removal, Heat the top edge and corner: crwdns2935265:07crwdnd2935265:01crwdnd2935265:01crwdne2935265:0
    • Use a hair dryer or heat gun to heat the top edge and top-right corner of the back glass until it's hot to the touch.

  8. iPhone 16 Pro Max Back Glass Removal, Separate the top adhesive: crwdns2935265:08crwdnd2935265:01crwdnd2935265:02crwdne2935265:0 iPhone 16 Pro Max Back Glass Removal, Separate the top adhesive: crwdns2935265:08crwdnd2935265:02crwdnd2935265:02crwdne2935265:0
    • Don't insert your pick deeper than 3 mm to avoid damaging the spring contacts.

    • Insert a third opening pick into the top-left corner.

    • Slide the opening pick along the top edge and around the top-right corner, stopping above the volume up button.

    • Leave this pick inserted to prevent the adhesive from resealing.

  9. iPhone 16 Pro Max Back Glass Removal, Heat the right edge: crwdns2935265:09crwdnd2935265:01crwdnd2935265:01crwdne2935265:0
    • Use a hair dryer or heat gun to heat the right edge of the back glass until it's hot to the touch.

  10. iPhone 16 Pro Max Back Glass Removal, Separate the right adhesive: crwdns2935265:010crwdnd2935265:01crwdnd2935265:02crwdne2935265:0 iPhone 16 Pro Max Back Glass Removal, Separate the right adhesive: crwdns2935265:010crwdnd2935265:02crwdnd2935265:02crwdne2935265:0
    • Don't insert your pick deeper than 3 mm to avoid damaging the spring contacts.

    • Insert a fourth opening pick into the bottom-right corner.

    • Slide the opening pick around the corner and up the right edge, stopping below the volume down button.

    • Leave this pick inserted to prevent the adhesive from resealing.

  11. iPhone 16 Pro Max Back Glass Removal, Reposition the back glass: crwdns2935265:011crwdnd2935265:01crwdnd2935265:03crwdne2935265:0 iPhone 16 Pro Max Back Glass Removal, Reposition the back glass: crwdns2935265:011crwdnd2935265:02crwdnd2935265:03crwdne2935265:0 iPhone 16 Pro Max Back Glass Removal, Reposition the back glass: crwdns2935265:011crwdnd2935265:03crwdnd2935265:03crwdne2935265:0
    • At this point, the back glass should be free from the frame. If the back glass feels stuck, go back around the perimeter with your pick to check for missed sections of adhesive or stuck clips.

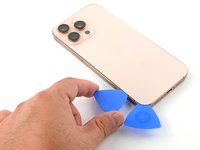
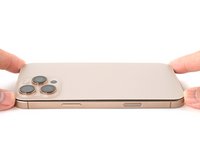
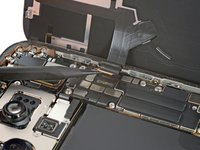
    • Swing open the back glass to the right of the iPhone to separate the remaining adhesive.

    • Support the back glass with a clean, sturdy object.

  12. iPhone 16 Pro Max Back Glass Removal, Remove the battery connector cover: crwdns2935265:012crwdnd2935265:01crwdnd2935265:01crwdne2935265:0
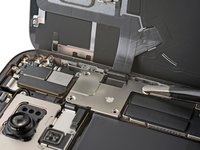
    • Use a tri-point Y000 driver to remove the three screws securing the battery connector cover:

    • Two 1.3 mm‑long screws

    • One 1.0 mm‑long screw

  13. iPhone 16 Pro Max Back Glass Removal: crwdns2935265:013crwdnd2935265:01crwdnd2935265:02crwdne2935265:0 iPhone 16 Pro Max Back Glass Removal: crwdns2935265:013crwdnd2935265:02crwdnd2935265:02crwdne2935265:0
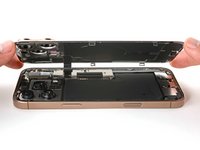
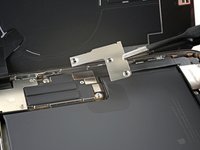
    • Lift and remove the battery connector cover.

  14. iPhone 16 Pro Max Back Glass Removal, Disconnect the battery: crwdns2935265:014crwdnd2935265:01crwdnd2935265:02crwdne2935265:0 iPhone 16 Pro Max Back Glass Removal, Disconnect the battery: crwdns2935265:014crwdnd2935265:02crwdnd2935265:02crwdne2935265:0
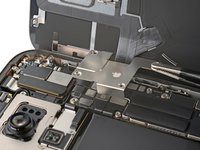
    • Use the point of a spudger to pry up and disconnect the battery press connector.

  15. iPhone 16 Pro Max Back Glass Removal, Remove the back glass connector cover: crwdns2935265:015crwdnd2935265:01crwdnd2935265:01crwdne2935265:0
    • Use a tri-point Y000 driver to remove the four screws securing the back glass connector cover:

    • Two 1.3 mm‑long screws

    • Two 1.0 mm‑long screws

  16. iPhone 16 Pro Max Back Glass Removal: crwdns2935265:016crwdnd2935265:01crwdnd2935265:02crwdne2935265:0 iPhone 16 Pro Max Back Glass Removal: crwdns2935265:016crwdnd2935265:02crwdnd2935265:02crwdne2935265:0
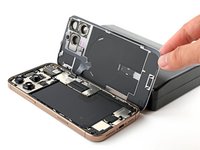
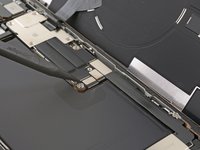
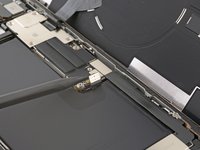
    • Lift the back glass connector cover straight up and remove it.

  17. iPhone 16 Pro Max Back Glass Removal, Remove the back glass: crwdns2935265:017crwdnd2935265:01crwdnd2935265:02crwdne2935265:0 iPhone 16 Pro Max Back Glass Removal, Remove the back glass: crwdns2935265:017crwdnd2935265:02crwdnd2935265:02crwdne2935265:0
    • Use the point of a spudger to pry up and disconnect the back glass connector.

  18. iPhone 16 Pro Max Back Glass Removal: crwdns2935265:018crwdnd2935265:01crwdnd2935265:01crwdne2935265:0
    • Remove the back glass.

crwdns2935217:0crwdne2935217:0

Arthur Shi

crwdns2935283:001/03/18crwdne2935283:0

283 790 crwdns2915208:0crwdne2915208:0

crwdns2935297:0587crwdne2935297:0

crwdns2915084:0crwdne2915084:0

iFixit crwdns2935289:0iFixitcrwdne2935289:0

Staff

crwdns2931471:0121crwdne2931471:0

crwdns2935297:019 671crwdne2935297:0

crwdns2947412:00crwdne2947412:0

crwdns2917038:0crwdne2917038:0

crwdns2936625:0crwdne2936625:0:

crwdns2936751:024crwdne2936751:0 4

crwdns2936753:07crwdne2936753:0 15

crwdns2936753:030crwdne2936753:0 104

crwdns2942667:0crwdne2942667:0 199