crwdns2942213:0crwdne2942213:0
-
crwdns2935201:0crwdne2935201:0 crwdns2935203:0crwdne2935203:0
-
Unplug all cables from your phone.
-
Hold the power and either volume button and slide to power off your phone.
-
-
crwdns2935201:0crwdne2935201:0 crwdns2935203:0crwdne2935203:0
-
If your screen or back glass is cracked, lay overlapping strips of packing tape over the glass to protect yourself and make disassembly easier.
-
-
crwdns2935201:0crwdne2935201:0 crwdns2935203:0crwdne2935203:0
-
Measure 3 mm from the tip and mark the opening pick with a permanent marker.
-
-
crwdns2935201:0crwdne2935201:0 crwdns2935203:0crwdne2935203:0
-
Use a P2 pentalobe screwdriver to remove the two 7 mm‑long screws on either side of the charging port.
-
-
crwdns2935201:0crwdne2935201:0 crwdns2935203:0crwdne2935203:0
-
Use a hair dryer or heat gun to heat the bottom edge of the back glass until it's hot to the touch.
-
-
crwdns2935201:0crwdne2935201:0 crwdns2935203:0crwdne2935203:0
-
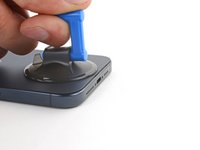
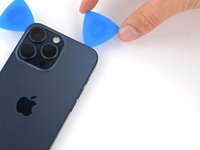
Apply a suction handle to the bottom edge of the back glass.
-
Pull up on the handle with a strong, steady force to create a gap between the back glass and the frame.
-
Insert the tip of an opening pick into the gap.
-
-
-
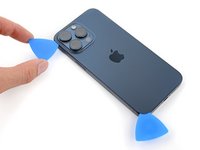
crwdns2935201:0crwdne2935201:0 crwdns2935203:0crwdne2935203:0
-
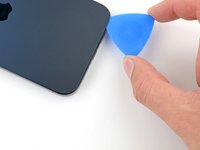
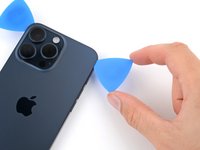
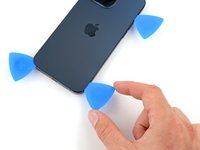
Slide your pick back and forth along the bottom edge to separate the adhesive.
-
Leave your pick inserted in the bottom left corner to prevent the adhesive from re-sealing.
-
-
crwdns2935201:0crwdne2935201:0 crwdns2935203:0crwdne2935203:0
-
Heat the left edge of the back glass until it's hot to the touch.
-
-
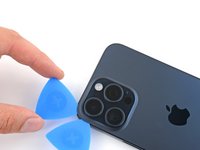
crwdns2935201:0crwdne2935201:0 crwdns2935203:0crwdne2935203:0
-
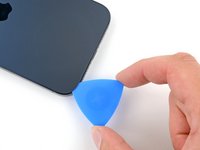
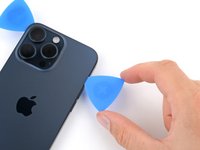
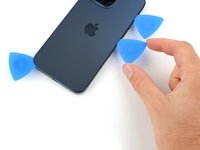
Insert a second opening pick to the left of the first one.
-
Slide this pick to the top left corner of the back glass to separate the left edge adhesive.
-
Leave this pick inserted to prevent the adhesive from resealing.
-
-
crwdns2935201:0crwdne2935201:0 crwdns2935203:0crwdne2935203:0
-
Heat the top edge of the back glass until it's hot to the touch.
-
-
crwdns2935201:0crwdne2935201:0 crwdns2935203:0crwdne2935203:0
-
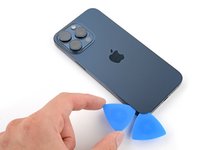
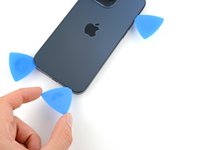
Insert a third opening pick in the top left corner of the back glass.
-
Slide your pick to the top right corner to separate the top edge adhesive.
-
-
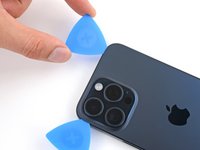
crwdns2935201:0crwdne2935201:0 crwdns2935203:0crwdne2935203:0
-
Rotate your pick around the top right corner of the back glass.
-
Slide your pick to the volume up button.
-
Leave this pick in place to prevent the adhesive from resealing.
-
-
crwdns2935201:0crwdne2935201:0 crwdns2935203:0crwdne2935203:0
-
Heat the right edge of the back glass until it's hot to the touch.
-
-
crwdns2935201:0crwdne2935201:0 crwdns2935203:0crwdne2935203:0
-
Insert a fourth opening pick at the bottom edge of the back glass.
-
Rotate your pick around the bottom right corner of the back glass.
-
Slide your pick to the volume down button.
-
-
crwdns2935201:0crwdne2935201:0 crwdns2935203:0crwdne2935203:0
-
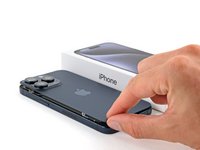
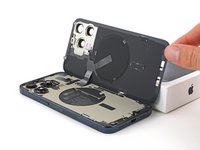
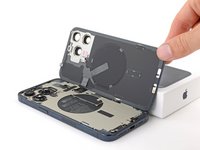
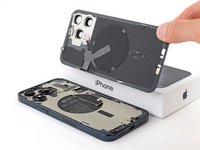
Gently swing open the back glass over the right edge of the phone.
-
Rest the back glass against a box or similar object so it doesn't strain the cable.
-
-
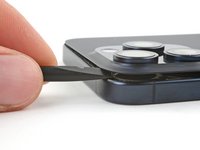
crwdns2935201:0crwdne2935201:0 crwdns2935203:0crwdne2935203:0
crwdns2935267:0crwdne2935267:0Tweezers$4.99-
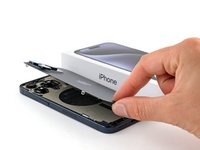
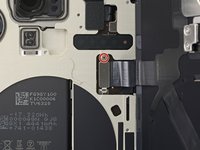
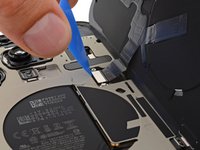
Use a tri-point Y000 driver to remove the 1.0 mm screw securing the wireless charging connector cover.
-
Use tweezers to slide the cover out of its slot on the logic board and remove it.
-
-
crwdns2935201:0crwdne2935201:0 crwdns2935203:0crwdne2935203:0
-
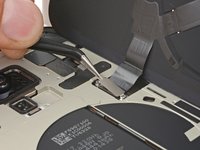
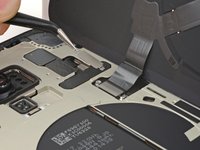
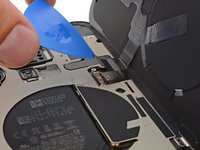
Use the tip of an opening pick to pry up and disconnect the wireless charging coil press connector.
-


crwdns2935221:0crwdne2935221:0
crwdns2935229:012crwdne2935229:0


crwdns2947412:011crwdne2947412:0
Dont understand why Apple used all-glueed back glass earlier.
Is the flash camera still tied to the motherboard?
The flash unit is glued to the back glass, along with the wireless charging coil. The rear cameras are accessible by entering through the screen.
Wo bekomme ich denn eine solche Rückseite her?
does ifixit sell parts for this?