crwdns2915892:0crwdne2915892:0
Follow this guide to replace the battery on an iPad mini 5 Wi-Fi. You may need to do this if the battery is no longer holding a charge as well as it used to.
For your safety, discharge the battery below 25% before disassembling your device. This reduces the risk of a dangerous thermal event if the battery is accidentally damaged during the repair. If your battery is swollen, take appropriate precautions.
Some photos in this guide are from a different model and may contain slight visual discrepancies, but they won't affect the guide procedure.
crwdns2942213:0crwdne2942213:0
-
-
If your display glass is cracked, keep further breakage contained and prevent bodily harm during your repair by taping the glass.
-
Lay overlapping strips of clear packing tape over the iPad's display until the whole face is covered.
-
Do your best to follow the rest of the guide as described. However, once the glass is broken, it will likely continue to crack as you work, and you may need to use a metal prying tool to scoop the glass out.
-
-
-
Heat an iOpener and apply it to the left edge for two minutes.
-
-
-
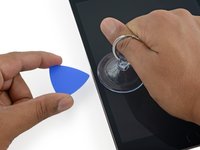
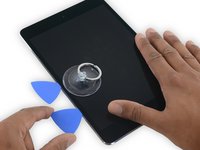
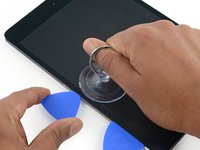
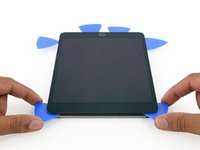
Apply a suction cup halfway up the heated side.
-
Be sure the cup is completely flat on the screen to get a tight seal.
-
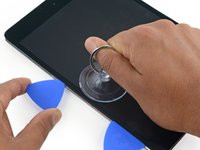
While holding the iPad down with one hand, pull up on the suction cup with strong, steady force to create a gap.
-
-
-
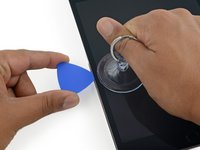
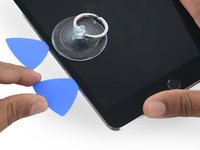
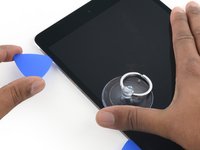
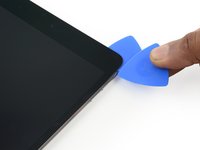
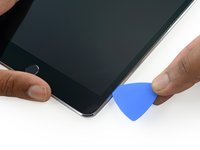
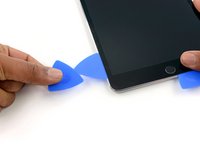
While holding the glass up with the suction cup, insert the point of an opening pick into the gap between the glass and body of the iPad.
“Don't insert the opening pick any deeper than the black bezel on the side of the display. Inserting the pick too far may damage the LCD.”
Unfortunately, you only know you have inserted it too far when you have, and you start seeing little bubble veins form between the glass screen and the LCD.
The adhesive can be very stiff/hard, and if pushing through it can result in the pick plunging into the LCD when the adhesive finally gives way.
Take your time, use alot of heat, and if you need to try and push the pick in, try and do so in a slicing motion along the edge, use the wide edge, or hold the pick so that your finger will hit the edge of the screen before the pick tip will pass the bezel.
Adhesive strips are only 1mm wide on sides. Up to 5mm wide top and bottom. I used the Isclack. Screen seemed ok bending without breaking. Worth looking for a photo of the replacement adhesive strips so you know what you have to separate. Be extra careful at the lower right corner where the cables are.
This is a failure of a guide as it doesn’t tell you to insert at a downward angle so you don’t potrude into the LCD… Now I have to spend more money to replace the screen as I pushed adhesive between the LCD and the screen even though I went no farther than a millimeter short of the screen...
can you open the right side if the left is too cracked to use a suction cup on?
This guide needs amending urgently.
You MUST NOT put the pick or whatever you are using more than 2mm under the sides of the screen, or you will cut through the adhesive tape securing the backlight assembly to the LCD glass.
This will push adhesive into the viewable area of the LCD and cause the backlight assembly to no longer be secured against the LCD fully.
I now need a new screen.
This line below from the guide is absolutely INCORRECT and will ruin your expensive display:
”Don't insert the opening pick any deeper than the black bezel on the side of the display.”
The black bezel is 5mm to 6mm wide; you MUST NOT insert anything to that depth or you will destroy your display. 2mm maximum!
thanks. will take this into account for my repair
Adab Abu -
I too damaged my display because of this absolute nonsense (The German version, which I used, still had this INCORRECT portion in it). I can't believe how long it took iFixit to update this, even though people have been reporting this for years on end. Sadly iFixit still haven't updated a variety of other things that are still at the very least high risk instructions. I just messaged them the other day, but they don't seem to care about or understand the remaining issues that this guide has. At least they updated one of the most severe things, but they just plainly told me 'I'm wrong' about the rest. I liked iFixit it so far, and I've worked on a variety of (difficult) repairs - but this experience was a very huge let down.
A few thoughts after opening a number of Mini 4’s.
1) if the display is warm enough you can squeeze the digitizer and LCD back together after a minor incursion with the opening pick and it will reseal.
2) I’ve started going in at the top just to the right of the camera (I use an iFlex to get in then switch to a pick). Then I run down either side with my fingers choked up on the pick so there only a mm or 2 sticking out. Usually after running down one side, I can get the display open enough to get the pick in behind the LCD when I do the other side
-
-
-
Reheat and reapply the iOpener to the left edge for a few minutes.
If your iPad is cold, consider leaving the iOpener on for longer than 5 minutes. The aluminum housing is a very large thermally dissipating mass and will quickly cool off the glass and make you have to start over and wait the 10 minutes to reheat. There’s a very slim window in which you’re able to insert the pick into the glass adhesive before it solidifies once again. I’ve been fighting with it for like 20 minutes following these instructions and it’s not working. You really need to leave it for longer than just 5 minutes to get the back housing hot too.
Heat is essential. I used a 3d printer’s heated set at 65 degrees. Chris Storer’s stip above saved me as you really need to let it sit for quite a while to soften the adhesive. Since I was doing a battery change, I heated both sides as the aluminum back is a huge heatsink that really sucks up the heat. Don’t try forcing it; if the suction cup isn’t pulling a gap in the screen, leave it on the heater for additional time.
Love the 3d printer idea, I hadn’t thought of that! I have used a heat gun as well but you have to be very careful to not use too much heat. Also watch for inserting the pick too far, it is really easy to delaminate glass from the display!
russ -
-
-
-
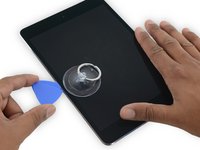
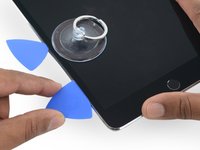
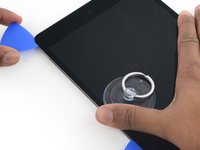
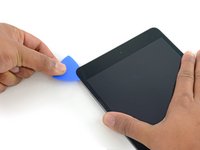
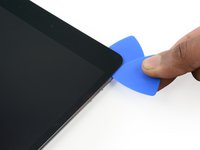
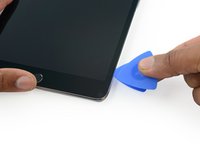
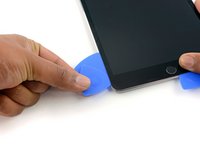
Insert a second opening pick alongside the first and slide the pick down along the edge of the iPad, releasing the adhesive as you go.
I have found that wedging a blue pry tool in between the frame and the glass can give you a better edge enough to slide the pick in.
-
-
-
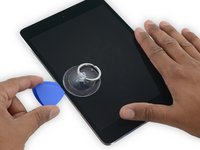
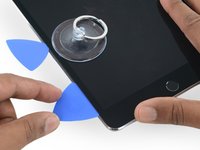
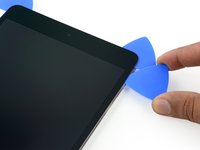
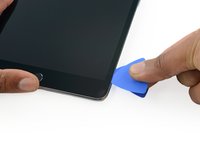
Continue moving the opening pick down the side of the display to release the adhesive.
-
If the opening pick gets stuck in the adhesive, "roll" the pick along the side of the iPad, continuing to release the adhesive.
-
-
-
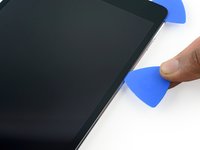
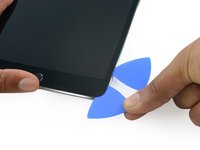
Take the first pick you inserted and slide it up toward the top corner of the iPad.
-
-
-
Reheat the iOpener and place it on the top edge of the iPad, over the front-facing camera.
-
If you have a flexible iOpener, you can bend it to heat both the upper left corner and the upper edge at the same time.
-
-
-
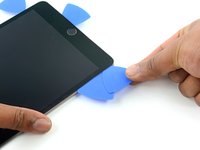
Slide the opening pick around the top left corner of the iPad to separate the adhesive.
-
-
-
Slide the opening pick along the top edge of the iPad, stopping just before you reach the camera.
-
As you reach the front-facing camera, pull the pick out slightly and continue sliding it across the top edge.
-
-
-
Leave the opening pick in the iPad slightly past the front-facing camera.
-
Take a second pick and insert it to the left of the camera, where the first pick just was. Slide it back to the corner to completely cut any remaining adhesive.
-
Leave the second pick in place to prevent the corner adhesive from re-sealing as it cools.
-
-
-
Insert the previous pick deeper into the iPad and slide it away from the camera toward the corner.
-
-
-
-
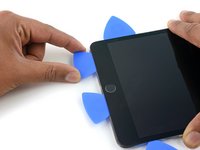
Leave the three picks in the corners of the iPad to prevent re-adhering of the front panel adhesive.
-
Reheat the iOpener and place it on the remaining long side of the iPad—along the volume and lock buttons.
-
-
-
Insert a new opening pick and slide it down the right edge of the iPad, releasing the adhesive as you go.
-
-
-
Continue sliding the opening pick down the right edge of the iPad, reheating the edge using an iOpener if necessary.
-
-
-
Leave the opening picks in place and reheat the iOpener.
-
Set the reheated iOpener on the home button end of the iPad and let it rest for a few minutes to soften the adhesive beneath the glass.
-
-
-
Insert a new opening pick at the bottom right corner of the display, below the last opening pick you used to slice down the right edge.
-
Rotate the new pick around the lower right corner of the device.
-
-
-
Slide the pick from the bottom right corner along the lower edge of the device. Stop about half an inch shy of the home button.
-
-
-
Insert a final opening pick at the lower left corner of the iPad, directly below the existing one.
-
-
-
Slide the pick around the lower left edge of the iPad.
-
-
-
Continue sliding the pick at the lower left edge of the display toward the center of the iPad, until it is roughly half an inch from the home button.
-
-
-
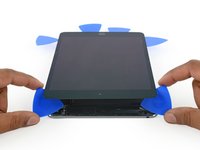
Twist the two picks at the top edge of the iPad to break up the last of the adhesive holding the display assembly in place.
-
Lift the display from the top edge to open the device.
"Twist the two picks at the top edge of the iPadTwist the two picks at the top edge of the iPad "
When I did this twisting motion, and I thought I was being gentle, one of the picks cracked nearly in half. That adhesive is very strong! I probably did not cut into it far enough before applying the twisting to open the screen.
-
-
-
To avoid stressing any cables, hold the screen perpendicular to the frame.
-
-
crwdns2935267:0crwdne2935267:0Magnetic Project Mat$19.95
-
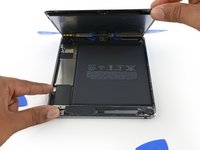
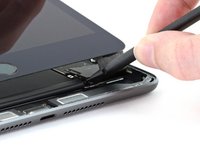
Use a Phillips screwdriver to remove the two 1.3 mm screws securing the display cable bracket.
-
-
-
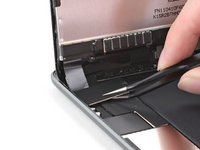
Lower the screen to about 30 degrees above the frame.
-
-
-
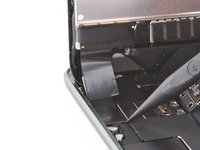
Insert the flat end of a spudger under the display cable bracket and lift up to disconnect the battery press connector from the logic board.
The guide says "Don't try to remove the display cable bracket as it's attached to the battery by the battery cable.Don't try to remove the display cable bracket as it's attached to the battery by the battery cable.".
Well then, please explain how to attach a new battery since my battery does not come with an attached display cable bracket. This point caused me a lot of confusion and finally I removed the bracket and installed it on the new battery. But the question remains about exactly what is the required steps.
The bracket has conductive material fixed to the underside but the part that goes on the battery connector has a separate piece of adhesive which may or may not serve as to insulate. Without any available guidance, I installed the battery cable and the top of it rests on the conductive material, apparently providing a ground bond between the other 3 connectors and the bracket.
More information should be provided here.
Hello! I was just wondering if you also took the bracket off of the battery cable, and it still worked for you, correct? I was scared that i tore it off or something, but it appears that it can be detached, but you can't just pull it off, you need to do so very carefully. Also, do you think that the ipad wouldn't power up properly, if it were missing that bracket? Thanks, in advance, for your assistance.
-
-
crwdns2935267:0crwdne2935267:0Tweezers$4.99
-
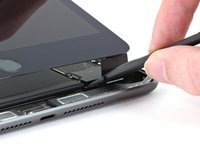
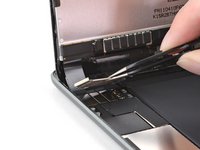
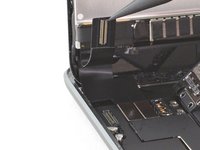
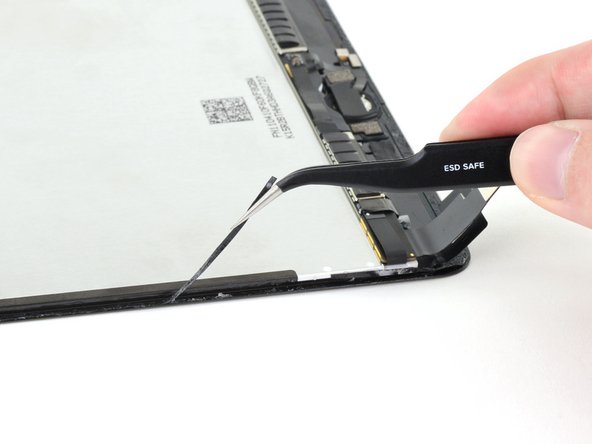
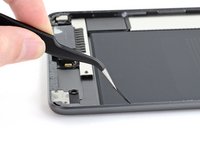
Use a pair of tweezers to pull the display cable bracket's clip out from under the frame's edge.
-
Rotate the display cable bracket toward the battery.
-
-
-
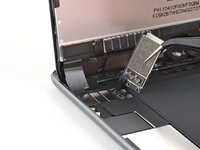
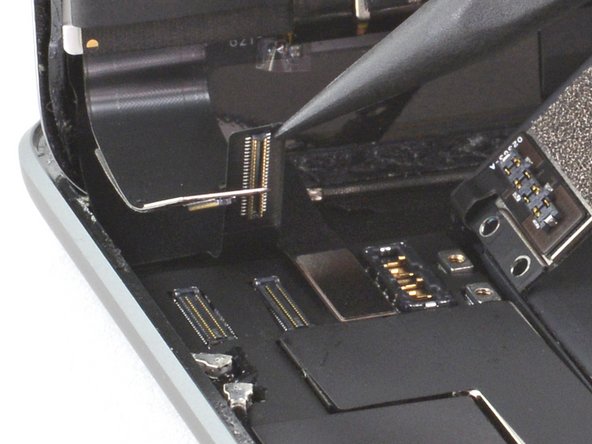
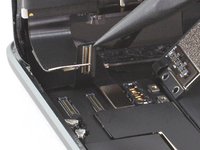
Use the pointed end of a spudger to disconnect the digitizer press connector from the logic board.
-
-
-
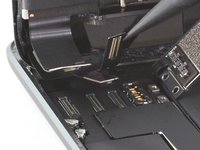
Use the pointed end of a spudger to disconnect the second and third display press connectors.
-
-
-
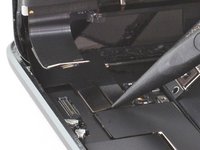
Lift and remove the screen.
-
-
-
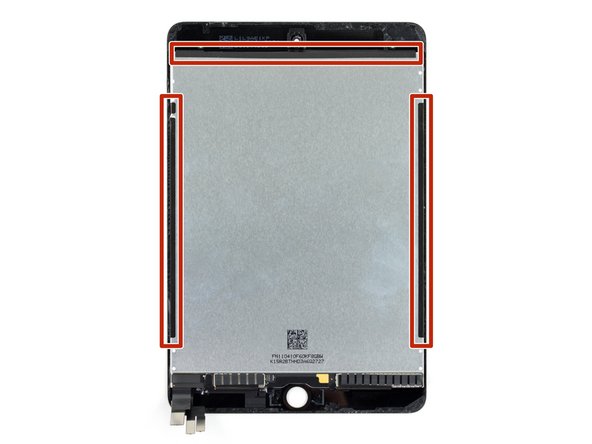
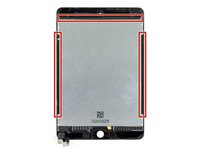
Don't remove the black tape on the left, right, and upper edges of the display. These hold the display to the front glass.
-
-
crwdns2935267:0crwdne2935267:0Plastic Cards$2.99
-
The adhesive is laid out as shown: two strips along the long edges, and two shorter strips perpendicular in the center.
-
-
-
Apply a few drops of high-concentration (90% or higher) isopropyl alcohol around the perimeter of the battery.
-
Wait two minutes for the isopropyl alcohol to weaken the adhesive underneath the battery.
I used the method shown in these steps but later on I reviewed battery removal of a iPad 4 mini. That guide used the iOpener on the backside of the case. That seems like a good idea to me and wish I had checked that out before going to step 35.
-
-
-
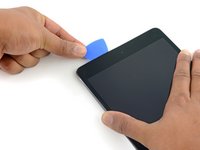
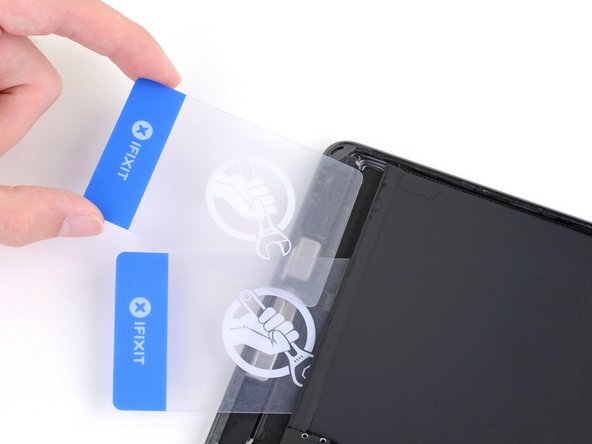
Insert the corner of a plastic card between the lower end of the battery and the frame.
-
Press the card until approximately an inch and a half of it is underneath the battery.
-
-
-
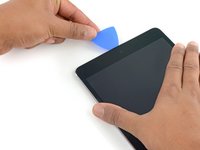
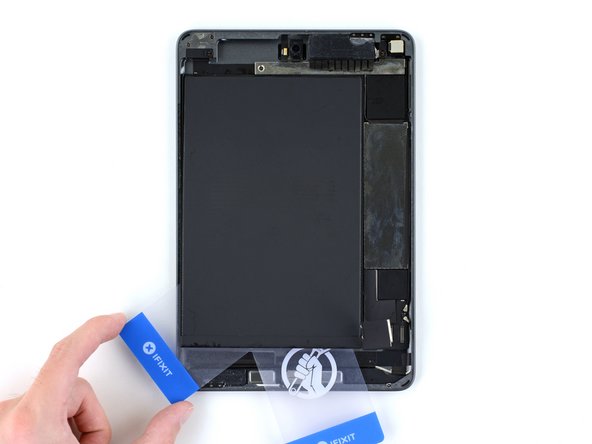
Insert a second plastic card between the battery and first card, this time with the card edge parallel to the battery.
-
Press the card in until about an inch and a half of it is underneath the battery.
-
-
-
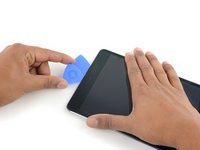
Rotate the second plastic card around the bottom left corner under the battery.
-
Slide the second plastic card up the left edge of the battery toward the top left corner.
-
-
-
Lift and remove the battery.
-
Remove the old adhesive and residue from the battery well.
-
If your replacement battery doesn't come with replacement adhesive, apply stretch release adhesive strips, double sided adhesive tape, or pre-cut adhesive in the iPad's battery well.
-
Peel away any tape liners to expose the adhesive.
-
Lay the battery on the adhesive and press firmly.
I have not seen any info in this guide about removing the battery connector from the underside of the display bracket. I wonder if all I need to do is pull it off (which is what I did) but is that just sticky tape under or is it conductive and necessary for proper operation?
Hello, I have the same exact ?. Were you able to get an answer? I have an ipad mini 5th gen, and I have replaced the battery, and the display, with no luck, however, I don't believe I put the bracket on when attempting to power it on, because I was just testing it, but now I am going to try it fully assembled.
Yes, you have to remove the old battery connector from the display bracket. Being very careful not to cut yourself, simply use a razor blade (single edge preferred) to slice through the foam sticky stuff holding the connect to the bracket. Then connect the battery to the iPad mini 5 WiFi and reinstall the display using the original bracket to keep everything connected. Fiddly? Yep. Take your time.
jscott, June 3, 2025
-


Compare your new replacement part to the original part—you may need to transfer remaining components or remove adhesive backings from the new part before installing.
For optimal performance, calibrate your newly installed battery after completing this guide.
To reassemble your device, follow these instructions in reverse order.
Take your e-waste to an R2 or e-Stewards certified recycler.
Repair didn’t go as planned? Try some basic troubleshooting, or ask our iPad mini 5 Answers community for help.
crwdns2935221:0crwdne2935221:0
crwdns2935229:09crwdne2935229:0

crwdns2947412:03crwdne2947412:0
This whole battery replacement took more than 4 hours. Most of the time was devoted to cleaning the surfaces on both halves of the iPad. The other reason for the time of repair is probably due to my age (mid-70's) and the poor dexterity and eyesight that comes with old age. I bought the appropriate adhesive strips to bond the top case to the bottom but the instructions left much to my imagination. The 3 pieces adhesive installation needs to be updated to match their currently available product.
Thanks, I’m 82. I’ve replaced the battery in my iPhone so I’m somewhat familiar with the general process. I’ll need to fix the iPad mini when my wife isn’t playing her games - hope I can get it done before she starts having withdrawal!
I followed the tutorial to repair my iPad Mini 5, and it’s as good as new. Removing the display was tricky—I used a hairdryer to soften the adhesive, a suction cup to lift the screen, and a plastic card to carefully separate the frame. I disconnected the display and power connectors. Removing the battery was challenging due to the strong adhesive, but with patience and multiple applications of 99% Isopropyl alcohol, I managed to remove it without damage. Apple’s adhesive choices remain puzzling, but the repair was a success. iFixit´s black glue set (to glue the display to the frame) did not work for me. "Luckily" there was some old glue residue on the frame, so the display stays in place for now. I contacted customer service about the black glue kit.