
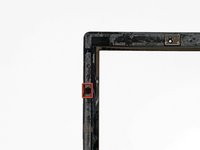
iPad 3 4G Logic Board Replacement

crwdns2944107:0crwdnd2944107:0Brett Harttcrwdnd2944107:0crwdnd2944107:0crwdnd2944107:04crwdnd2944107:0crwdne2944107:0
crwdns2944111:0Mud 6, 2024crwdne2944111:0
crwdns2915892:0crwdne2915892:0
crwdns2942287:0crwdne2942287:0Use this guide to replace the logic board.
crwdns2942213:0crwdne2942213:0
crwdns2943213:0crwdne2943213:0


crwdns2943215:0crwdne2943215:0


crwdns2944105:0crwdne2944105:0

-
-
Place the iOpener in the center of the microwave.
-
-
-
Heat the iOpener for thirty seconds.
-
Throughout the repair procedure, as the iOpener cools, reheat it in the microwave for an additional thirty seconds at a time.
-
-
-
Remove the iOpener from the microwave, holding it by one of the two flat ends to avoid the hot center.
-
-
-
Fill a pot or pan with enough water to fully submerge an iOpener.
-
Heat the water to a boil. Turn off the heat.
-
Place an iOpener into the hot water for 2-3 minutes. Make sure the iOpener is fully submerged in the water.
-
Use tongs to extract the heated iOpener from the hot water.
-
Thoroughly dry the iOpener with a towel.
-
Your iOpener is ready for use! If you need to reheat the iOpener, heat the water to a boil, turn off the heat, and place the iOpener in the water for 2-3 minutes.
-
-
-
If your display glass is cracked, keep further breakage contained and prevent bodily harm during your repair by taping the glass.
-
Lay overlapping strips of clear packing tape over the iPad's display until the whole face is covered.
-
Do your best to follow the rest of the guide as described. However, once the glass is broken, it will likely continue to crack as you work, and you may need to use a metal prying tool to scoop the glass out.
-
-
-
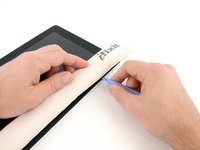
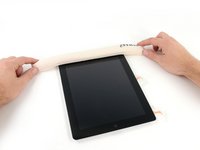
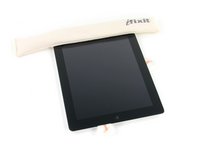
Lay the iOpener flat on the right edge of the iPad, smoothing it out so that there is good contact between the surface of the iPad and the iOpener.
-
Let the bag sit on the iPad for approximately 90 seconds before attempting to open the front panel.
-
-
-
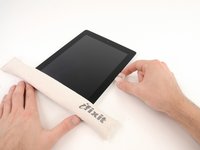
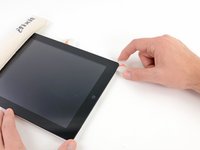
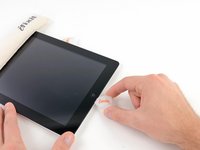
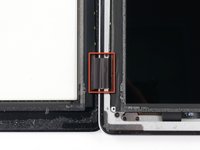
There is a small gap in the iPad's adhesive ring in the upper right corner of the iPad, approximately 2.0 inches (~5 cm) from the top of the iPad. You are going to exploit this weakness.
-
Align the tool with the mute button. Insert the tip of a plastic opening tool into the gap between the front glass and the plastic bezel. Just insert the very tip of the opening tool, just enough to widen the crack.
-
-
-
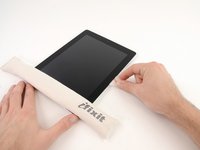
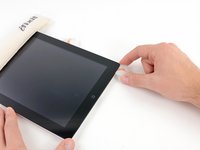
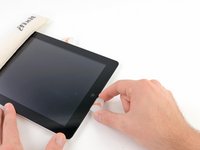
Make sure you place the tool in the proper spot—between the plastic display bezel and the front panel glass.
-
-
-
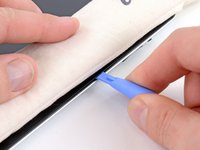
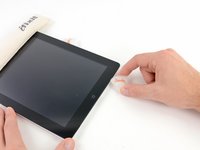
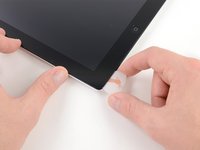
Keeping the tip of the plastic opening tool wedged between the front glass and plastic bezel, slide a plastic opening pick in the gap, right next to the plastic opening tool.
-
-
-
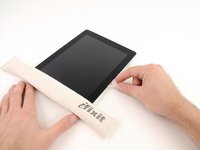
Remove the plastic opening tool from the iPad, and push the opening pick further underneath the front glass to a depth of ~0.5 inches.
-
-
-
While you work on releasing the adhesive on the right side of the iPad, reheat the iOpener, and replace it on the bottom edge of the iPad.
-
-
-
While the bottom edge is being heated by the iOpener, begin releasing the adhesive from the right edge of the iPad.
-
Slide the opening pick down along the edge of the iPad, releasing the adhesive as you go.
-
-
-
If the opening pick gets stuck in the adhesive, "roll" the pick along the side of the iPad, continuing to release the adhesive.
-
-
-
Before removing the first opening pick from the bottom corner of the iPad, insert a second pick under the right edge of the front glass to keep the adhesive from re-adhering.
-
Re-heat the iOpener, and move it to the top edge of the iPad.
-
-
-
You will have to release the adhesive securing the antenna to the front panel without damaging the delicate parts attaching the antenna to the bottom of the iPad. Follow the next steps carefully.
-
-
-
Slide the opening pick around the bottom right corner of the iPad, releasing the adhesive there.
-
-
-
Slide the tip of the opening pick along the bottom edge of the iPad, releasing the adhesive over the Wi-Fi antenna.
-
-
-
Once you have moved past the Wi-FI antenna (approximately 3" (75 mm) from the right edge, or right next to the home button) re-insert the opening pick to its full depth.
-
Slide the pick to the right, releasing the adhesive securing the Wi-Fi antenna to the front glass.
-
The antenna is attached to the bottom of the iPad via screws and a cable. This step detaches the antenna from the front panel, ensuring that when you remove the panel, the antenna will not be damaged.
-
-
-
Continue releasing the adhesive along the bottom of the iPad, pulling the opening pick out far enough to go around the home button, and re-inserting it to a depth of 1/2 inch (10 mm) once the pick is past the home button.
-
-
-
Continue releasing the adhesive all the way along the bottom edge of the iPad.
-
Leave the opening pick wedged underneath the front glass near the home button.
-
-
-
Reheat the iOpener in the microwave and set it on the left edge of the iPad to start warming the adhesive in that section.
-
-
-
Slide the opening pick along the top edge of the iPad, pulling it out slightly to go around the front-facing camera bracket.
-
The adhesive along this section is very thick, and a fair amount of force may be required. Work carefully and slowly, making sure to not slip and damage yourself or your iPad.
-
-
-
Continue releasing the adhesive along the top edge of the iPad, and slide the opening pick around the top left corner.
-
-
-
Slide the opening pick along the left edge of the iPad, releasing the adhesive as you go. The adhesive is thin here due to the digitizer along the whole left side. Make sure the pick is not too deep (max 1/2 inch) 10 mm to prevent damaging the digitizer.
-
-
-
Using the opening pick that is still underneath the bottom edge of the iPad, release the adhesive along the bottom left corner.
-
-
-
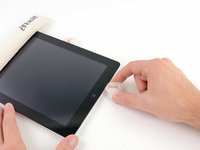
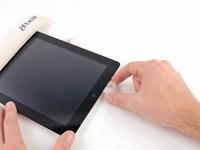
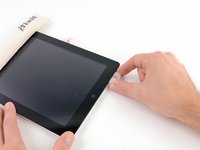
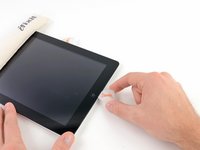
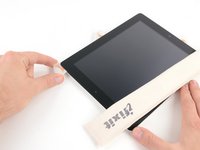
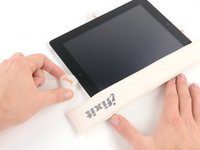
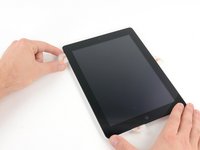
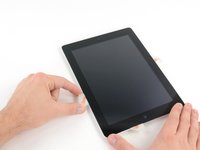
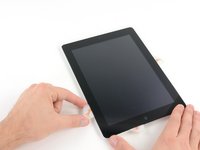
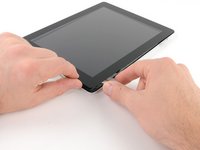
Using one of the opening picks, pry up the bottom right corner of the iPad and grab it with your fingers.
-
-
crwdns2935267:0crwdne2935267:0Microfiber Cleaning Cloths$3.99
-
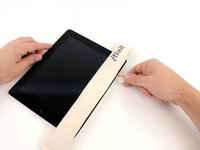
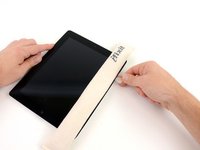
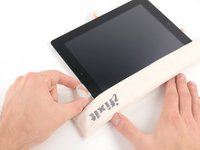
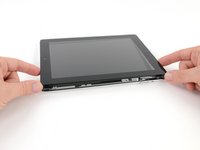
Holding the iPad by the top and bottom right corners, rotate the front glass away from the iPad.
-
-
-
Remove the four 2 mm Phillips #00 screws securing the LCD to the aluminum frame.
-
-
-
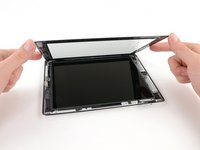
Using a plastic opening tool or a spudger, lift the right edge of the LCD out of the iPad.
-
Rotate the LCD along its left edge and lay it down on top of the front panel.
-
-
-
Using the tip of a spudger, peel back the piece of tape covering the LCD ribbon cable connector.
-
-
crwdns2935267:0crwdne2935267:0Tweezers$4.99
-
Flip up the retaining flap on the LCD ribbon cable ZIF connector.
-
Using your fingers or a pair of tweezers, pull the LCD ribbon cable from its socket on the logic board.
-
-
-
Without touching the front of the LCD, lift the LCD off the front panel.
-
-
-
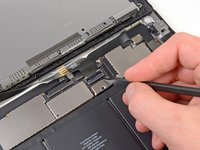
Using the tip of a spudger, peel back the piece of tape that secures the touchscreen ribbon cable to the logic board.
-
-
-
Flip up the retaining flap on both of the touchscreen ribbon cable ZIF connectors.
-
-
-
Use the flat end of a spudger to loosen the adhesive underneath the digitizer ribbon cable.
-
Pull the digitizer ribbon cable straight out of its sockets on the logic board.
-
-
-
Peel back the touchscreen ribbon cable and use the flat end of a spudger to release the adhesive securing the cable to the rear aluminum case.
-
-
-
Using your fingers, pull the touchscreen ribbon cable out of its recess in the aluminum frame.
-
Remove the front panel from the iPad.
-
-
-
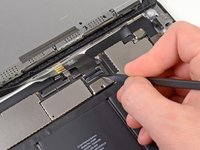
Peel back and remove the piece of electrical tape covering the headphone jack assembly cable connector.
-
Using the tip of a spudger, flip up the retaining flap on both of the ZIF connectors securing the headphone jack cable to the logic board.
-
-
-
Slide the flat end of a spudger underneath the headphone jack assembly cable, releasing the adhesive securing it to the rear aluminum frame.
-
Pull the headphone jack assembly cable straight out of its socket on the logic board.
-
-
-
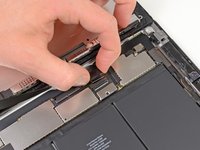
Peel back and remove the piece of tape covering the SIM board cable ZIF connector.
-
Flip up the retaining flap on the SIM board cable ZIF connector.
-
Using the tip of a spudger, pull the SIM board cable straight out of its socket on the logic board.
-
-
-
Disconnect the following connectors from their respective sockets on the logic board:
-
Wi-Fi antenna cable
-
Speaker connector cable.
-
Dock connector cable.
-
-
-
Remove the following seven screws securing the logic board to the rear aluminum panel.
-
Six 2.1mm Phillips #00
-
One 2.5mm Phillips #00
-
-
-
Holding the logic board by the side nearest the dock connector, carefully pull the logic board toward the bottom of the iPad.
-
-
-
Flip the logic board over, minding any cables that may get caught.
-
Using the tip of a spudger, remove the three antenna connectors from their sockets on the logic board.
-


To reassemble your device, follow these instructions in reverse order.
crwdns2935221:0crwdne2935221:0
crwdns2935229:024crwdne2935229:0
crwdns2947821:0crwdne2947821:0
crwdns2947823:0crwdne2947823:0


crwdns2947412:02crwdne2947412:0
Where can I purchase a logic board for an ipad 3 4g?
can be reused the right part of the logic board (the one connected on the sim ) in a new motherboard only wifi ?
I didn't find this to be as hard as I had built it up in my mind to be; HOWEVER, saying that I need to say years ago I was the local Nokia service center in my town. But many years ago right after they got rid of analog times. Yeah. A classic installer/repairer mistake when starting something they haven't fixed or installed before is picking up the instructions, flipping through them; maybe even reading a section that is new-then tossing the instructions over the shoulder. "I got this." This usually comes right before something major gets broke. And I can tell you when you try to do it yourself and then mess it up horribly then take it to the repair shop. Well we called that "I can do it myself" syndrome and charged extra to put back together what they brought in in the box. Now knowing all this - I can't stress this enough because I am stupid, stupid, stupid. COVER YOUR SCREEN IN CLEAR BOXING TAPE AND READ ALL THE INSTRUCTION BELOW THROUGH TO THE END BEFORE EVEN ATTEMPTING THIS FIX. Take my advise.
windizy - crwdns2934203:0crwdne2934203:0
I didn't have an iOpener, so I used a wheat type heat bag. If you do this though, make sure you put a layer of plastic between your Mac and the bag, or you'll get condensation in places you don't want it.
Martin Gray - crwdns2934203:0crwdne2934203:0
I started out using the iOpener but switched to my wife's hairdryer. A heat gun or hair dryer proved to be much more convenient and is a time saviour. You can heat more and the glue becomes more fluid make the next steps with the opening picks much easier
Jan Van Puymbroeck - crwdns2934203:0crwdne2934203:0
I know this is obvious, but backup your iPad with iTunes before you start. I'd also turn off your passcode if you have one.
Laurie Higgins - crwdns2934203:0crwdne2934203:0
Ther first time you heat up the iOpener for this repair when its room temperature I had to heat it up for more than 30 seconds. I remember I had to heat it up for around 45 seconds. However, after that when you need to reheat it again during the repair 30 seconds will be enough.
Yousef Ghalib - crwdns2934203:0crwdne2934203:0
I used the wheat bag in a sensor microwave heating up to 65-70 deg C (155 def F).
ian cheong - crwdns2934203:0crwdne2934203:0
Get yourself a cherry pit bean bag the size of your iPad. Heat it, put the iPad on it for 3 to 5 minutes or so, reheat the cherry pit bean bag, again put your iPad on it. Then heat the iOpener and start working. The cherry pit bean bag will have to be reheated several times, but it will soften the adhesive so you have less problems with the iOpener
Tim Feyaerts - crwdns2934203:0crwdne2934203:0
The heating can be done very effectively (and quickly) with 3d printer heated bed. Make sure the bed is clean. Set the temperature to 60c, (130f ) and put the ipad face down for +/- 10 minutes. Repeat as needed throughout the “gentle prying” stages.
polleyphony - crwdns2934203:0crwdne2934203:0
The iOpener did not work at all for me.
I had to use a heat gun and bring the edges of the case up to ~200 degrees (used an infrared thermometer to measure) before the glue would weaken. This obviously superheated the metal frame, so I also had to wear gloves to handle the phone while prying the back off with the included picks.
Mike Jeanette - crwdns2934203:0crwdne2934203:0
Repair instructions worked like a charm. Had to be patient with the iOpener and getting the screen off. I tried repeatedly without success until shifting the suction cup a bit to the left side where perhaps the glue had loosened up a bit more.
Kyle - crwdns2934203:0crwdne2934203:0
The iOpener, in my opinion, is of no help. Many warnings to say “don’t warm it too much”, but the glue doesn’t melt if not warm enough. As a result, a complete waste of time and energy. In addition, too much liquid in it, so it doesn’t lay on the device on a sufficient surface. I took a hairdryer and it worked much much better.
laurentvidu - crwdns2934203:0crwdne2934203:0
I used an immersion bath to heat this to 180F and applied it to the device until the outside temperature of the opener read 150F with an IR thermometer. Removing the screen took very little force with this method.
breadandbits - crwdns2934203:0crwdne2934203:0
My experience. I was replacing the screen which had been cracked and a little shattered in some places. The iopener is pretty much useless, so was the suction cup. The suction cup would probably be more useful if I was doing something besides the screen. Also you probably want the clean the screen before using it so it can get good suction. I used a hair dryer on high for a couple of minutes at a time (someone on this tread suggested that). I used my exacto knife and a razor blade to get into the adhesive. First the exacto to get the initial cut, then the razor blade to go a little deeper. Could have probably just used the razor blade, but the exacto has a little more finesse. I got the razor blade in and a little under the glass then I used the picks to wedge in. I didn’t want to risk anything using the razor blade too much. Used tape to keep the shattered glass together.
trebor65 - crwdns2934203:0crwdne2934203:0
My experience pt2
Fortunately the shattering was mostly on the edges and most of it had adhesive on the back so it stuck together. Just take your time and work your way around following the guide to get the screen off. Have some goof off or goo be gone to clean the frame when putting the new glass on or putting the existing one back. (someone suggested that also, very good idea). Be careful of the LCD (you should know that). The cable on my LCD was pretty tight, so I propped it up while taking the cable cover off and when I put it back on I did the same thing. I just put a bottle on the battery and leaned the back of the LCD on that while attaching the cables and putting the screws back on the cover. Also be careful with the home button and the bracket on the back of it. I had enough old adhesive on left on the bracket that it stuck back to the new glass fine. So far only 12 hours in, so we will see how that holds up when the kids get at it.
trebor65 - crwdns2934203:0crwdne2934203:0
Another alternative if you do not have the iopener is to use a bed time hotwater bottle. Do not over fill it though. Just put enough hot water in to support the phone while you work around the adhesive.
I use both the hot water bottle and iopener together on Samsung's. It makes life easier
gazza667 - crwdns2934203:0crwdne2934203:0
I followed the directions and heated my iOpener for 30 seconds in a 1000 watt microwave, and it came out at 160 degrees F, as verified by a infrared thermometer. This allowed me to separate the last bit of the back of my Samsung S8, which was already coming off due to a swollen battery (hence the reason for the repair).
Dennis - crwdns2934203:0crwdne2934203:0
Hallo,habe den Akku erfolgreich getauscht.Doch seitdem gibt es bei Telefonaten eine Rückkopplung für den anrufenden.Bei mir ist alles normal.Woran liegt das?Mfg
Manu R - crwdns2934203:0crwdne2934203:0
If you follow these instructions, you will crack your screen like I did. Heating the iOpener for 30 seconds, using it to melt glue, then waiting 10 minutes to reheat is useless. The iOpener can be used to maybe warm the glue on whatever side you aren’t working on. You need a hairdryer and/or a heat gun to melt the glue and separate the glass from the iPad.
Anyone want to buy an old iPad with broken glass and a dead battery?
mpulliam - crwdns2934203:0crwdne2934203:0
Not everybody has a microwave. You should provide a target temperature for the iOpener and instructions for a conventional oven, or pot of warm water, or whatever. Although I will probably use a heat gun …
Esmond Pitt - crwdns2934203:0crwdne2934203:0
Three times heating opener and no luck. Tried pressing down gently on opener with a towel, and the opener broke. Wondering if I now replace table mats, fancy table cloth, etc. or will this stuff wash out.
Not impressed so far. Maybe the hair dryer next.
doug - crwdns2934203:0crwdne2934203:0
I support the comments about the iOpener. Everyone has a hair drier, FHS, so get a cheap IR thermometer (£18) and blow heat until the area is 60+ deg C. Still takes w while, and getting the screen off is v scary, but just add more heat if you feel resistance.
The rest of the kit is good, esp the magnetic screwdrivers.
Richard O'Brien - crwdns2934203:0crwdne2934203:0
No, everyone does not have a hairdryer. Some of us don’t even have hair. Thank goodness I already had an IR thermometer, though.
nin10doh -
#### WARNUNG WENN MINIMALSTER SPRUNG IM DISPLAY IST FUNKTIONERT DAS NICHT!!! ######
Hatte einen winzigen, minimalen Sprung im Display. Ich dachte es könnte gehen, weil der Sprung “abgeschlossen” war. Er hat in einer Ecke ein winzige Glasteil rausgeschnitten. NEIN! Geht nicht. Habe alles mit viel Geduld dem iOpener und einem Föhn erhitzt. Es ist trotzdem sofort über das komplette Display zersprungen…
T z - crwdns2934203:0crwdne2934203:0
I’ve started with iOpener but changed very quickly to a heatgun. That was more efficient.
Mizzoo, s.r.o. - crwdns2934203:0crwdne2934203:0
I could not get the iOpener hot enough to melt the glue on my ipad 6. I heated for 45 seconds once and it was boiling and it still never worked. Thank goodness contributors mentioned using a hair dryer. Using an 1700w hair dryer on high did the trick to get the screen off. Still took some time and the case got pretty hot but be patient. It took twice as long and a lot more patience to get the battery out.
Randal Haufler - crwdns2934203:0crwdne2934203:0
I have an Ipad with touch screen issue, if i replace this part it should be Ok?
janderson martin - crwdns2934203:0crwdne2934203:0
WARNING - DO NOT MICROWAVE ON A METAL MICROWAVE RACK
The metal microwave rack can heat up and melt through the iOpener cover letting the contents leak out.
Not a big issue for me as I have a heat gun and used that instead.
Run Up A Tree - crwdns2934203:0crwdne2934203:0
I opened my iPad with the iOpener. Be patient! It may take quite a bit longer to it the iOpener in the microwave than it says in the guide. My microwave can only do 800W and I had to put the iOpener in several times (maybe a total of 90-120 seconds). I recommend that you have the transparent side up an watch the bag carefully. As long a the bag doesn't bloat up and the liquid doesn't start bubbling you should be fine. But I recommend to take the iO out from time to time to check it. (More comments in Step 6.)
marcelflueeler - crwdns2934203:0crwdne2934203:0
I gave upon the I opener and used a hairdryer. (Fixed an iPad 6)
Tom Weber - crwdns2934203:0crwdne2934203:0
iPad mini gen5. I used the iOpener. My microwave is 1200w with carousel. 30 sec got the iOpener to 155ºF. For the 2nd heating, after 10 minutes sitting, the temp was still around 125º so I only cooked it for 15 sec. Not enough increase so +5 sec more which me to 165-170ºF. This should be considered ballpark info because who knows the real output of the various microwaves and the quality of the IR tool used to determine temp.
To successfully open my iPad mini I applied the iOpener twice to the left edge and twice to bottom. & once to R edge. Using the suction cup was difficult for me (I'm in my 70's so my hands don't work too well anymore). I had trouble holding the guitar pick and slipping them in (at an downward angle). In the end, sliding my thumbnail along the edge opened it very slightly and allowed the pick to get into the gap. I marked the ends of all my picks with a sharpie pen for the recommended 2mm insertion to avoid going in too deep. To get the screen open it took me approx 1 hour.
jharrison - crwdns2934203:0crwdne2934203:0
Can’t you just use a hair curler instead?
Aspect22 - crwdns2934203:0crwdne2934203:0
A hairdryer or heat gun works, if heating is kept around 100 deg C (212 deg F - boiling point of water). But… heating this way is cumbersome. Using a hotplate, set to 100 deg C, measured carefully with a fairly inexpensive IR gun, is simpler and easier, if you can afford the hotplate (I used an old pancake griddle with a thermostat knob). It works great for phones, setting them face down for 2 minutes, then picking them up with insulated gloves - cheap, wool gloves work fine. This may require repeated reheating to continue the display removal, but its much simpler.
Because its almost impossible to repeatedly lay an iPad/tablet on the hot plate, I propose an alternative.
Initially lay the larger iPad/tablet, face down, for 2 min, to heat all of the adhesive surrounding the display. Lift and begin the picking process describe in your removal steps. Then lay an iOpener on the hotplate for 2 min (already set to the exact, desired temp) to bring it to working temp for the remaining operations.
Dan Smith - crwdns2934203:0crwdne2934203:0
For iPads in particular, it makes sense to construct a simple, aluminum window frame, laid on a hotplate (see my comment above) that only touches the edges of the display, heating only the adhesive underneath. This prevents general heating of the entire device. Four strips of aluminum, placed together as a frame, would be the simplest and allow variations for all devices - envision it as a pinwheel of strips, radiating outward. Use it for any size device.
Dan Smith - crwdns2934203:0crwdne2934203:0
BTW, always read all comments at each step. New, and possibly useful, suggestions appear on occasion that can be crucial.
Dan Smith - crwdns2934203:0crwdne2934203:0
My iOpener got damaged at the first heating (30 s @ 800 W). The bag got a little melted hole where the liquid came out and a little melted area. I used a combination oven (normal heat and microwave) in microwave only mode. It has a metal grill where the iOpener was placed on. I suppose the metal grill concentrates the microwaves at some points and there the bag melted?
K. Fe - crwdns2934203:0crwdne2934203:0