crwdns2915892:0crwdne2915892:0
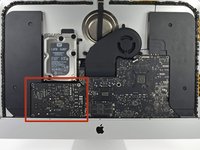
Removing the display on the iMac Intel 27" Retina 5K Display requires cutting adhesive with a specialized iMac opening tool. After you've completed your repair, you'll need to follow our adhesive strip replacement guide to scrape off the old adhesive and replace it with new double-stick adhesive strips.
Before beginning any work on your iMac: Unplug the computer and press and hold the power button for ten seconds to discharge the power supply's capacitors.
Be very careful not to touch the capacitor leads or any exposed solder joints on the back of the power supply.
crwdns2942213:0crwdne2942213:0
-
crwdns2935267:0crwdne2935267:0iMac Intel 27" Cardboard Service Wedge$4.99
-
With the hinge free to move, the iMac will be unbalanced and hard to work on. Repairs can be completed with the iMac laying down, but are faster and easier with an iMac service wedge.
-
If you are using the iFixit cardboard service wedge, follow these assembly directions to put it together.
-
-
-
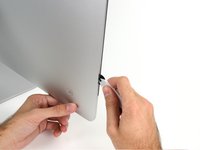
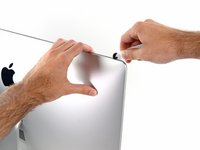
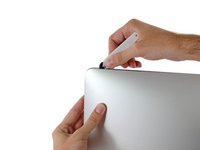
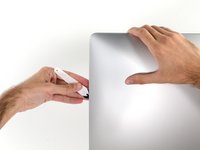
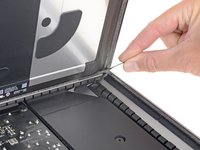
Starting on the left of the display, near the power button, insert the iMac Opening Tool into the gap between the glass panel and the rear case.
-
-
-
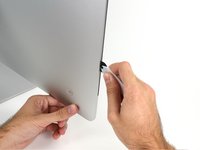
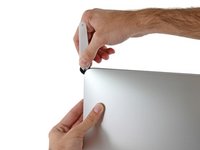
Use the tool like a pizza cutter—roll it along through the gap, and it will cut the foam adhesive through the center.
-
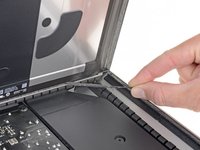
Run the tool up along the left side of the display.
-
-
-
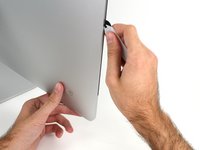
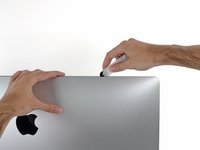
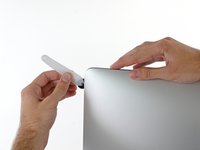
Continue wheeling the tool up around the top left corner.
-
-
-
Cut the adhesive along the top left of the display.
-
-
-
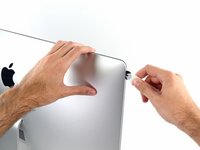
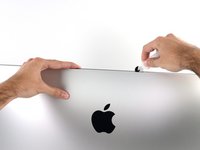
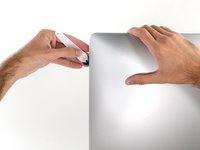
Continue along the top of the display.
-
-
-
Push the tool around the top right corner of the display.
-
-
-
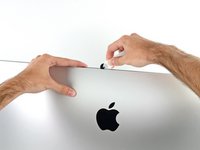
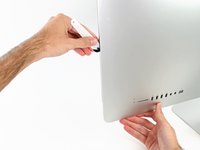
Wheel the tool down along the right side of the display.
-
-
-
-
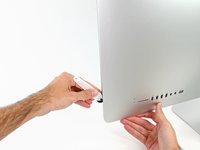
Finish pushing the opening tool to the bottom of the right side of the display.
-
-
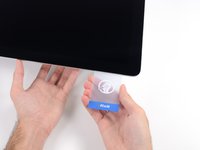
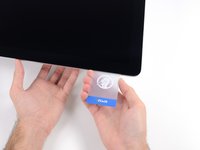
crwdns2935267:0crwdne2935267:0Plastic Cards$2.99
-
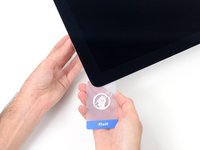
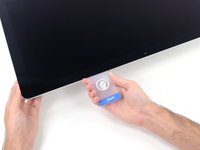
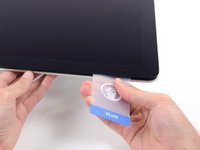
Set the iMac face-up on a table.
-
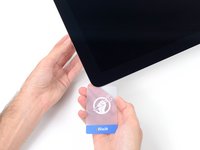
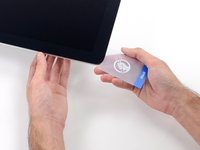
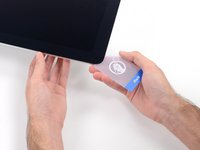
Starting from the top right corner of the iMac, insert a plastic card between the display and frame.
-
-
-
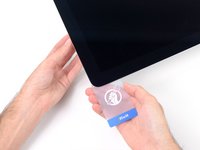
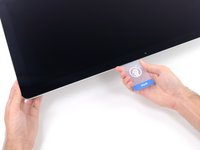
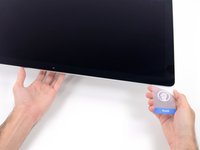
Gently twist the plastic card to open the space between the display and frame, and cut any remaining adhesive near the corner.
-
-
-
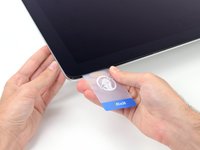
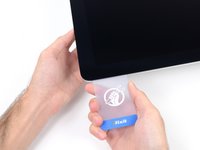
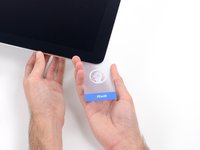
Slide the card toward the center of the display, to cut any remaining adhesive.
-
-
-
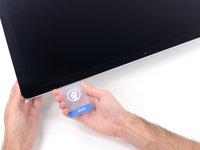
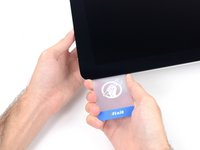
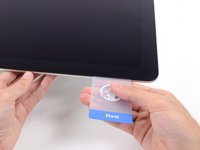
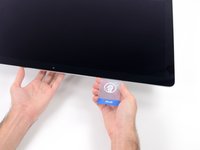
Put the card into the corner again and let it stay there to keep the adhesive from resettling.
-
-
-
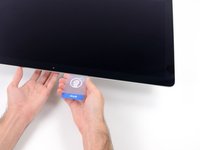
Insert a second card into the gap between the display and frame in the top left corner.
-
-
-
Gently twist the card, slightly increasing the space between the display and frame.
-
-
-
Slide the plastic card toward the center, again stopping just before the iSight camera.
-
-
-
Insert the card back into the top left corner.
-
-
-
With the cards inserted as shown near the corners, gently twist the cards to increase the gap between display and case.
-
If there are any sections that seem to stick and won't separate, stop twisting and use one of the cards to cut the adhesive in the problem area.
-
Begin to lift the top of the display up from the frame.
-
-
-
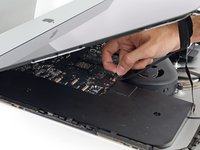
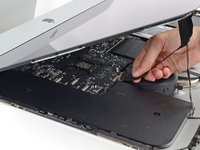
While holding the display up with one hand, use the other to unplug the display power cable.
-
-
-
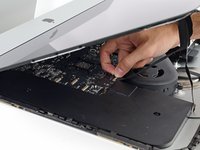
Flip up the metal retaining bracket on the display data cable.
-
Disconnect the display data cable.
-
-
-
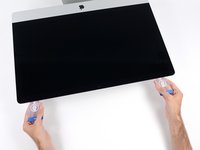
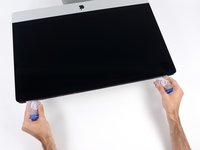
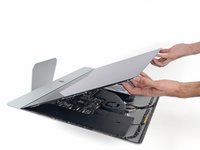
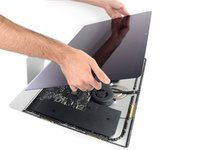
Lift the display up to a near-vertical position.
-
Remove as much of the adhesive as possible by grabbing it at the outer edges, and then pulling or rolling it towards the middle.
-
-
-
If necessary, a plastic card can be used to cut any remaining sections of the bottom adhesive strip.
-
-
-
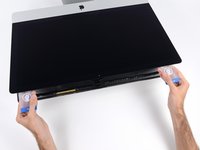
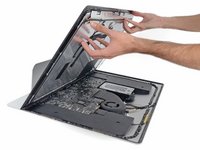
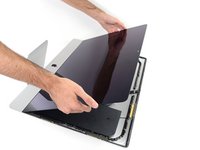
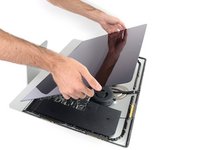
Lift the display up from the frame and remove it from the iMac. Lay the display face down on a flat, soft surface.
-
It may be necessary to slowly lift from one side, to peel against the remaining adhesive.
-
-
-
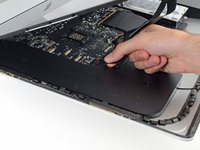
If there is a wire or cable underneath adhesive tape, always pull the tape off first.
-
If the cable is glued to the chassis, use a heated iOpener or a hair dryer to soften the adhesive first. You can then slide an opening pick underneath the cable to loosen it. Never pull directly on the delicate connectors.
-
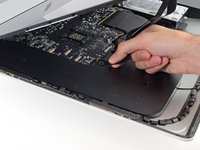
Slide an opening pick underneath the foam cushion pieces to separate them from the display, and gently pull them off. You may need some double sided tape to re-attach them to the new display.
-


To reassemble your device, follow these instructions in reverse and use our Adhesive Strips Guide to reattach the display glass.
Take your e-waste to an R2 or e-Stewards certified recycler.
Repair didn’t go as planned? Try some basic troubleshooting, or ask our Answers community for help.
crwdns2935221:0crwdne2935221:0
crwdns2935229:056crwdne2935229:0


crwdns2947412:027crwdne2947412:0
If you cut around the display well and take your time to roll back and forth (using the iFixit roller opener tool), especially around the corners, you don't actually need to use any cards (Steps 9 - 17) to get the screen to come free of the body. On the top edge left and right, take each end of the screen gently and pry free with your fingers - GENTLY - and you will hear the remaining tape separating along the sides. Take care NOT to flex the screen as you do so.
If you are removing a cracked screen (as I was), be super careful to pry and swing the display EVENLY up from the body - this is an item of utmost importance, whether you use cards or not to get the last of the adhesive to release.
Finally, with the power and data cables disconnected and the display held up at around 80º, you will find that the adhesive along the bottom edge of the display assembly will take quite some work to free. As the guide says, you can use a plastic card; but I found it necessary to use a metal spuger (carefully so as not to touch the power supply board of course!) in order to free the lower adhesive and remove the display.
Overall, take your time and focus on "being one with the iMac" as you work, and you will find it quite trivial to remove this 27" retina display.
hello, I'm writing from Italy. I have a problem with the screen of the iMac 27 "5k retina late 2014, purchased the 12-22-2014, I do not know if the warranty covers this type of defect within two years. There are spots in the lower left, appear as sagging, I think it's the dust, but I assure you that the environment is clean with no smoke or whatever. Obviously the spots are inside, how can I fix it, other news of these spots? I have to completely change the display or can separate the glass from the monitor LED?
Many thanks
Enzo
this should be covered by warranty. call applecare.
vireshkj -
Hello,
Any Update? Mine has the same issue and it is out of warranty.
Would an air blower do the trick past point 17/18?