crwdns2915892:0crwdne2915892:0
Upgrade your hard drive for more storage space!
crwdns2942213:0crwdne2942213:0
-
-
Loosen the two Phillips screws securing the access door to your iMac.
-
Remove the access door.
-
-
-
Remove the following screws along the lower edge of your iMac:
-
Three 6 mm T8 Torx screws
-
One 8 mm T8 Torx screw
My iMac had four 6mm T8 Torx screws (so not one 8mm screw)
My late 2006 iMac24 also has only 4, 6mm long T8 screws here.
-
-
-
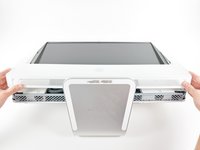
To lift the front bezel off the iMac, simultaneously:
-
Use your thumbs to press in the RAM arms and hold the iMac down.
-
Use your index fingers to pull the small bridge of material on the front bezel toward yourself.
-
Pull the front bezel up with your index fingers.
-
Once the small bridge of material has cleared the RAM arms, lift the front bezel by its lower edge just enough to clear the bottom edge of the rear case.
My iMac did not have the "small bridge of material" mentioned, however the bezel just lifted off easily.
-
-
-
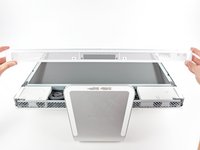
Lift the front bezel off the rear case and rotate it away from the bottom edge of the iMac, minding the camera and microphone cables still attached to its upper edge.
-
-
-
Disconnect the microphone cable.
-
Disconnect the camera cable by pulling its connector away from the socket on the camera board.
I found it easier not to remove the cables connecting camera and microphone, but rather to lean the plastic frame agains a pile of books so that it could rest almost vertical avoiding the need to disconnect those two sensitive cables.
I agree that for a simple, quick battery change, don't risk damaging those delicate wires. Ignore Step 6 and instead of disconnecting the mic and camera wires, keep them in place and just have a friend hold the plastic frame up while you change the battery, or prop it up as mentioned by Stefano C above.
Make sure you double check the new logic board for the presence of the GPU assembly before installing. I stupidly installed a new board without moving the GPU from the old one first. So i guess you can say this guide worked for me twice. :)
-
-
-
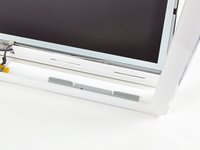
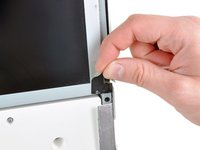
Peel the two highlighted EMI shield tabs off the frame of the LCD.
-
-
-
-
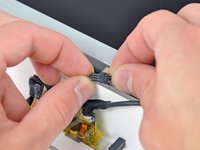
Remove the two T6 Torx screws securing the display data cable to the logic board.
Wait, we need a T6 screwdriver as well?
I purchased the T8 and T10 from your site as per the parts list above and now am here with an opened iMac on the dining room table unable to continue :/
-
-
-
Pull the black plastic tab attached to the display data cable connector to disconnect it from the logic board.
-
-
-
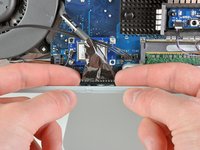
Use your fingertips to pull both sides of the wide inverter cable connector out of its socket on the logic board.
-
De-route the inverter cable from its location next to the CPU fan.
-
-
-
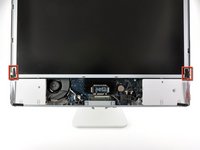
Remove the eight T8 Torx screws securing the display assembly to the rear case.
It would be useful to use a torx screw driver with a long, narrow shank… some of these screws are in tight places.
It may also be useful to prop up the back so it is level. This will prevent the screws from falling inside. They can be retrieved once the scene is off.
-
-
-
Remove the display assembly from the iMac.
-
-
-
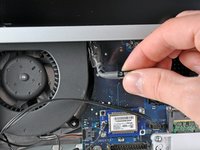
Disconnect the SATA data and power cables by pulling their connectors away from the hard drive.
-
-
-
Disconnect the hard drive thermal sensor cable from the thermal sensor attached to the side of the hard drive.
Since you're going to transfer this to the new drive, I found it easier to disconnect the other end of the temp sensor cable, on the edge of the mobo.
Agree 100% with maccentric. Disconnecting the other end of the temp sensor cable is a much easier way to go on this step.
-
-
-
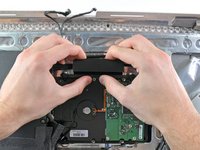
Compress the plastic hard drive retainer by pushing it toward the bottom edge of the iMac.
-
Pull the top edge of the hard drive slightly away from the rear case.
I found it easier to take out the two torq screws on the plastic holder, in stead of compressing it.
-
-
-
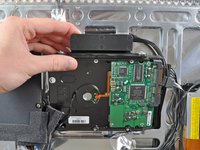
Lift the hard drive off its bottom retaining posts and remove it from the iMac.
-
-
-
Remove the two T8 Torx screws securing the hard drive bracket to the side of the hard drive.
-
Remove the hard drive bracket.
-
-
-
Remove the two T8 Torx retaining posts from the other side of the hard drive.
-
-
-
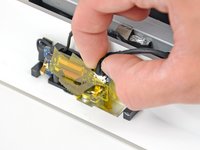
Use the flat end of a spudger to remove the thermal sensor from the side of the hard drive.
-
Hard drive remains.
-


To reassemble your device, follow these instructions in reverse order.
To reassemble your device, follow these instructions in reverse order.
crwdns2935221:0crwdne2935221:0
crwdns2935229:0121crwdne2935229:0

crwdns2947412:07crwdne2947412:0
Does the T8 Torx have to be security type? In the guide it only says remove T8 torx screws. But never says if they are security type or not.
Not necesary to be secured
Is it possible to replace it with an SSD? If yes which are compatible and what about the termal sensor?
Watch that LCD temp sensor cable guys, it's a !@#$% to repair or replace. It runs around the monitor housing and can get severed by a bezel screw if not hidden carefully before attaching the outer housing of the iMac. If you tear it, here's the part number and discussion of this very issue: https://discussions.apple.com/message/24... Apple Part Number: 922-8236
The T8 Torx does *not* have to be security type. However it is critical to have a long, thin, dedicated T8 screwdriver, not one that is part of a kit with interchangeable tips (and thus a thick collar that won't fit into the narrow slot). I got the kit, it didn't work, returned it and got an unmagnetized T8 with 2.5" length. I then magnetized it with a strong refridge magnet (which didn't work well), so better yet after I removed the 8 screws (Step 11), I magnetized the screws themselves, which worked great.
Could the author add a few notes about how to clean off any remaining adhesive on the HD Temp. Sensor and what type of adhesive to use in re-attaching the HD Temp. Sensor to the new drive? In addition; a note on how to locate the sensor on the drive chassis, if using the original location, but on the new drive, is not possible.
To remove the excess of adhesive you may use isopropyl alcohol. To reattach the sensor try to use kapton tape.