crwdns2915892:0crwdne2915892:0
Upgrade your hard drive for more storage capacity.
crwdns2942213:0crwdne2942213:0
-
-
Lay the iMac display-side down on a flat surface (putting a cloth under the screen to protect it from bumps).
-
Loosen the three Phillips screws securing the rear panel to the iMac.
-
-
-
Lift the rear panel slightly near the bottom of the iMac.
-
Pull the rear panel toward yourself and remove it from the iMac.
-
-
-
Remove the following three screws:
-
One shouldered 12.4 mm Phillips.
-
Two 7 mm T10 Torx.
My model have 3 phillips screws, no torx
Same here. No torx. Very easy to do. Not a moderate difficulty at all. As long as you don't rush anything and ease the electronics out. Did I say ease? I meant "tease." Tease the connectors out. Slow and steady. Easy as pie.
-
-
-
-
Lift the hard drive slightly and disconnect the hard drive thermal sensor connector.
I broke mine trying to disconnect it. It was very fragile. Better to just skip disconnecting it. Leave it connected to the hard drive bracket, and unscrew the bracket from the hard drive. Then screw the bracket to the new hard drive.
Perfect! I didn't disconnect it and the cable had plenty of slack! Great job!
-
-
-
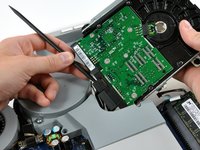
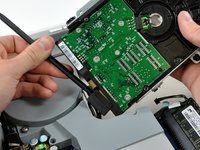
Insert the flat end of a spudger into the gap between the SATA data connector and the hard drive.
-
Twist the spudger to separate the SATA data connector from the hard drive, then disconnect it from the hard drive.
-
-
-
Remove the two 15 mm shouldered T10 Torx screws from the hard drive and remove the bracket.
-
-
-
Remove the two 6 mm T10 Torx screws from the hard drive and remove the hard drive bracket.
-


To reassemble your device, follow these instructions in reverse order.
To reassemble your device, follow these instructions in reverse order.
crwdns2935221:0crwdne2935221:0
crwdns2935229:0149crwdne2935229:0

crwdns2947410:01crwdne2947410:0
Very helpful and easy guide. Thanks!
Some models (with light sensor) have only the two outboard screws.
Robert Huber - crwdns2934203:0crwdne2934203:0