crwdns2915892:0crwdne2915892:0
If you suddenly realize you do not feel vibration from your Xbox One Wireless Controller when appropriate, you may have an issue with the rumble motors inside the controller. The best solution to this problem is to replace the Bumper Rumble motors inside the controller. This is a very difficult process and will require wiring skills such as soldering.
crwdns2942213:0crwdne2942213:0
-
-
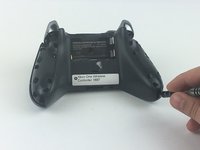
Remove the battery pack cover.
-
Remove the two AA batteries.
-
Carefully remove the sticker or puncture to reveal the screw.
-
-
-
Remove the side handles by wedging the spudger around the side panels.
-
Pry the side panel by moving the spudger back and forth. You must do this along the entire seam to remove the side handle panel.
-
There are seven clips that need to be opened to remove each handle panel.
Absolutely use the spudger to do this. DO NOT just lift up a bit at the bottom and then try to forcefully pull off this panel (as is shown and suggested on *multiple* YouTube videos). You WILL snap the clips. Maybe not all of them and *maybe* none of them, but as the instructions here detail, what you want to do is UNCLIP the clips where they are located, using the PLASTIC spudger. NOT a screwdriver. I watched three separate videos on YouTube where the person said “just stick a screwdriver in there and once you’re able to lift up enough to fit your finger inside, do so, and then just carefully pull the panel off.” That’s not how it works.
-
-
-
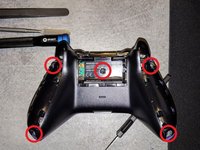
Use the TORX TR8 screwdriver to remove the five TR9 Torx screws.
you must also remove the T8 screw hidden under the label in the battery compartment to free the faceplate.
Precised by Dennis Kim, but to remove the screws you need a TORX TR8 screwdriver (I guess it’s a Torx size 8)
-
-
-
-
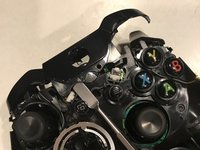
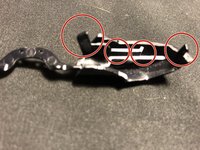
The bumpers are connected by a middle plastic cover that is around the Xbox home button. Remove this plastic piece by lifting the plastic cover over the two pins, pressing the home button in, and pushing the cover towards the top of the controller.
-
Be aware of the sync button loosely placed under the plastic covering. Ensure it is put back before putting back the bumper/plastic cover assembly.
-
Remove the current bumper assembly by pulling them off the plastic cover.
you forgot to include directions for removing the central cover.
And when you do, the connect button pops out, and now I have no clue how to put it back -_-
The replacement part I bought fit OK but was too snug, with the result that the bumpers wouldn’t spring back so they wouldn’t click and unclick the tiny control switches they connect to.
After a bit of examination I determined that if I cut out the middle arch section that joins the bumpers, but leaving enough plastic to go under the central plastic cover so that they would be held in place securely, that it was possible to reassemble the controller so the bumpers click and unclick freely.
I had the same issue, But i just shaved the little lugs that connect the button to the switch with a scalpel and used the original plastic black cover. Works a treat and i’ve no fear the button will fall out.. :)
-
-
-
Align the new bumpers onto the top of the controller by holding down the triggers and aligning the four pins on both sides.
-
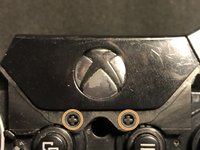
Set the new home button cover over the micro USB port, push the home button in, and pull the cover over the two pins shown.
-
-
-
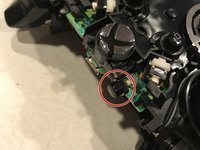
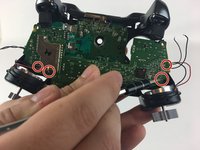
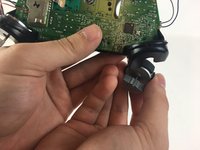
De-solder the soldered joints while holding the red and black wires down on the top motherboard.
-


To reassemble your device, follow these instructions in reverse order.
To reassemble your device, follow these instructions in reverse order.
crwdns2935221:0crwdne2935221:0
crwdns2935229:06crwdne2935229:0
crwdns2915084:0crwdne2915084:0

USF Tampa, Team S9-G1, Remmell Fall 2017 crwdns2935289:0USF Tampa, Team S9-G1, Remmell Fall 2017crwdne2935289:0
USFT-REMMELL-F17S9G1
crwdns2931471:04crwdne2931471:0
crwdns2935297:014crwdne2935297:0
crwdns2947410:01crwdne2947410:0
Péssimo tutorial. Não mostra a ordem dos fios para soldar os motores Rumble.
Não é a mesma qualidade quando os guias eram do próprio Ifixit.
Note: Screw removal is in Step 3
jkgarrett17 - crwdns2934203:0crwdne2934203:0