crwdns2915892:0crwdne2915892:0
This guide is important because it is necessary to access certain components on the board that may need replacing.
crwdns2942213:0crwdne2942213:0
-
-
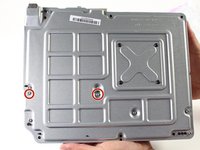
Flip the Xbox One S so that the bottom of the case is facing upward.
-
-
-
Begin by working at the case on the rear where the warranty sticker is located. Insert the plastic opening tool into the gap between the bottom of the case and the grated top side. Then find the clips in between that hold the case in place. Use the opening tool to pop the clips out. The best method is to pry the black case away from the bottom.
-
Use the opening tool to pop the clips out. The best method is to pry the black case away from the bottom.
Be careful not to damage the pairing button on this part
Important!!
You've to start from the back corner where is the information label, because there is a main clip behind a warranty sticker
They should add this to the guide! I didnt know that, and did some minor damage to the bottom piece where that main clip is.
I dont mind because it's my own Xbox, but what if it belonged to a customer?
They should add this to the guide! I didnt know that, and did some minor damage to the bottom piece where that main clip is.
I dont mind because it's my own Xbox, but what if it belonged to a customer?
💯% same opinion!
This was hard! I tried using plastic pry tools, but they did not work. A metal tool did, but make sure to watch a video or two, to see what you actually are dealing with. After the videos it went quite smoothly.
I legitimately cannot open the case where the warranty sticker is, ive tried everything, im resorting to a fork to try and open this
nothing is moving... not sure what I am doing wrong but I can't feel any clips anywhere. I'm genuinely scared to break something.
undid all the clips on the back and nothing moves more than a few millimeters... is there actually a good guide out there that doesn't promote breaking plastic?
-
-
-
Once all of the clips are opened, remove the bottom part of the case.
-
-
-
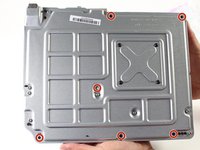
Use a T10 Torx screwdriver to remove the six green 50 mm long screws from the metal case labeled F1 through F6.
My F3 isn't coming out. The screwdriver isn't sitting tight like it is for the other ones. Any idea on how to fix that?
-
-
-
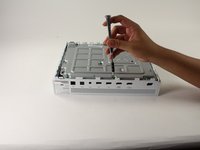
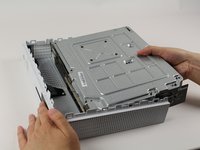
Gently separate the interior case from the white exterior case using the appropriate method.
-
Pry the white plastic sides outwards at the rear to separate from the plastic I/O shield.
Essential tip: be sure to slide the metal housing backward, away from the from of the case as pictured above, rather than upward. If not, you can easily break off the teeny momentary switches on the IR blaster board!
“appropriate method is not descriptive like Mr. Ross’s comment. The original poster should edit the description to ensure people do in fact remove the box from the case appropriately. I would also add arrows to the picture.
____________⬆️
↖️Yes! I see it the same way!↗️
⬅️Arrows are always a good thing!➡️
↙️Can't do anything wrong with them! ↘️
____________⬇️
😅😅
I didn't realize that metal ribbon was connecting the case to the console and I yanked it w out realizing it was there. How o I get a replacement?
-
-
-
-
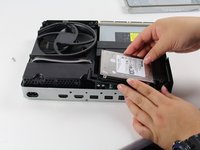
To replace the hard drive, flip over the console and remove the two 10 mm T-10 Torx screws, C3 and C5, from the backside of the Xbox One S.
Some of my silver were gold screws, so just letting people know to look out for that!
The Torx screw circled on the left is actually C5
I found the same. On my Xbox One S, it's C3 and C5 that hold in the hard drive caddy. C4 holds in the optical disk caddy.
jamesr -
Yeah, C3 and C5 on my console too.
Funny thing on my console rev t t3 built feb 2018 it’s C4 and C5
The instructions fail to mention that the top metal cover can be lifted off at this point without undoing any more screws.
-
-
-
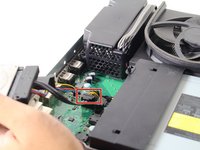
Gently disconnect the hard drive from the motherboard (at the two plastic connector bodies).
Do not disconnect the connector in the second image! There are tiny prongs that bend easily and if bent just a tad bit they will break off. I had first hand experience with this and I ended up breaking my Xbox because I could not put that cable back on.
Do not remove the cable!!!! You can change while the cables are plugged. It took 2 hours trying to put mm precisely all the little pins because of the removal of the cables.
Please update the post, I could easily end up as the Aaron, breaking the XBOX completly.
Yes, this has also happened to me the connectors had broken and the pins bent and snapped off.
c3 and c5 are reversed in the pictures
-
-
-
To remove the optical disc drive, remove the silver 10 mm T-10 Torx screw labeled "C4."
The image shows screw 'C4' witch is the correct screw. 'C5' is for the HDD.
-
-
-
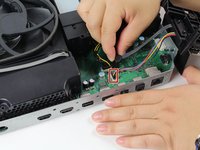
Pull the disc drive slightly off the motherboard and disconnect the plastic connectors from the motherboard.
-
-
-
To replace the motherboard you must remove the three silver 10 mm T-10 Torx screws labelled "C1," "C2," and "C6."
-
Remove the four black 8 mm T-8 Torx screws lablelled "A1," "A2," "A3," and "A4."
The Black screws are T-8 Torx, not T-9!
I didnt see this before, so thankfully I was able to use T9 without stripping the screws!
IMPORTANT! You also need to remove the two T10 screws labeled B1 and B2 in order to remove the motherboard! I had to figure this out on my own.
I hust had to remove the red ones and than i was able to lift the powersupply of the mainboard
I had to remove B1 and B2 as well.
-
-
-
Locate the rectangular silver clamp on the opposite corner of the power block.
-
Remove the black bracket near the fan.
-
-
crwdns2935267:0crwdne2935267:0Tweezers$4.99
-
Grab the clamp with the tweezers. Pull the clamp upward, away from the silver casing. Jiggle it back and forth like a tooth if necessary.
-
-
-
Remove the four black 8 mm T-9 Torx screws labeled "E1," "E2," "E3," and "E4."
-
-
-
Remove the three black 8 mm T-9 Torx screws labeled "D1," "D2," and "D3" to remove the Mediatek board.
-
-
-
Now that the clamp is removed, gently lift the motherboard from its edges out from the metal casing. The motherboard should come out with ease.
How do you open it?
They forget, I think, to tell that first you need to take off screw B1 and B2
this messed me up for a bit
-


To reassemble your device, follow these instructions in reverse order.
To reassemble your device, follow these instructions in reverse order.
crwdns2935221:0crwdne2935221:0
crwdns2935229:062crwdne2935229:0
crwdns2915084:0crwdne2915084:0

Cal Poly, Team S22-G3, Livingston Spring 2017 crwdns2935289:0Cal Poly, Team S22-G3, Livingston Spring 2017crwdne2935289:0
CPSU-LIVINGSTON-S17S22G3
crwdns2931471:04crwdne2931471:0
crwdns2935297:059crwdne2935297:0
crwdns2947412:010crwdne2947412:0
This guide is really missing alot between steps 13 and 14. There are two black panels that have to be removed(they’re in the teardown guide). One is on the front with with screws E1 ,E2, E3, E4. And theres another panel on the side with screws D1, D2, D3. Finally there are two more screws on the bottom that hold down the motherboard B1, and B2. Theres Also a black from in between the Fan and case that slides off too.
Yep, I was using this guide and realized that it is missing a few vital steps. Thank you Nathan.
If you have a multimeter could you please test the test points around the board and give me a list of a voltages?
fantastic! only issues that are missing, are mentioned in the comments above. I´d like to include that most of the exterior hardcase clips are made to be HELD in place. Which is why it´s a nuisanse to remove. So, newcomers be careful with it. otherwise you´ll easily break it.
Son los mejores
My xbox one s turns on, fan runs but no signal nor will not connect to controller.
I do have a faint burnt smell, any idea what could be at fault?
a 5 min job ???????? LOL
How do you remove the old heat sink from the motherboard?
How do u remove the fan?
My father had bought me the new motherboard and in china region locked, this is not ok, you should test your reused products before selling them