crwdns2915892:0crwdne2915892:0
This guide will show you how to remove the top panel of the interior case of the Xbox Box One S. This is necessary for the removal of either the hard drive, the disk drive, the heatsink/fan, the motherboard, or the power block.
crwdns2942213:0crwdne2942213:0
-
-
Flip the Xbox One S so that the bottom of the case is facing upward.
-
-
-
Begin by working at the case on the rear where the warranty sticker is located. Insert the plastic opening tool into the gap between the bottom of the case and the grated top side. Then find the clips in between that hold the case in place. Use the opening tool to pop the clips out. The best method is to pry the black case away from the bottom.
-
Use the opening tool to pop the clips out. The best method is to pry the black case away from the bottom.
Be careful not to damage the pairing button on this part
Important!!
You've to start from the back corner where is the information label, because there is a main clip behind a warranty sticker
They should add this to the guide! I didnt know that, and did some minor damage to the bottom piece where that main clip is.
I dont mind because it's my own Xbox, but what if it belonged to a customer?
They should add this to the guide! I didnt know that, and did some minor damage to the bottom piece where that main clip is.
I dont mind because it's my own Xbox, but what if it belonged to a customer?
💯% same opinion!
This was hard! I tried using plastic pry tools, but they did not work. A metal tool did, but make sure to watch a video or two, to see what you actually are dealing with. After the videos it went quite smoothly.
I legitimately cannot open the case where the warranty sticker is, ive tried everything, im resorting to a fork to try and open this
nothing is moving... not sure what I am doing wrong but I can't feel any clips anywhere. I'm genuinely scared to break something.
undid all the clips on the back and nothing moves more than a few millimeters... is there actually a good guide out there that doesn't promote breaking plastic?
-
-
-
Once all of the clips are opened, remove the bottom part of the case.
-
-
-
-
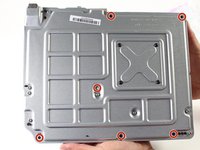
Use a T10 Torx screwdriver to remove the six green 50 mm long screws from the metal case labeled F1 through F6.
My F3 isn't coming out. The screwdriver isn't sitting tight like it is for the other ones. Any idea on how to fix that?
-
-
-
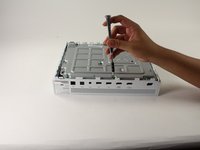
Gently separate the interior case from the white exterior case using the appropriate method.
-
Pry the white plastic sides outwards at the rear to separate from the plastic I/O shield.
Essential tip: be sure to slide the metal housing backward, away from the from of the case as pictured above, rather than upward. If not, you can easily break off the teeny momentary switches on the IR blaster board!
“appropriate method is not descriptive like Mr. Ross’s comment. The original poster should edit the description to ensure people do in fact remove the box from the case appropriately. I would also add arrows to the picture.
____________⬆️
↖️Yes! I see it the same way!↗️
⬅️Arrows are always a good thing!➡️
↙️Can't do anything wrong with them! ↘️
____________⬇️
😅😅
I didn't realize that metal ribbon was connecting the case to the console and I yanked it w out realizing it was there. How o I get a replacement?
-
-
-
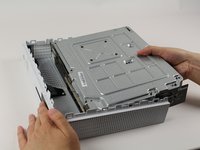
Flip the interior case so it is fan side upward.
-
-
-
To access the hardware within the casing, you can pop and lift the top panel of the casing. It should come right off.
-


To reassemble your device, follow these instructions in reverse order.
To reassemble your device, follow these instructions in reverse order.
crwdns2935221:0crwdne2935221:0
crwdns2935229:012crwdne2935229:0
crwdns2915084:0crwdne2915084:0

Cal Poly, Team S22-G3, Livingston Spring 2017 crwdns2935289:0Cal Poly, Team S22-G3, Livingston Spring 2017crwdne2935289:0
CPSU-LIVINGSTON-S17S22G3
crwdns2931471:04crwdne2931471:0
crwdns2935297:059crwdne2935297:0
crwdns2947412:02crwdne2947412:0
Pourquoi ma X boxe One s'allume plus
Very sloppy manual. Skips removing a couple screws (such as those marked Bx like B1), says to remove certain screw, then on the next step it's back in the image. Skips removal of some elements. Overall, this guide is usable, but only just. 3 stars out of 5.