crwdns2915892:0crwdne2915892:0
Put some feeling back in your gameplay by replacing the vibration motors in your Xbox 360 wireless controller.
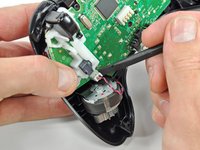
The two vibration motors have different counterweights. The left motor has the heavier counterweight, and the right motor has the lighter counterweight.
crwdns2942213:0crwdne2942213:0
-
-
Depress the battery release button on the top of the controller.
-
Remove the battery holder from the controller.
-
-
crwdns2935267:0crwdne2935267:0Tweezers$4.99
-
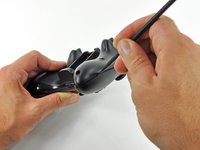
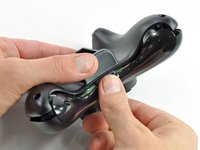
Use a pair of tweezers to peel the barcode sticker from the battery compartment.
-
-
-
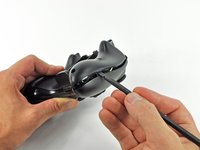
Remove the seven 9.3 mm T8 Security Torx screws securing the rear case to the front case.
Any recommendation on which set of Security Torx tools to use? I've already purchased 2 kits, one of those being sold as "Xbox controller tools" but the diameter of the head does not fit the hole on the controller and that's critical for the 2 screws on the bottom. The tools must obviously be thinner in diameter and long enough to get there.
How to open an XBOX 360 controller without a special screwdriver. http://www.instructables.com/id/How-to-o... Works perfectly.
A lot of thanks for your comment. It's very usefull
Echedey -
I picked up a handy torx key set from Auto Zone. Was about $10, no lose driver bits. has both sizes you need to repair the controller and the console. Here's the link:
It doesn't really matter which set of bits you by or what brand makes them, Torx bits (and the security versions of them) are generic & come in standardized sizes. You do not need a special "xbox" tool kit, you just need a size 8 torx security bit, no matter what brand makes the bit/kit. Those types of "specialty kits" are usually just collections of generic bits that you can buy at a hardware store in a regular bit set. The difference is that a general bit set will have bits for screws that a specific item doesn't have in it, whereas a specialty kit will only include bits for the types & sizes of fasteners used in the specified item.
BTW, with the smaller sizes of torx security bits you can try breaking off the little post in the middle with needlenose pliers or something else that can fit in the there. Even if the post doesn't break off cleanly, it's usually short enough to fit a regular (non security) torx bit in the slot.
-
-
-
crwdns2935267:0crwdne2935267:0Spudger$2.99
-
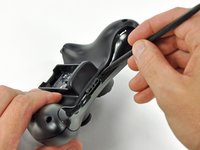
Insert a Spudger between the front and rear cases along the left edge of the controller.
-
Rotate the spudger toward the front of the controller, prying the two cases apart.
-
-
-
Insert a spudger between the front and rear cases, near the headphone jack.
-
Rotate the spudger toward the front of the controller to pry the two cases apart.
-
-
-
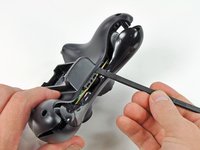
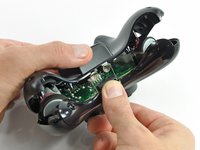
Grasp the controller by the battery compartment and the headphone jack.
-
Lift the battery compartment away from the headphone jack, separating the rear case from the front case and logic board.
The RB / LB bar will fall away easily as you handle the upper case and logic board; just be prepared for it.
Good information
-
-
-
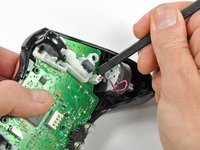
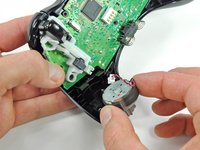
Use the flat end of a spudger to remove the vibration motor cable, moving it upward from its socket on the logic board.
-
Lift the vibration motor out of the front case.
-
-
-
Remove the vibration motor from the other side of the controller using the same method previously described.
The opposite was true for the controller I just opened. It was the left motor counterweight (as you hold the controller normally) which had more weight. Perhaps it doesn't matter which goes where?
For anyone reading this in the future, it does matter. The way you had them originally is the correct way.
-


To reassemble your device, follow these instructions in reverse order.
To reassemble your device, follow these instructions in reverse order.
crwdns2935221:0crwdne2935221:0
crwdns2935229:019crwdne2935229:0


crwdns2947412:03crwdne2947412:0
Hello, I am very concerned about which side of the controller the motor with heavier counterweight should be. Shouldn’t it be on the left side of the controller, since the right side should be used for higher frequency vibrations?
Hi Yado,
Thanks for pointing this out! You are right—the left side have the heavier counterweight. I’ve corrected the relevant step.
Hi there, I believe that the screenshots provided have the vibration motors on the wrong sides. Watching several videos of the disassembly on youtube as well as taking apart my own controller that previously was never opened, the larger heavier motor should be on the right side and the smaller lighter motor should be on the left side.