crwdns2933423:0crwdne2933423:0

Whirlpool Refrigerator Door Sensor Replacement

crwdns2942213:0crwdne2942213:0

  1. Whirlpool Refrigerator Door Sensor Replacement, Open the doors: crwdns2935265:01crwdnd2935265:01crwdnd2935265:03crwdne2935265:0 Whirlpool Refrigerator Door Sensor Replacement, Open the doors: crwdns2935265:01crwdnd2935265:02crwdnd2935265:03crwdne2935265:0 Whirlpool Refrigerator Door Sensor Replacement, Open the doors: crwdns2935265:01crwdnd2935265:03crwdnd2935265:03crwdne2935265:0
    • Depending on your repair, open one or both doors.

  2. Whirlpool Refrigerator Door Sensor Replacement, Unclip the door sensor: crwdns2935265:02crwdnd2935265:01crwdnd2935265:03crwdne2935265:0 Whirlpool Refrigerator Door Sensor Replacement, Unclip the door sensor: crwdns2935265:02crwdnd2935265:02crwdnd2935265:03crwdne2935265:0 Whirlpool Refrigerator Door Sensor Replacement, Unclip the door sensor: crwdns2935265:02crwdnd2935265:03crwdnd2935265:03crwdne2935265:0
    • Insert a flathead screwdriver, or a similar tool, between the door sensor and the chassis.

    • Pry up to separate the door sensor enough so you can grip it with your fingers.

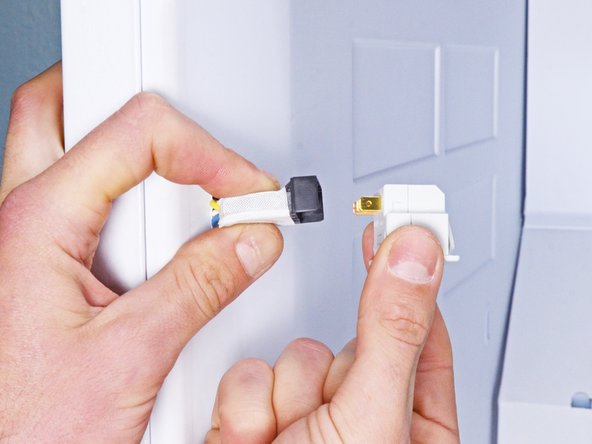
  3. Whirlpool Refrigerator Door Sensor Replacement, Remove the door sensor: crwdns2935265:03crwdnd2935265:01crwdnd2935265:02crwdne2935265:0 Whirlpool Refrigerator Door Sensor Replacement, Remove the door sensor: crwdns2935265:03crwdnd2935265:02crwdnd2935265:02crwdne2935265:0
    • Pull the door sensor through the chassis enough to access its connectors.

    • Disconnect any connectors attached to the door sensor.

    • Remove the door sensor.

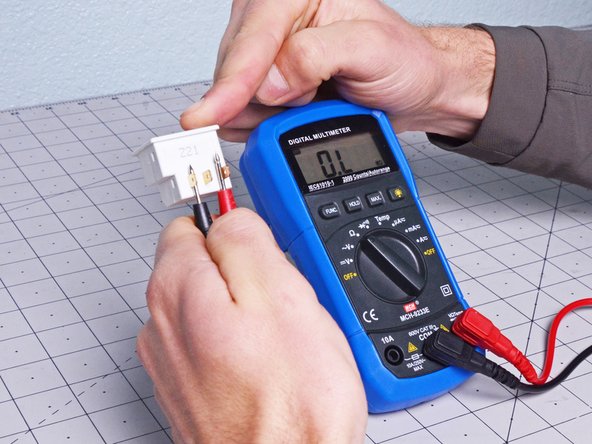
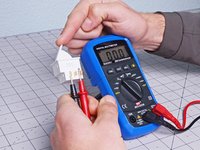
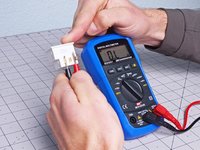
  4. Whirlpool Refrigerator Door Sensor Replacement, Meter the door sensor: crwdns2935265:04crwdnd2935265:01crwdnd2935265:02crwdne2935265:0 Whirlpool Refrigerator Door Sensor Replacement, Meter the door sensor: crwdns2935265:04crwdnd2935265:02crwdnd2935265:02crwdne2935265:0
    • If you own a multimeter, you can test your door sensor's resistance.

    • Set the multimeter to the resistance or continuity measurement mode.

    • With the button in its neutral position, the multimeter should read "OL."

    • With the button pressed, the multimeter should read around 0Ω.

crwdns2915888:0crwdne2915888:0

To reassemble your device, follow these instructions in reverse order.

Take your e-waste to an R2 or e-Stewards certified recycler.

Repair didn’t go as planned? Ask our Answers community for help.

nicO

crwdns2935283:004/14/15crwdne2935283:0

15.927 crwdns2915208:0crwdne2915208:0

crwdns2935297:088crwdne2935297:0

crwdns2915084:0crwdne2915084:0

Global Fixers crwdns2935289:0Global Fixerscrwdne2935289:0

Community

crwdns2931471:033crwdne2931471:0

crwdns2935297:0551crwdne2935297:0

crwdns2944067:00crwdne2944067:0

crwdns2917038:0crwdne2917038:0

crwdns2936625:0crwdne2936625:0:

crwdns2936751:024crwdne2936751:0 1

crwdns2936753:07crwdne2936753:0 27

crwdns2936753:030crwdne2936753:0 143

crwdns2942667:0crwdne2942667:0 1,725