crwdns2915892:0crwdne2915892:0
The power cord is what provides power to the motor, once its plugged in. Sometimes these can become stripped and worn down, therefore they may need to be replaced. Following this guide will give you detailed instructions on how to remove the power cord.
crwdns2942213:0crwdne2942213:0
-
-
Turn the blender on its side so the bottom panel is facing you.
-
Unscrew the 22mm Phillips #1 screw on the indent of the panel.
-
Unscrew the 3 screws in the rubber holes.
-
-
-
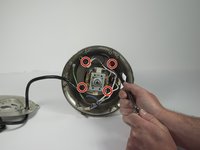
Place the screwdriver in the head of the middle flat-head screw.
-
-
-
-
Unscrew this screw while holding the coupling with your other hand and not allowing it to rotate.
-
-
-
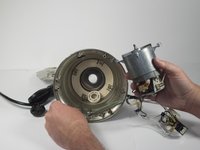
Once the coupling mechanism has been loosened all the way, gently pull it off the top of the blender.
THANK YOU!
THANK YOU!
THANK YOU!
I have a Model SDM50. A lot of online instructions address that screw/bolt but mine, like yours, and unlike the models for many of the instructions, cannot be accessed without removing the plate. The part came with absolutely no hint on how to install it. Waring should pay you and utilize your instructions at its website.
-
-
-
Unscrew the four nuts in the bottom of the motor cavity.
-
Wiggle the motor until it is free and you can remove it.
-
-
-
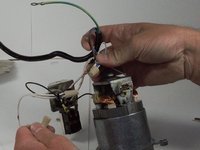
Once motor is pulled out, unscrew the 8 mm screw for the green wire from the base of the blender.
-
-
-
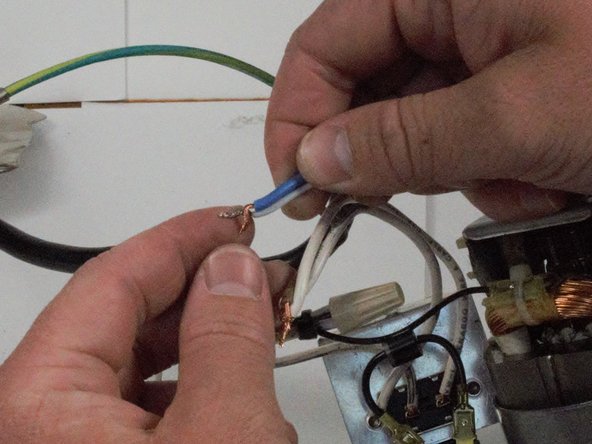
Unscrew each white wire cap in order to free the motor from the power cord.
-
Once wire caps are removed, separate wires carefully.
-
-
-
Remove the black power cord.
-


To reassemble your device, follow these instructions in reverse order.
To reassemble your device, follow these instructions in reverse order.
crwdns2915084:0crwdne2915084:0

Cal Poly, Team S15-G4, Banghart Spring 2017 crwdns2935289:0Cal Poly, Team S15-G4, Banghart Spring 2017crwdne2935289:0
CPSU-BANGHART-S17S15G4
crwdns2931471:04crwdne2931471:0
crwdns2935297:05crwdne2935297:0