crwdns2915892:0crwdne2915892:0
The battery is located under the top cover of the UE Boom 2. It is held in place by 4 screws and can be replace with a single screwdriver and a spudger.
crwdns2942213:0crwdne2942213:0
-
-
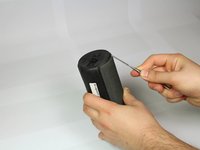
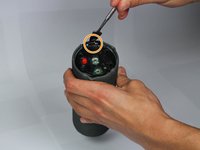
First, remove the D-ring located on the bottom of the UE Boom 2, the opposite end of the power button.
-
Remove by twisting in a counter-clockwise motion.
-
-
-
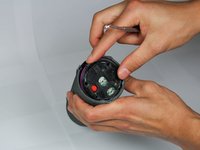
After the D-ring has been removed, remove the rubber port cover.
-
-
-
-
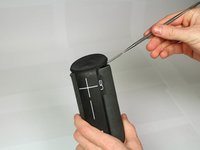
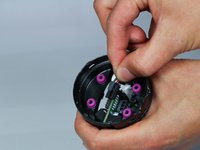
Remove the rubber stripping using a metal spudger.
-
Work around the edge of the rubber stripping slowly prying up the edge.
-
-
-
Continue removing the rubber stripping down the side if you intend to replace it.
-
-
-
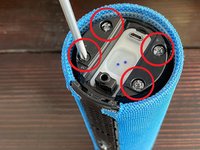
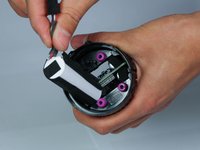
Use a Phillips #2 screwdriver to unscrew the four 15mm screws on the bottom of the speaker. DO NOT OPEN SIDE WITH RED CAP (AS SHOWN IN SOME IMAGES), BATTERY IS ON OPPOSITE SIDE
-
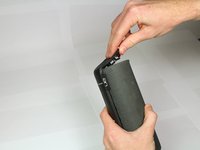
Use a metal spudger to pry up the plastic cap.
-
-
-
Carefully unseat the battery cable from the retaining posts.
-
Squeeze the small black clip on the battery connector, then lift the connector to unplug it.
-
Slowly pull out the battery, and handle with care.
-


For optimal performance, calibrate your newly installed battery after completing this guide.
Compare your new replacement part to the original part—you may need to transfer remaining components or remove adhesive backings from the new part before installing.
To reassemble your device, follow the above steps in reverse order.
Take your e-waste to an R2 or e-Stewards certified recycler.
crwdns2935221:0crwdne2935221:0
crwdns2935229:051crwdne2935229:0
crwdns2947412:027crwdne2947412:0
what kind of battery ?and do you have a link to buy one
I was looking for a battery replacement all over the place. Came up with this site that carries parts for the Boom 2:
Why is this set to difficult though? It doesn’t look THAT hard… And will this affect waterproofing of the feature?
Because you do not simply stick the plunger in and pop those tabs. They are a force of evil and I even bent my metal tools to open mine.
It isn't that hard if you've done a couple of repairs, although you gotta work slow and really make sure you got yourself like 3-4 spudger like items (butter knife) and look at reference images where the tabs are. Btw. You don't need to remove more than the bottom plastics and the plate with 4 screws to change the battery. Managed to change my battery while not damaging a single plastic tab