crwdns2915892:0crwdne2915892:0
If your microphone does not work after troubleshooting, it may need to be replaced. This guide will show the user how to remove a broken microphone and replace it with a new one.
This guide requires desoldering the microphone connectors from a small board. It is easier to desolder and solder connections if you remove the board first. This step is missing from the guide.
Use a soldering iron to carefully desolder the microphone wire connectors from the board. Take care not to overheat the board or nearby components. Soldering produces fumes, so work in a well-ventilated area and avoid inhaling smoke. Always handle the iron carefully, as it can reach extremely high temperatures.
If you’re new to soldering, this How to Solder and Desolder Connections guide is a great reference.
Before you begin the repair, make sure to disconnect your headphones from the audio jack and the charger.
crwdns2942213:0crwdne2942213:0
-
-
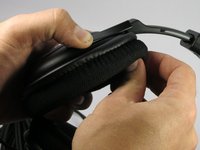
Use your fingers to peel off ear cushion by pinching and pulling off the leather.
-
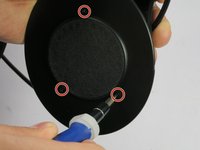
Use a Philips #00 head screwdriver to remove three 7.1 mm screws around the speaker.
-
Gently lift the speaker housing off the ear cup, being careful not to pull on the driver/speaker assembly, which is still connected to a board inside.
 crwdns2952109:0crwdne2952109:0
-
-
-
Remove the 7.1 mm screw with a Phillips #2 screwdriver to gain access to the microphone.
-
-
-
-
Use a soldering iron to carefully desolder the microphone wire connectors from the board.
-
Insert the new microphone and solder the wires into the correct positions.
-
Replace the screw that secures the microphone with a Phillips #2 screwdriver.
-
Pull the excess microphone wire back into the speaker housing.
-
-
-
Position the speaker on the headset so that the screw holes line up. It should click into place.
-
Use a Phillips #00 screwdriver to secure the three screws.
-
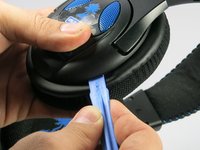
Replace the ear cushion.
-


To reassemble your device, follow these instructions in reverse order. Take your e-waste to an R2 or e-Stewards certified recycler.
crwdns2935221:0crwdne2935221:0
crwdns2935229:02crwdne2935229:0
crwdns2935287:0crwdne2935287:0

UMass Dartmouth, Team 3-1, Duarte Spring 2015 crwdns2935289:0UMass Dartmouth, Team 3-1, Duarte Spring 2015crwdne2935289:0
UMASSD-DUARTE-S15S3G1
crwdns2931471:04crwdne2931471:0
crwdns2935297:012crwdne2935297:0
crwdns2947412:03crwdne2947412:0
Where do we buy the mic?
Brit B - crwdns2934203:0crwdne2934203:0 crwdns2950251:0crwdne2950251:0
could someone help me say what each and every on of those wire points on this logic board goes to? like 1,2,3,4,5 and 6, what do they go to???
alexalv55 - crwdns2934203:0crwdne2934203:0 crwdns2950251:0crwdne2950251:0
i need the cable for my px 24 it broke in my phone how do i get a new cable to fix my px 24 headset
rjbubba1960 - crwdns2934203:0crwdne2934203:0 crwdns2950251:0crwdne2950251:0