crwdns2933423:0crwdne2933423:0

Toshiba Satellite L55-A CMOS Battery Replacement

crwdns2942213:0crwdne2942213:0

  1. Toshiba Satellite L55-A CMOS Battery Replacement, Remove the RAM cover: crwdns2935265:01crwdnd2935265:01crwdnd2935265:01crwdne2935265:0
    • Before you begin, be sure to power down your laptop.

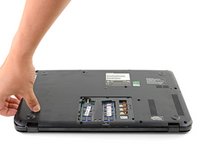
    • Flip the laptop over so that the back cover is facing up.

    • Unscrew the captive Phillips screw securing the RAM cover.

  2. Toshiba Satellite L55-A CMOS Battery Replacement: crwdns2935265:02crwdnd2935265:01crwdnd2935265:02crwdne2935265:0 Toshiba Satellite L55-A CMOS Battery Replacement: crwdns2935265:02crwdnd2935265:02crwdnd2935265:02crwdne2935265:0
    • Lift up the edge of the RAM cover and remove it.

  3. Toshiba Satellite L55-A CMOS Battery Replacement, Disconnect the ethernet connector cable: crwdns2935265:03crwdnd2935265:01crwdnd2935265:03crwdne2935265:0 Toshiba Satellite L55-A CMOS Battery Replacement, Disconnect the ethernet connector cable: crwdns2935265:03crwdnd2935265:02crwdnd2935265:03crwdne2935265:0 Toshiba Satellite L55-A CMOS Battery Replacement, Disconnect the ethernet connector cable: crwdns2935265:03crwdnd2935265:03crwdnd2935265:03crwdne2935265:0
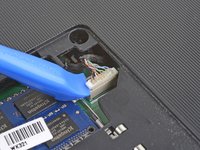
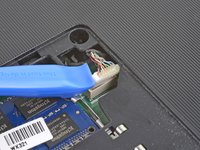
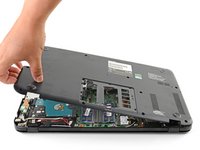
    • Use an opening tool to pry up the ethernet connector cable from its socket near the RAM module.

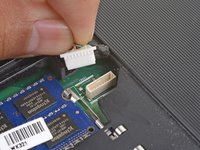
    • Disconnect the cable.

    • During reassembly, make sure you re-insert this connector right-side-up. The connector is keyed to plug in only one orientation, so if it doesn't slide into place easily, turn it around and try the other way.

  4. Toshiba Satellite L55-A CMOS Battery Replacement, Remove the back cover: crwdns2935265:04crwdnd2935265:01crwdnd2935265:01crwdne2935265:0
    • Remove the thirteen 6.8 mm long Phillips screws securing the back cover.

  5. Toshiba Satellite L55-A CMOS Battery Replacement: crwdns2935265:05crwdnd2935265:01crwdnd2935265:03crwdne2935265:0 Toshiba Satellite L55-A CMOS Battery Replacement: crwdns2935265:05crwdnd2935265:02crwdnd2935265:03crwdne2935265:0 Toshiba Satellite L55-A CMOS Battery Replacement: crwdns2935265:05crwdnd2935265:03crwdnd2935265:03crwdne2935265:0
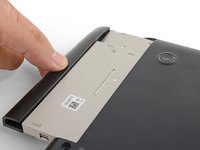
    • Insert the point of an opening pick in the seam between the SuperMultiDrive and the rest of the back cover.

    • Push the SuperMultiDrive's lip away from the back cover to disconnect the drive.

    • Slide the drive out of the bay and remove it from the laptop.

  6. Toshiba Satellite L55-A CMOS Battery Replacement: crwdns2935265:06crwdnd2935265:01crwdnd2935265:02crwdne2935265:0 Toshiba Satellite L55-A CMOS Battery Replacement: crwdns2935265:06crwdnd2935265:02crwdnd2935265:02crwdne2935265:0
    • The back cover is still held in place by plastic clips.

    • Insert the point of an opening pick into the back cover seam near the ethernet port.

    • Twist the pick to release the plastic clips along the edge.

  7. Toshiba Satellite L55-A CMOS Battery Replacement: crwdns2935265:07crwdnd2935265:01crwdnd2935265:03crwdne2935265:0 Toshiba Satellite L55-A CMOS Battery Replacement: crwdns2935265:07crwdnd2935265:02crwdnd2935265:03crwdne2935265:0 Toshiba Satellite L55-A CMOS Battery Replacement: crwdns2935265:07crwdnd2935265:03crwdnd2935265:03crwdne2935265:0
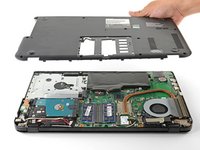
    • Grasp the loosened back case edge with your hand and lift it slowly away from the laptop. The remaining clips should release with ease.

    • If you meet significant resistance, stop and check for forgotten screws.

    • Remove the back cover.

    • To reinstall the back cover, align the cover and press along the edges to snap the clips back in place.

  8. Toshiba Satellite L55-A CMOS Battery Replacement, Remove the coin cell: crwdns2935265:08crwdnd2935265:01crwdnd2935265:03crwdne2935265:0 Toshiba Satellite L55-A CMOS Battery Replacement, Remove the coin cell: crwdns2935265:08crwdnd2935265:02crwdnd2935265:03crwdne2935265:0 Toshiba Satellite L55-A CMOS Battery Replacement, Remove the coin cell: crwdns2935265:08crwdnd2935265:03crwdnd2935265:03crwdne2935265:0
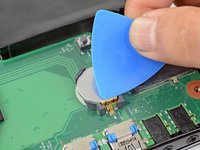
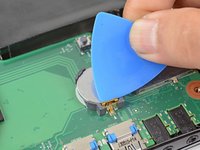
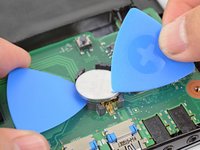
    • Use your fingernail or an opening pick to push the gold metal clip off of the top of the coin cell.

    • Pry the coin cell out of its holder and remove it.

    • To install a replacement battery, align the battery and press it firmly into the holder until the battery snaps into position.

crwdns2915888:0crwdne2915888:0

To reassemble your device, follow these instructions in reverse order.

Take your e-waste to an R2 or e-Stewards certified recycler.

Arthur Shi

crwdns2935283:001/03/18crwdne2935283:0

254.543 crwdns2915208:0crwdne2915208:0

crwdns2935297:0529crwdne2935297:0

crwdns2915084:0crwdne2915084:0

iFixit crwdns2935289:0iFixitcrwdne2935289:0

Staff

crwdns2931471:0136crwdne2931471:0

crwdns2935297:017.410crwdne2935297:0

crwdns2944067:00crwdne2944067:0

crwdns2917038:0crwdne2917038:0

crwdns2936625:0crwdne2936625:0:

crwdns2936751:024crwdne2936751:0 4

crwdns2936753:07crwdne2936753:0 11

crwdns2936753:030crwdne2936753:0 54

crwdns2942667:0crwdne2942667:0 2,431