crwdns2915892:0crwdne2915892:0
Do you want a bigger hard drive or a second SSD? Follow this guide to replace your hard drive. 1/10/24 Edit: If your Studio is noisy, but the computer is operating fine, replace your fans first; they are available on Amazon, eBay, etc.
crwdns2942213:0crwdne2942213:0
-
-
Lay the Surface face down on a padded surface
-
Remove the four rubber feet at each corner concealing the Torx screws
-
Remove the four Torx screws under the rubber feet.
-
Two screws on the upper corners are longer than two screws on the lower corners.
-
Attach suction cups to the bottom cover and then pull on the suction cups to free the bottom cover.
-
-
-
Remove five torx screws holding the two fans to the midframe
-
Remove the two fans
-
Remove four large torx screws holding the midframe
-
Remove four small torx screws holding the midframe. Note: The 4th blue circle is missing in the picture and is above the far right green circle. In line with the second red circle and below the GPU heat sink.
4th blue is missing and is above the far right green circle. In line with the second red circle and below the GPU heat sink.
Thanks for the comment. I just figured that out when I had "extra parts laying on the bench". Wish I had read the comment first! Seems as if someone could please take a second to fix the picture.
-
-
-
-
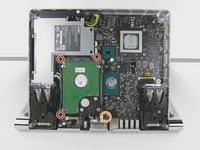
Slowly remove the midframe
-
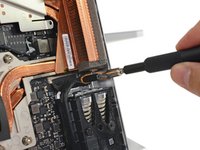
Detach the connectors for the two fans and the speaker
-
-
-
Fully loosen (they don't come out) the four spring loaded torx screws labeled 1 to 4;
-
Remove three torx screw labeled 5 to 7
-
Remove 5mm hex mounting post
-
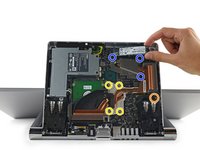
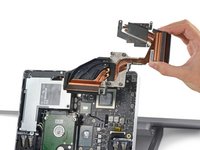
Use a spudger to remove the heatsink assembly from the motherboard
-
-
-
Remove three torx screws holding the hard drive brackets
-
Remove 5mm hex mounting post
-
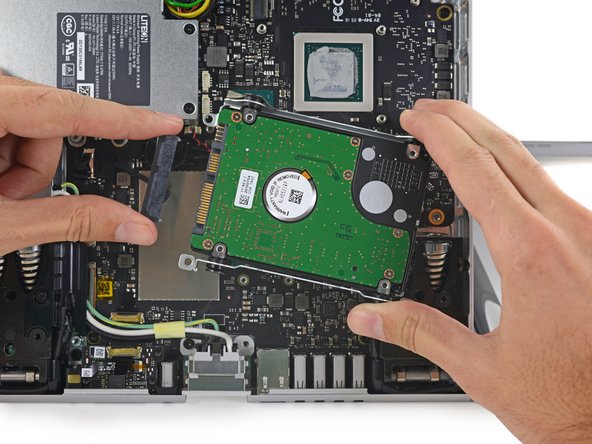
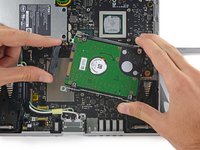
Remove the hard drive and disconnect the SATA/SATA power cable
-
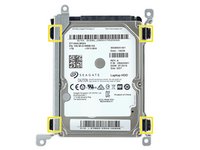
Remove four torx screws holding the hard drive brackets to the hard drive
Do yourself a bit of a favor and MAKE sure that you well tighten [but not overtighten] the standoffs, since the screws need to be screwed into them. If you don't, you'll find yourself needing to take the midframe off multiple times.
-


To reassemble your device, follow these instructions in reverse order.
To reassemble your device, follow these instructions in reverse order.
crwdns2935221:0crwdne2935221:0
crwdns2935229:018crwdne2935229:0
crwdns2947412:015crwdne2947412:0
Thank you for this step by step guide to replace the "Hard Drive" Here are a few measures that I took before drive replacement:
1) have to turn off drive encryption
2) I cloned the drive to the new SSD drive (I used Samsung 850 PRO 1TB) using Acronis True Image
3) Replaced the drive followed your instructions.
4) Turned ON the Surface Studio and success! no issues and better performance.
Does changing to a SSD drive cut down on the fan noise?
vanstar7 -
Does changing to a SSD drive cut down on the fan noise?
vanstar7 - January 15
No, fan noise level does not change, the heat that is been produced comes mostly from the processor.
Did you only change the m.2 drive? Or both drives?
I upgraded to to a SATA SSD 2TB and a M.2 NVMe SSD 1TB and wrote my experience here:
Hi Cesar, When I load the RST_AHCI “Intel Chipset SATA RAID Controller” drivers, downloaded from https://www.microsoft.com/en-us/download.... It doesn´t recognize my m.2 ssd 64gb/Go. I have a Surface Studio core i5. I don´t know what else to do to install windows in that disk.
Cristian Adrian Blanco Montero - crwdns2934203:0crwdne2934203:0
Hi Cesar. I can’t get your link to the blog on the Surface Studio SSD upgrade to work. Is it still valid please?
Thank you.
David
Has anyone done this lately? The hardware update was no problem, however I can’t get past windows update. I can install windows to either drive, but as soon as I update it, the thing hangs on boot, and I can’t recover it at all, without full reload. seems like the raid driver RST_AHCI, just will not work for me.
I’m trying to convert to Ubuntu, but that won’t work with RAID. I thought if I can separate the HDD from the SSD, the 128GB SSD would be plenty to install Ubuntu and program files, then use the HDD for user files. How to separate the disks as a software fix?
Which disk number (0 or 1) is the M.2 drive? I replaced both with 2TB drives, and I don’t know which one is which.
From what I have read, the M.2 is drive 1.
Is it really necessary to reapply thermal compound? That’s the first I’ve seen it mentioned.
mine does not boot, witch hard drive has the os ?? the ssd or the regular one>?
The advertised fix kits say "These kits contain all the parts and tools needed to complete this guide." However, that's not true. These kits bundle an SSD with the "Essential Electronics Toolkit", but the bundles do not include two necessary items: the thermal paste and a 5mm hex driver. (In addition, either isopropyl alcohol or a thermal paste removal solvent should also be obtained.)
Cleaning and reapplication of the thermal compound is necessary - don't skip this step, or you risk your CPU and/or GPU overheating due to poor thermal conductivity to the heat sink.