crwdns2915892:0crwdne2915892:0
This replacement guide will address how to remove a faulty LCD screen from a Sony a7 model number ILCE-7 camera. The LCD screen is an essential part of the camera that allows the user to review pictures or access the settings menu and edit the photography quality settings. Here are the steps for you to replace the LCD screen.
If the camera screen turns black, or the screen is unresponsive to commands, then the LCD screen of the camera may have failed. Before proceeding, it may be helpful to refer to the troubleshooting page, which can help mitigate any easy to remedy problems before going through the LCD screen removal process.
Helpful Hint: The LCD screen is made of glass, therefore it is fragile. Handle it with caution.
crwdns2942213:0crwdne2942213:0
-
-
Flip the camera upside down, and observe where the battery door and switch are located on the camera.
-
-
-
Slide the switch over to the right side to open the battery door.
-
-
-
Depress the blue lever to allow the battery to pop out slightly.
-
-
-
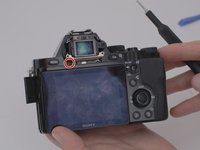
Remove the eyepiece cover by removing the four M1.5x4mm screws with a PH00 Phillips screwdriver.
-
Remove the M1.5x4mm screw that retains the adjustment wheel with a PH00 Phillips screwdriver.
-
-
-
Remove the six M1.5x4mm screws with a PH00 Phillips screwdriver.
-
-
-
-
Remove one M1.5x4mm screw with a PH00 Phillips screwdriver.
-
-
-
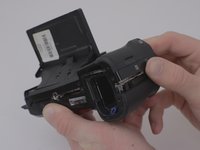
Once the screws have been removed, unsnap and lift the rear plastic cover off of the camera.
-
-
crwdns2935267:0crwdne2935267:0Tweezers$4.99
-
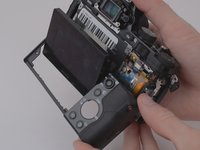
Using the blunt tweezers, remove the blue ribbon cable.
-
-
-
Place the tweezers on the side of the circuit board and lift it from underneath so as to free it from the three retaining tabs.
-
-
-
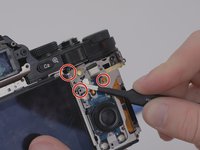
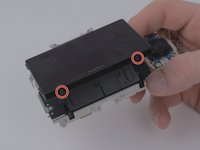
Remove four M1.5x4mm screws using a PH00 Phillips screwdriver.
-
-
-
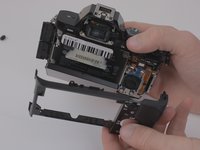
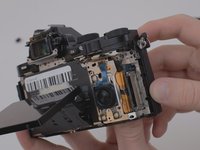
Lift the metal plate and LCD screen away from the camera body.
-
-
-
Detach the amber ribbon cable from the motherboard.
-
-
-
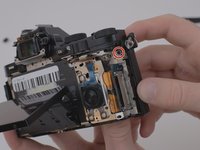
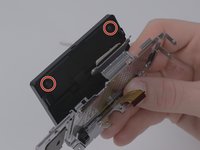
Remove four M1.5x2mm screws with a PH00 Phillips screwdriver.
-
-
-
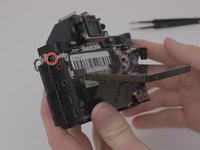
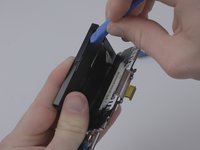
Using the iFixit opening tools, pry the plastic casing off the back of the LCD screen.
-
-
-
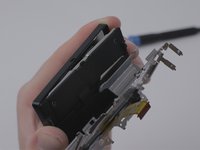
Seperate LCD screen from its metal backing.
-
-
-
Remove the ribbon cable that connects the LCD screen to the camera by using the iFixit opening tools.
-


To reassemble your device, follow these instructions in reverse order.
crwdns2935221:0crwdne2935221:0
crwdns2935229:05crwdne2935229:0

crwdns2935287:0crwdne2935287:0

Embry-Riddle Aeronautical University, Team S16-G2, Branham Spring 2020 crwdns2935289:0Embry-Riddle Aeronautical University, Team S16-G2, Branham Spring 2020crwdne2935289:0
ERAU-BRANHAM-S20S16G2
crwdns2931471:03crwdne2931471:0
crwdns2935297:015crwdne2935297:0
crwdns2947412:06crwdne2947412:0
this isn’t finished
Hello,
If by “isn’t finished” you mean that the instructions do not contain the steps to put the camera back together, this was done in the hope that the user would follow the steps in a reverse order to put the camera back in one piece.
Best.
completely-incomplete tutorial in 4 steps
I hope you never made a plane like this
Hello there,
Thank you for your constructive comment. The criteria we needed to meet for this project was to provide instruction on iFixit guides for how to remove various parts on the device. We were being evaluated on the content pertaining to our writing and not the technical depth of the guide. Furthermore, we did not have a vested interest in replacing the screen nor did we have another screen to replace it with. In your rush to make a rude comment, you might have missed the end of the guide where it states that in order to reassemble you must follow the steps we provided in the reverse order. Reverse means doing something in the opposite direction.
Regards.
Thanks for the guide.