crwdns2915892:0crwdne2915892:0
Follow this guide to replace the battery on the Sony WH-1000XM4 wireless headphones.
Most single-celled lithium-ion replacement batteries with the same battery connector should work—as long as they physically fit.
Note: If you’re having battery charging problems, follow this procedure to disassemble your headphones, disconnect the battery for 15 minutes, reconnect it, and see if the problem is fixed before replacing the battery.
To minimize risk of damage, turn on your headphones and allow the battery to fully discharge before starting this procedure. If a charged lithium-ion battery is accidentally punctured, a dangerous and uncontrollable fire may result. If your battery looks puffy or swollen, take extra precautions.
crwdns2942213:0crwdne2942213:0
-
-
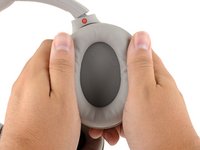
Place your headphones onto a work surface, ear pads facing up.
-
-
-
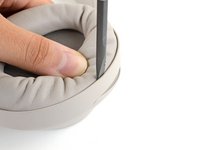
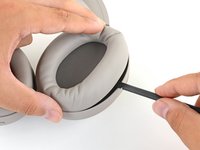
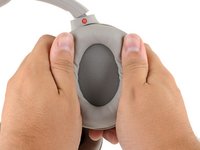
Use your thumb to depress the RIGHT ear pad near the long outer edge, creating a gap between the cushion and the frame.
-
-
-
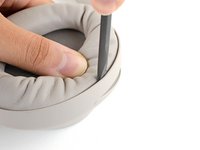
Insert the flat end of a spudger into the gap you've created, between the edge of the cushion and the frame.
-
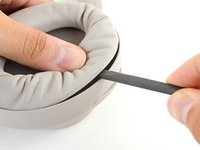
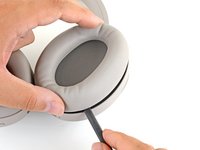
Pivot the spudger down to unclip the long edge of the ear pad.
-
-
-
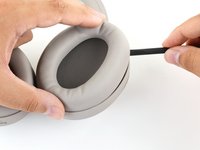
Repeat the previous step around the perimeter of the ear cup to disconnect the remaining clips.
-
-
-
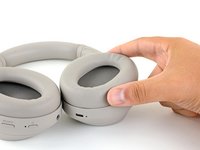
Remove the right ear pad.
-
-
-
-
Align the cushion over the speaker and press them firmly together to snap it into place.
-
Press around the entire edge of the cushion, making sure all the clips have engaged.
-
-
-
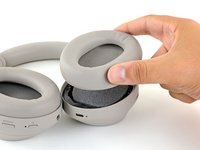
Remove the foam liner from the right ear cup's speaker.
-
-
-
Use a Phillips screwdriver to remove the four 8.4 mm screws securing the right ear cup cover.
Hi there, on my headphones the screws on the bottom 2 seem to be really screwed on hard and I struggle to remove it, any advice?
Hi - I know I'm responding almost 4 years later but just in case this helps someone else, I ended up using a 1.3 FLAT screwdriver because I could not find a phillips head that could get a grip on the screws and I was quite afraid of stripping them. A good bit of force with a flathead that fits in the groove will get you there. I did also dab them with WD40 but I'm not sure whether that made a difference because I didn't try the flathead until after I had done that.
-
-
-
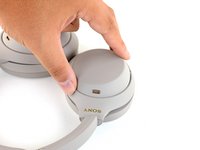
Flip the headphones over, ear cups facing down.
-
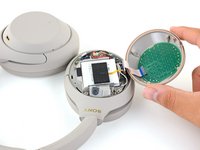
Use your fingers to lift up and flip over the right ear cup cover.
-
-
-
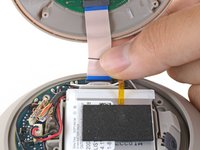
Grip the touch ribbon cable and pull it straight out of its connector on the main board to remove it.
-
Remove the ear cup cover.
-
-
crwdns2935267:0crwdne2935267:0Tweezers$4.99
-
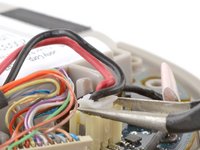
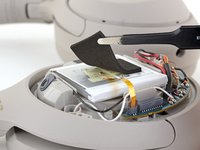
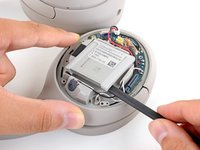
Use a pair of tweezers to grip the edges of the battery connector, and pull up to disconnect it from the main board. If necessary, lever the connector out, or "walk" the tweezer arms side-to-side to release the connector from its socket.
While pulling, the connector on the board ( the white thingy) came off. I did not even use force. Did I break it? I inspected but seemed there were no solders connecting to board, it appeared to have been glued by four tiny points. Which doesn’t make any sense, please help
Replacing the battery requires a number of steps, the final of which (disconnecting the battery) is clearly not intended by Sony to be done by end consumers. The connector is held onto the circuit board only with two small solder joints and possibly some very weak glue. I pulled it very carefully out and managed to break the solder joints. They are too small to resolder without causing circuit board damage, so this effectively turned my headset into a brick. Don't try it.
And shame on ifixit.com for selling the replacement parts and encouraging people to attempt it. What an expensive mistake and waste of time and effort this was.
-
-
-
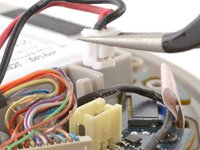
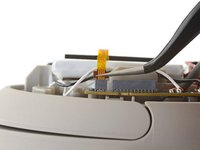
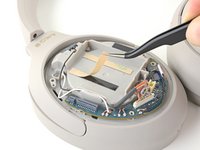
Use a pair of tweezers to peel back the foam and adhesive covering the battery thermal sensor.
SVP, est-ce que quelqu’un sait où trouver un remplacement pour l’adhésif qui recouvre le capteur thermique du casque ?
Je recommanderais d'utiliser un petit morceau de ruban électrique. Bonne réparation !
-
-
-
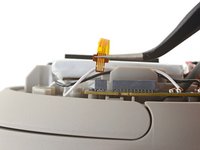
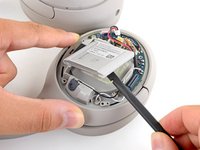
Use a pair of tweezers to pull up on the thermal sensor ribbon cable to disconnect it from the main board.
-
Remove the thermal sensor.
You can skip this step (of removing thermal sensor strip) if you are re-using the thermal sensor.
-
-
-
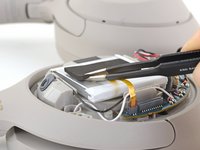
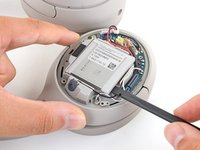
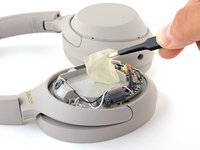
Slide the flat end of a spudger under the top-lefthand corner of the battery.
-
Push the spudger underneath the battery, prying up intermittently to work the battery away from its adhesive.
-
-
crwdns2935267:0crwdne2935267:0Tesa 61395 Tape$5.99
-
Remove the battery.
-
Remove any remaining adhesive from the battery well.
-
If your replacement battery does not come with replacement adhesive, lay some double-sided tape or pre-cut adhesive strips in the headphone's battery well.
-
Peel away any tape liners to expose the adhesive.
-
Lay the battery on the adhesive and press firmly.
-


Compare your new replacement part to the original part—you may need to transfer remaining components or remove adhesive backings from the new part before installing.
To reassemble your device, follow the above steps in reverse order.
Take your e-waste to an R2 or e-Stewards certified recycler.
Repair didn’t go as planned? Try some basic troubleshooting or search our Answers community for help.
crwdns2935221:0crwdne2935221:0
crwdns2935229:041crwdne2935229:0


crwdns2947412:011crwdne2947412:0
You can also get the battery from sony’s site!
Is this a xm3 or an xm4 battery?
In reply to the previous comment, that is NOT “sony’s site”. Encompass is not Sony! They distribute parts for hundreds of different brands, not just Sony. I’m not saying there’s anything wrong with them but don’t mislead people into thinking they’re buying directly from Sony!
Thanks for this guide. I was able to repair a loose cable on my XM3s with this disassembly information.
Since the design of the models are mostly the same it would be nice to have a similar disassembly guide on the XM3 website too.
como puedo adquirir la batería con el sensor térmico preinstalado de los audífonos sony wh1000xm4 ????? avisarme a josephchr_est@hotmail.com
Bought one tool kit. Buying a few more, because all the guides on this site have saved me hours of frustration.
Thank you, IFixIt, please don't change!!!
will a 3.7Wh battery work? the only replacement batteries I've found available in my area are the 3.7Wh ones for the XM3s
Followed the excellent instructions on this page and disconnected the battery on my XM4 headphone, left it unhooked for a while, then reconnected enough parts to put it on the charger, left it there for several hours, and now my battery, which wouldn't hold a charge at all, is reading 100 percent. Very pleased. Also bought the iFixit set of 3 tweezers which are very nice.
Top handleiding. De batterij van amazon zit erin en hij laadt op!
Thank you so much. Helped me replace my battery.
Step 14 however, there was adhesive attaching the battery to the housing and was attached quite tight. Other than that, the steps were perfect.
Much appreciated.
Clair, simple, imagé ! Merci pour ce Tuto fait de la meilleure façon !
https://sony.encompass.com/item/11687300...
You can get the battery from here as well!
Will - crwdns2934203:0crwdne2934203:0