crwdns2915892:0crwdne2915892:0
The SSD is what stores the operating system, program executables, and the personal files of every user. If the device is constantly displaying warnings about disk usage, replacing with a larger capacity module will allow for additional file storage.
crwdns2942213:0crwdne2942213:0
-
-
Begin by opening the HDMI/USB port cover on the left edge.
-
Remove the three #000 headed, 3 mm long screws located underneath the port cover.
-
-
-
Locate and open the Micro SD slot on the top side of the device.
-
Remove the two screws located beneath the cover.
-
-
-
-
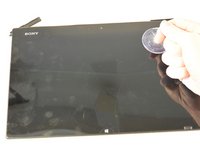
Attach the suction cup to the top right area of the screen.
-
Pull to separate the screen from the rest of the device.
-
Detach the display ribbon cable.
#1:
I found pulling with two suckers started to bend the screen as the little clips holding the screen wouldn't release. So instead of risking damage I started to work my way around the edges of the screen by slowly pulling with the sucker and at same time using the trusty old a spudger tool (Spudger) to gently pry open.
#2:
Be care sliding out the ribbon cable connector that goes to the screen. Its also tricky to slide back in after so you might need to peel the ribbon from the back plate to give some more wiggle room. I did.
Cracked the screen following the instructions. Too bad I didn’t read the user’s comment. Fortunately it can still be used as normal, though on a white screen the cracks are evident. Good luck doing this .
The comment is very important.
#1. Spudger tools should be used together with suction cup.
#2. Yes. I have small hands and was wondering how anybody with more normal sized hands would be able to do it. I made it but it was a bit tricky.
Poor guide.
Unfortunately cracked the screen :(
The guide doesn't mention that there is also glue sticking the front panel to the body; it's very difficult to release the front panel especially around the corners.
-
-
-
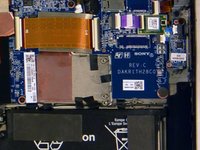
Remove the two 3 mm Phillips #000 screws from the right edge of the SSD.
-
-
-
Pull the SSD towards the right and slightly up, removing it from the back assembly.
-


To reassemble your device, follow these instructions in reverse order.
To reassemble your device, follow these instructions in reverse order.
crwdns2935221:0crwdne2935221:0
crwdns2935229:03crwdne2935229:0
crwdns2915084:0crwdne2915084:0

IUPUI, Team 1-2, Harley Fall 2015 crwdns2935289:0IUPUI, Team 1-2, Harley Fall 2015crwdne2935289:0
IUPUI-HARLEY-F15S1G2
crwdns2931471:04crwdne2931471:0
crwdns2935297:020crwdne2935297:0
crwdns2947412:03crwdne2947412:0
What kind of M2 Type? SSD is needed for replacement/upgrade?
OK, found the answer, it's mSATA, like the Samsung 840 EVO Series:
Marius -
I did the same without pulling out the battery jack. As i tried to turn the tablet on it didn’t work. Even the fan stopped working. I inserted the power cable but no response .. nothing at all ! Please help!