crwdns2915892:0crwdne2915892:0
In order to change a broken screen, you need to get into the body of the camera. We will show you how to not only take apart your camera but also how to replace a broken screen. Properly following the steps included will ensure a safe and easy LCD Screen replacement.
crwdns2942213:0crwdne2942213:0
-
-
Using a screwdriver, remove the five 6mm screws located on the back panel.
-
Using a screwdriver, remove the two 3mm screws located on the back panel.
-
-
-
Using a screwdriver, remove one 6mm screw on the front panel.
-
Using a screwdriver, remove two 3mm screws on the front panel.
-
-
-
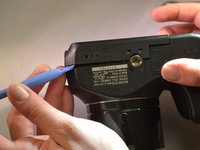
Open the SD Door, unscrew and remove the single 6mm screw closest to "PUSH IN/OUT" under the SD card slot.
-
-
-
-
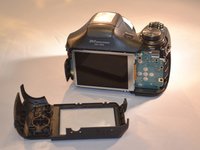
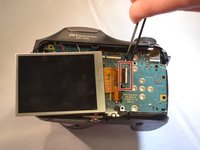
Remove the back panel (the LCD and motherboard are exposed).
-
-
-
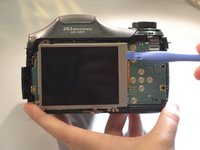
Using a screwdriver, remove the three 4mm screws that attach the LCD to the camera motherboard. (The LCD is contained in a holding plate, attached to the motherboard with a ribbon cable.)
-
-
-
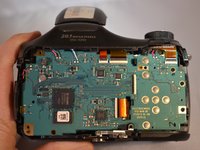
Using a screwdriver, remove the single 4mm screw at the bottom of the holding plate.
-
-
-
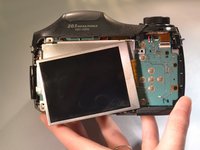
Lift the holding plate away from the motherboard and set aside.
-
-
crwdns2935267:0crwdne2935267:0Tweezers$4.99
-
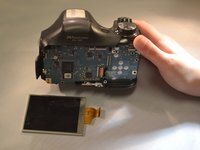
Using tweezers, open the LCD ribbon port by lifting the black hinge. (The LCD ribbon cable will detach.)
-
-
-
Using tweezers, remove the LCD with the ribbon cable and set aside.
-


To reassemble your device, follow these instructions in reverse order.
To reassemble your device, follow these instructions in reverse order.

crwdns2915084:0crwdne2915084:0

Eastern Washington University, Team 2-3, Matresse Spring 2015 crwdns2935289:0Eastern Washington University, Team 2-3, Matresse Spring 2015crwdne2935289:0
EWU-MATRESSE-S15S2G3
crwdns2931471:04crwdne2931471:0
crwdns2935297:010crwdne2935297:0
crwdns2947410:01crwdne2947410:0
Where can you purchase a new replacement monitor?