crwdns2915892:0crwdne2915892:0
The headphones not charging or needing to be charged constantly can be due to a faulty or worn out battery. This guide will help guide users on how to remove and replace the battery. The process is relatively easy difficult, it requires the use of the standard #0 Philips screwdriver and a new battery which can be ordered online.
crwdns2942213:0crwdne2942213:0
-
-
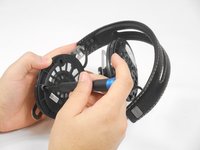
Grab the earmuff with one hand and hold the headphones with the other.
-
-
-
Pull the earmuff near the top until the seam starts to pull from the split in the headphone case. Continue until the earmuff fully separates from the headphones as shown.
-
-
-
-
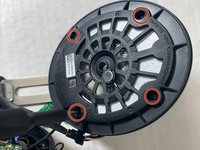
Using a sharp knife, carefully remove the clear plastic stickers covering the screw holes, and save them for later. Use the #0 Philips screwdriver to unscrew the four 8mm long screws.
-
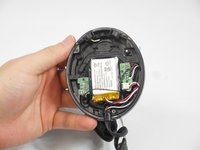
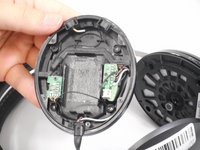
Grab the cover and carefully pull off to view inside of headphone.
-
-
-
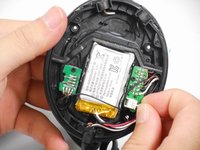
Use a spudger or finger nails to carefully pry out the battery connector (and wires) from the terminal on the main board. Once removed this will disconnect the wires connected to battery.
-
Working from the opposite end of the battery wires, carefully pry the battery off from its light adhesive.
-


To reassemble your device, follow the above steps in reverse order.
For optimal performance, after completing this guide, calibrate your newly installed battery.
Take your e-waste to an R2 or e-Stewards certified recycler.
Repair didn’t go as planned? Try some basic troubleshooting or ask our Answers community for help.
crwdns2935221:0crwdne2935221:0
crwdns2935229:03crwdne2935229:0
crwdns2915084:0crwdne2915084:0

University of New Orleans, Team 5-2, McDonald Fall 2023 crwdns2935289:0University of New Orleans, Team 5-2, McDonald Fall 2023crwdne2935289:0
UNO-MCDONALD-F23S5G2
crwdns2931471:03crwdne2931471:0
crwdns2935297:07crwdne2935297:0