crwdns2915892:0crwdne2915892:0
This is to access and replace the audio jack for the Sennheiser Momentum 4 Headphones. This can be done with a 00 Phillips head screwdriver, nylon tweezers, plastic spudger, and IFixit opening tool.
crwdns2942213:0crwdne2942213:0
-
-
On the right ear piece, insert an opening tool into the gap between the ear pad and the driver housing.
-
Gently pry the ear pad away from the driver housing until the ear pad fully releases.
-
Remove the right ear pad.
-
-
-
Use a Phillips #00 screwdriver to remove four 6.5mm screws that secure the right driver housing.
-
-
-
Insert a spudger into the seam between the driver housing and chassis.
-
Gently pry the driver housing up and out of the chassis, with care not to strain the connected cables.
-
-
-
-
Flip up the three black ZIF locking flaps that secure the three bronze ribbon cables.
-
Disconnect all three ribbon cables.
-
-
-
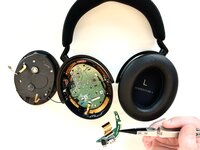
Use tweezers to remove the plastic covering surrounding the audio jack and charging port.
-
-
-
Break the adhesive securing the rubber audio jack/power housing.
-
-
-
Use a Phillips #00 screwdriver to remove the two black 1.4 mm screws that secure the I/O board.
-
Lift the I/O board up and out.
-


To reassemble your device, follow the above steps in reverse order.
Take your e-waste to an R2 or e-Stewards certified recycler.
Repair didn’t go as planned? Try some basic troubleshooting or ask our Answers community for help.
To reassemble your device, follow the above steps in reverse order.
Take your e-waste to an R2 or e-Stewards certified recycler.
Repair didn’t go as planned? Try some basic troubleshooting or ask our Answers community for help.
crwdns2915084:0crwdne2915084:0

Western Carolina University, Team 1-4, Virtue Spring 2025 crwdns2935289:0Western Carolina University, Team 1-4, Virtue Spring 2025crwdne2935289:0
WCU-VIRTUE-S25S1G4
crwdns2931471:04crwdne2931471:0
crwdns2935297:09crwdne2935297:0